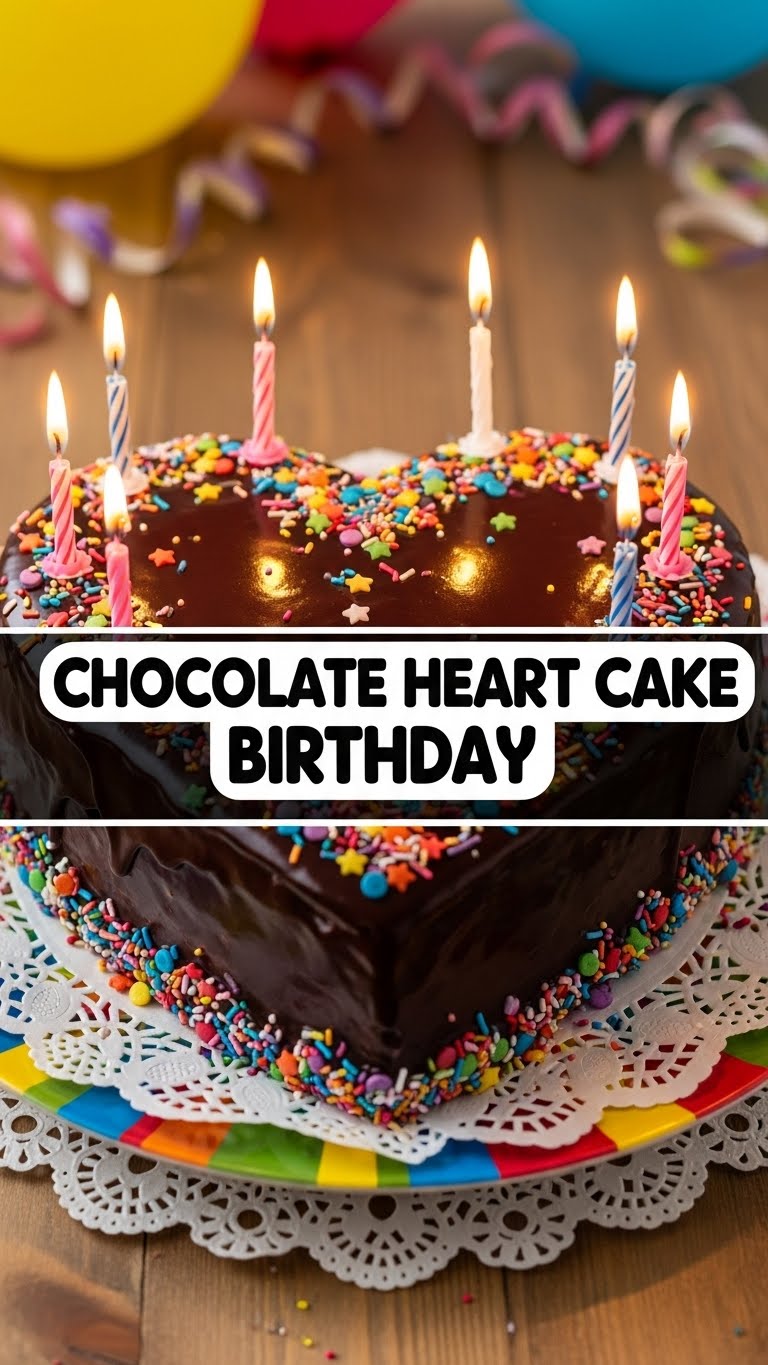
So, you wanna whip up something that screams “I love you!” (or “I love cake!”) but definitely *doesn’t* scream “I spent six hours in the kitchen and now I need a nap!”? My friend, you’ve stumbled into the right virtual kitchen. This isn’t just any chocolate cake; it’s a **Chocolate Heart Cake Birthday** special that’s designed for maximum impact with minimum fuss. Think of it as your secret weapon for looking like a baking superstar without actually having to *be* one. 😉
Why This Recipe is Awesome
Look, I get it. Life’s busy. Sometimes you just want to bake something gorgeous without needing a culinary degree or an entire weekend. This chocolate heart cake? It’s like magic. You look incredibly thoughtful, you *feel* incredibly accomplished, but the actual effort? Surprisingly minimal. Seriously, it’s so **idiot-proof**, I’m pretty sure my slightly-less-than-competent baking self managed it perfectly. Plus, it’s chocolate. And it’s a heart. It’s basically a double whammy of joy for any birthday or “just because” moment. IMO, that’s a win-win-win!
Ingredients You’ll Need
No fancy stuff here, just your everyday kitchen heroes ready to transform into pure deliciousness. Grab these:
- 1 ½ cups (180g) All-Purpose Flour: The backbone of our cake. Don’t go crazy with the sifting unless you *really* want to.
- 1 ½ cups (300g) Granulated Sugar: Sweet, sweet magic.
- ¾ cup (75g) Unsweetened Cocoa Powder: The darker, the better for that deep chocolatey hug.
- 1 ½ teaspoons Baking Soda: Our lift-off agent!
- ¾ teaspoon Baking Powder: Its trusty sidekick, ensuring a fluffy rise.
- ¾ teaspoon Salt: Don’t skip it! It actually makes the chocolate taste *more* chocolatey. Mind. Blown.
- 1 cup (240ml) Milk: Any kind will do.
- ½ cup (120ml) Vegetable Oil (or melted unsalted butter): For moisture and tenderness. Pick your poison!
- 2 Large Eggs: The glue that holds our dreams together.
- 1 teaspoon Vanilla Extract: Because everything is better with vanilla.
- ½ cup (120ml) Boiling Water (or freshly brewed hot coffee): This is the secret weapon for ultimate moisture and depth of flavor. Trust me!
For the Chocolate Buttercream Frosting:
- 1 cup (226g) Unsalted Butter: Softened, but not melted. Goldilocks zone, people!
- 3-4 cups (360-480g) Powdered Sugar (Confectioners’ Sugar): Sifted if you want to avoid lumps, but I often live dangerously.
- ¾ cup (75g) Unsweetened Cocoa Powder: For more chocolatey goodness.
- ¼ cup (60ml) Milk or Heavy Cream: Adjust as needed for desired consistency.
- 1 teaspoon Vanilla Extract: Again, essential!
- Pinch of Salt: Balances the sweetness.
Step-by-Step Instructions
Time to get your bake on! Follow these simple steps for cake glory:
- Preheat & Prep: Set your oven to 350°F (175°C). Lightly grease and flour a 9-inch heart-shaped cake pan (or two 8-inch round pans if you plan to cut a heart later). You can also line the bottom with parchment paper for easy release.
- Mix the Dry Stuff: In a large bowl, whisk together the flour, sugar, cocoa powder, baking soda, baking powder, and salt. Give it a good whisk to make sure everything’s evenly distributed.
- Combine the Wet Stuff (Mostly): In another bowl (or a large measuring cup), whisk together the milk, oil (or melted butter), eggs, and vanilla extract until well combined.
- Unite the Forces: Pour the wet ingredients into the dry ingredients. Mix on low speed (or by hand) until just combined. Don’t overmix! A few small lumps are okay.
- Add the Secret Weapon: Carefully pour in the boiling water (or hot coffee) and mix on low speed until the batter is smooth. The batter will be thin, don’t panic! This is what makes it so moist.
- Fill ‘er Up: Pour the batter evenly into your prepared heart-shaped pan(s).
- Bake Away: Bake for 30-35 minutes, or until a wooden skewer or toothpick inserted into the center comes out clean. If using two round pans, start checking around 25 minutes.
- Cool Down: Let the cakes cool in their pans for about 10-15 minutes before inverting them onto a wire rack to cool completely. **This is crucial!** Don’t rush it!
- Whip up the Frosting: While the cake cools, beat the softened butter in a medium bowl until creamy. Add the sifted powdered sugar and cocoa powder gradually, beating until combined. Pour in the milk (or cream) and vanilla extract, then beat on high speed until light and fluffy. Add a tiny pinch of salt to cut the sweetness. Adjust with more milk/sugar for desired consistency.
- Decorate Your Heart Out: Once the cake is completely cool, frost it generously with your chocolate buttercream. Get creative! Add sprinkles, chocolate shavings, or even a heartfelt message.
- Slice and Devour: Present your masterpiece, then cut a slice and enjoy your hard work (which wasn’t really that hard, was it?).
Common Mistakes to Avoid
Listen, we’ve all been there. Here are some rookie (and not-so-rookie) mistakes to sidestep:
- Not Preheating the Oven: This isn’t a suggestion, it’s a command! A cold oven = sad, unevenly baked cake.
- Overmixing the Batter: Once the wet and dry ingredients are *just* combined, stop. Overmixing develops gluten, leading to a tough, dense cake. Nobody wants a rubbery cake.
- Opening the Oven Door Too Soon: Patience, grasshopper! Opening the door before the cake is mostly set can make it sink. Resist the urge to peek for at least 20-25 minutes.
- Not Letting the Cake Cool Completely: Frosting a warm cake is a recipe for a melted, sliding mess. Trust me, it’s not a good look. Wait.
- Skipping the Boiling Water/Hot Coffee: This isn’t just for extra moisture; the hot liquid “blooms” the cocoa powder, enhancing its flavor like crazy. Don’t skip this trick!
Alternatives & Substitutions
Feeling a little rebellious? Here are some simple swaps:
- Oil vs. Butter: I love butter for flavor, but vegetable oil often makes cakes unbelievably moist. Feel free to use either! Canola, sunflower, or melted coconut oil (if you like a subtle coconut flavor) work great.
- Milk Alternatives: Dairy-free? No problem! Almond milk, soy milk, or oat milk can easily step in. Just make sure it’s unsweetened.
- Coffee vs. Water: If you’re a coffee lover, using hot brewed coffee instead of boiling water will seriously deepen the chocolate flavor without making the cake taste like coffee. It’s a game-changer!
- Different Frostings: Not feeling chocolate frosting (gasp!)? A classic vanilla buttercream, cream cheese frosting, or even a raspberry jam filling would be lovely.
- Gluten-Free: Use a good quality 1:1 gluten-free baking flour blend. The texture might be slightly different, but it’ll still be delicious!
FAQ (Frequently Asked Questions)
Got questions? I’ve got answers (and maybe some sass):
- Can I use a different shaped pan? Absolutely! This recipe works beautifully in two 8-inch round pans. Once cooled, you can even cut them into a heart shape if you’re feeling crafty (just Google “how to cut a round cake into a heart” – it’s surprisingly simple!).
- My cake is dry! What went wrong? Ugh, the worst! Usually, a dry cake means it was overbaked. Keep a close eye on it next time and start checking for doneness a few minutes earlier. Could also be too much flour, so measure accurately!
- Do I *really* need to sift the powdered sugar for the frosting? Well, technically no, but why risk those annoying little lumps ruining your smooth buttercream dreams? I usually don’t, but for a super smooth frosting, go for it!
- How long does this cake last? If stored in an airtight container at room temperature, it’s usually good for 3-4 days. In the fridge, maybe a bit longer. But honestly, it rarely lasts that long in my house.
- Can I make this dairy-free? Yep! Use a plant-based milk and substitute the butter in the cake and frosting with a good quality dairy-free butter substitute or oil.
- I don’t have baking powder, can I skip it? It’s not advisable. Both baking soda and baking powder serve different purposes in leavening, and skipping one can result in a dense, sad cake. Sorry!
Final Thoughts
And there you have it! Your very own, incredibly impressive (yet secretly easy) Chocolate Heart Cake. Whether it’s for a birthday, an anniversary, or just because Tuesday felt like it needed some chocolatey love, you’ve totally nailed it. Now go impress someone—or yourself!—with your new culinary skills. You’ve earned every delicious bite. Go on, get baking, you rockstar! ✨

