Ever stared at a fancy patisserie window and thought, “Yeah, I could totally make that… if I had three extra hands, a culinary degree, and infinite patience?” Same, friend, same. But guess what? This isn’t one of those recipes that requires a culinary bootcamp. We’re talking about a Chocolate Truffle Cake that looks like a million bucks but doesn’t demand you sell a kidney to make it happen. And the best part? The “design” part is just us playing around with chocolate. No pressure, just pure, unadulterated chocolate joy!
Why This Recipe is Awesome
Okay, let’s be real. We all want to impress, right? But sometimes, “impressive” feels like “impossible.” Not today! This chocolate truffle cake recipe is practically **idiot-proof** (speaking from personal experience, obviously). You get that rich, decadent, “I-just-won-an-award” flavor with minimal fuss, because the star of the show here is the luscious truffle ganache that we’ll whip up.
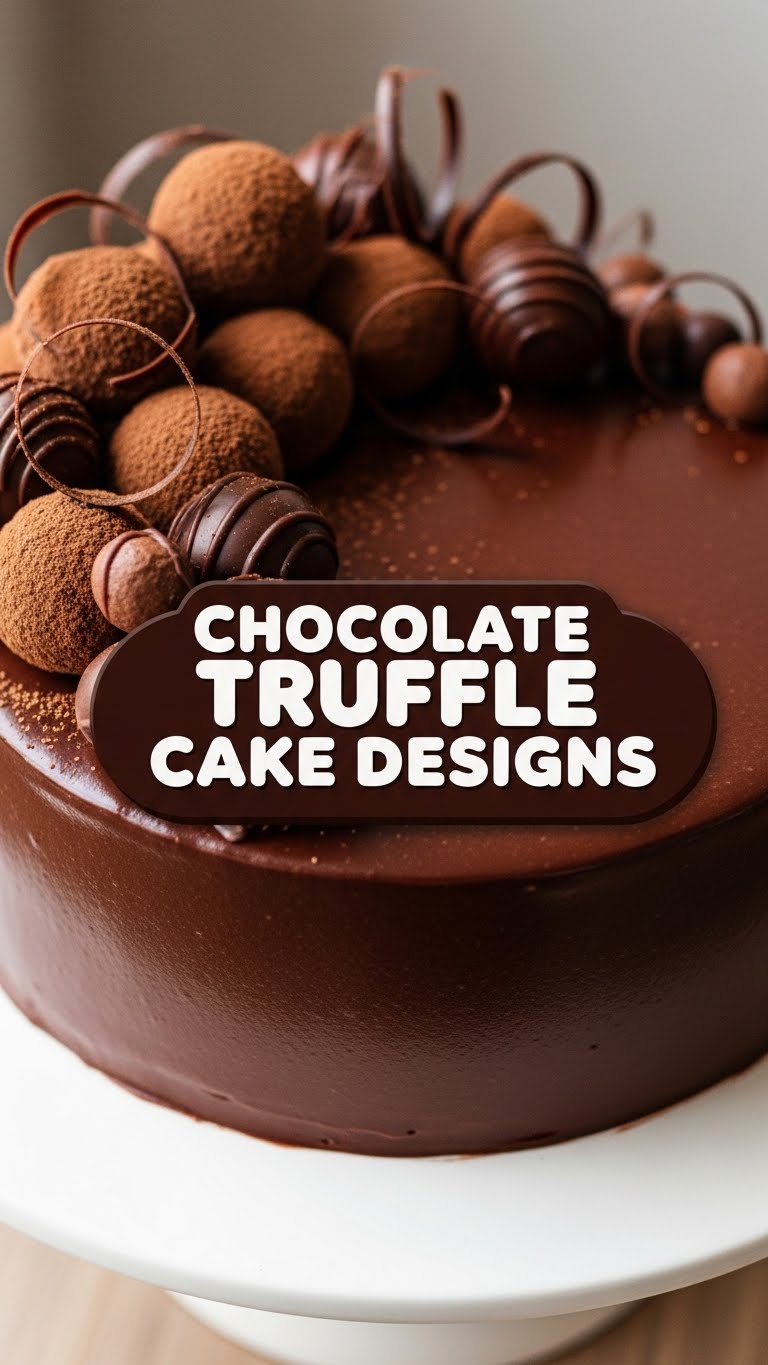
And for the “designs” part? We’re going for effortlessly elegant, not painstakingly perfect. Think swirls, drips, and artfully placed chocolate bits. It’s a showstopper that tastes as good as it looks, and trust me, people will think you spent hours. Your secret? It’s safe with me. 😉
Ingredients You’ll Need
Alright, gather your chocolatey arsenal! This is where the magic begins. No obscure ingredients, just good stuff.
- Your Favorite Chocolate Cake Layers: Seriously, use whatever! Store-bought? Homemade? We’re not judging. This recipe is all about the glorious truffle coating and designs, so if a box mix gets you there faster, go for it! (Make sure they’re cooled completely.)
- 12 oz (about 340g) Good Quality Dark Chocolate: Chopped into small pieces. Because life’s too short for mediocre chocolate, am I right? Aim for 60-70% cocoa for that rich, truffle vibe.
- 1 ½ cups (360ml) Heavy Cream: The magic potion that turns chocolate into ganache. Don’t skimp on the fat content here; “heavy” is key!
- 2 tbsp (28g) Unsalted Butter: Cubed. Just a touch, for that extra silky smooth finish and beautiful sheen.
- Optional Decorative Bits:
- Cocoa Powder: For dusting. Instantly makes things look more sophisticated.
- Powdered Sugar: For a soft, snowy look.
- Chocolate Shavings or Curls: Easy elegance!
- Fresh Berries: Strawberries, raspberries – a pop of color always wins.
- Sprinkles: If you’re feeling extra playful!
Step-by-Step Instructions
Let’s get this chocolate party started! Follow these simple steps, and you’ll be a truffle cake master in no time.
- Prep Your Cake Layers: First things first, ensure your chocolate cake layers are completely cool. A warm cake and ganache are like oil and water… but messier. Nobody wants a sliding, melting disaster!
- Make the Dreamy Ganache: Place your finely chopped dark chocolate into a heatproof bowl. In a small saucepan, gently heat the heavy cream over medium heat until it just begins to simmer around the edges – don’t let it boil vigorously. Pour the hot cream directly over the chopped chocolate. Let it sit undisturbed for about 5 minutes. This lets the hot cream work its melting magic.
- Stir Until Silky Smooth: After 5 minutes, grab a whisk or spatula and start stirring the chocolate and cream from the center outwards until it’s beautifully smooth and glossy. If there are any stubborn lumps, you can pop the bowl over a pot of simmering water (bain-marie style) for a minute or two, stirring gently. Now, stir in the cubed butter until fully melted and incorporated. This gives your ganache an incredible sheen and extra richness.
- Cool and Thicken the Ganache: This step is crucial for perfect truffle cake designs! Let the ganache cool at room temperature until it’s thick enough to spread but still easily scoopable – this usually takes 1-2 hours. You can speed it up by chilling it in the fridge for 30-45 minutes, stirring every 15 minutes, but **don’t let it get too hard** or it’ll be impossible to spread!
- Assemble & Crumb Coat Like a Pro: Place one cake layer on your serving plate or cake stand. Spread a generous layer of your cooled, spreadable ganache evenly over the top. Repeat with the remaining cake layers. Once stacked, use a thin layer of ganache to cover the entire cake – top and sides. This is your “crumb coat” and it locks in any loose crumbs. Pop the cake into the fridge for about 15-20 minutes to set the crumb coat.
- Final Coat & Design Your Masterpiece: Now for the fun part where those “designs” come into play! Take out your chilled cake. Spread a thick, generous layer of the remaining ganache over the entire cake. You can use an offset spatula to create beautiful swirls and textures on the top and sides. For a gorgeous drip effect, let some ganache gently spill over the edges. **Don’t overthink it; rustic is chic!**
- Truffle-fy It (Optional but Highly Recommended): If you have any leftover ganache, you can roll small spoonfuls into little balls, dust them with cocoa powder or powdered sugar, and arrange them artfully on top of your cake. Alternatively, use a vegetable peeler to create chocolate shavings over the top, or scatter those fresh berries for a pop of color. **No wrong answers here – it’s your edible canvas!**
- Chill for Perfection: Once decorated to your heart’s content, return the cake to the fridge for at least 1 hour to allow the ganache to fully set. This makes it easier to slice and serve.
Common Mistakes to Avoid
Nobody’s perfect, especially when delicious chocolate is involved! But here are a few rookie mistakes to steer clear of:
- Not cooling your ganache enough: Seriously, this is a big one. You’ll end up with a runny, sliding mess instead of a beautiful, set truffle coating. Patience, grasshopper!
- Overheating the chocolate: When making ganache, gentle heat is key. Scorched chocolate is a sad, sad thing, and it tastes bitter. Low and slow, or just pour hot cream over it.
- Trying to decorate a warm cake: I know you’re excited, but resist! A warm cake + ganache = melted misery. Let those layers cool completely, FYI.
- Being a perfectionist: This isn’t a competition, darling! Embrace the slightly rustic swirls and drips. It’s *artisan*, and it looks amazing because *you* made it.
Alternatives & Substitutions
Life’s about options, and so is baking! Here are a few tweaks you can make:
- Chocolate Type: While dark chocolate is king for that intense truffle flavor, you can totally use milk chocolate if you prefer a sweeter, milder taste. Or, for a contrasting drizzle, melt some white chocolate and swirl it over the dark ganache!
- Cream Swap: For a dairy-free version, full-fat coconut milk (the kind in a can, not a carton!) can work wonders. The texture might be slightly different, but it’s still delicious.
- Cake Base: No time to bake? A good quality store-bought sponge cake or even brownies can be transformed into a truffle masterpiece. **Zero judgment here!**
- Flavor Boosts: Want to level up your ganache? Add a splash of espresso, a dash of orange zest, a pinch of chili powder for a spicy kick, or a shot of booze (like Kahlua, rum, or Grand Marnier) to the warm cream before pouring it over the chocolate. Oh, yes!
FAQ (Frequently Asked Questions)
Got questions? I’ve got answers (and sometimes a little sass).
- Can I make the ganache ahead of time? Absolutely! Store it in an airtight container in the fridge for up to a week. When you’re ready to use it, let it come to room temperature, then gently whisk or warm it over a double boiler until it’s spreadable again.
- My ganache is too thin/thick! Help! Too thin? Pop it in the fridge for a bit longer, stirring occasionally. Too thick? Gently warm a small portion in the microwave (on low power, stirring every 10 seconds) or over a double boiler, then stir it back into the rest until it’s the right consistency.
- What if I don’t have fresh berries for decoration? No biggie! Candied orange peel, chopped nuts (pistachios look great!), mini chocolate chips, or even just a simple, elegant dusting of cocoa powder or powdered sugar works wonders. Or go wild with rainbow sprinkles!
- Do I need a special cake pan to make this? Nope! This recipe is about the truffle goodness and decorating, not the specific cake shape. Any round or square pan you have for your cake layers will do.
- How long does this cake last? In the fridge, covered, it should be good for 3-4 days. But let’s be real, it probably won’t last that long once people get a taste!
- Can I use chocolate chips instead of chopped chocolate? Technically, yes, but for the best, smoothest ganache, higher quality bar chocolate chopped finely melts more evenly and produces a better texture. If using chips, make sure they are good quality.
Final Thoughts
See? I told you it wasn’t rocket science! You’ve just whipped up a decadent chocolate truffle cake that looks like it came straight out of a fancy bakery, all with your own two hands and a little chocolate-infused swagger. And those designs? They’re uniquely yours, reflecting your own fabulous, chill vibe.
Now go impress someone—or yourself—with your new culinary skills. You’ve earned it! And remember, calories don’t count when it’s chocolate. That’s just science. 😉
