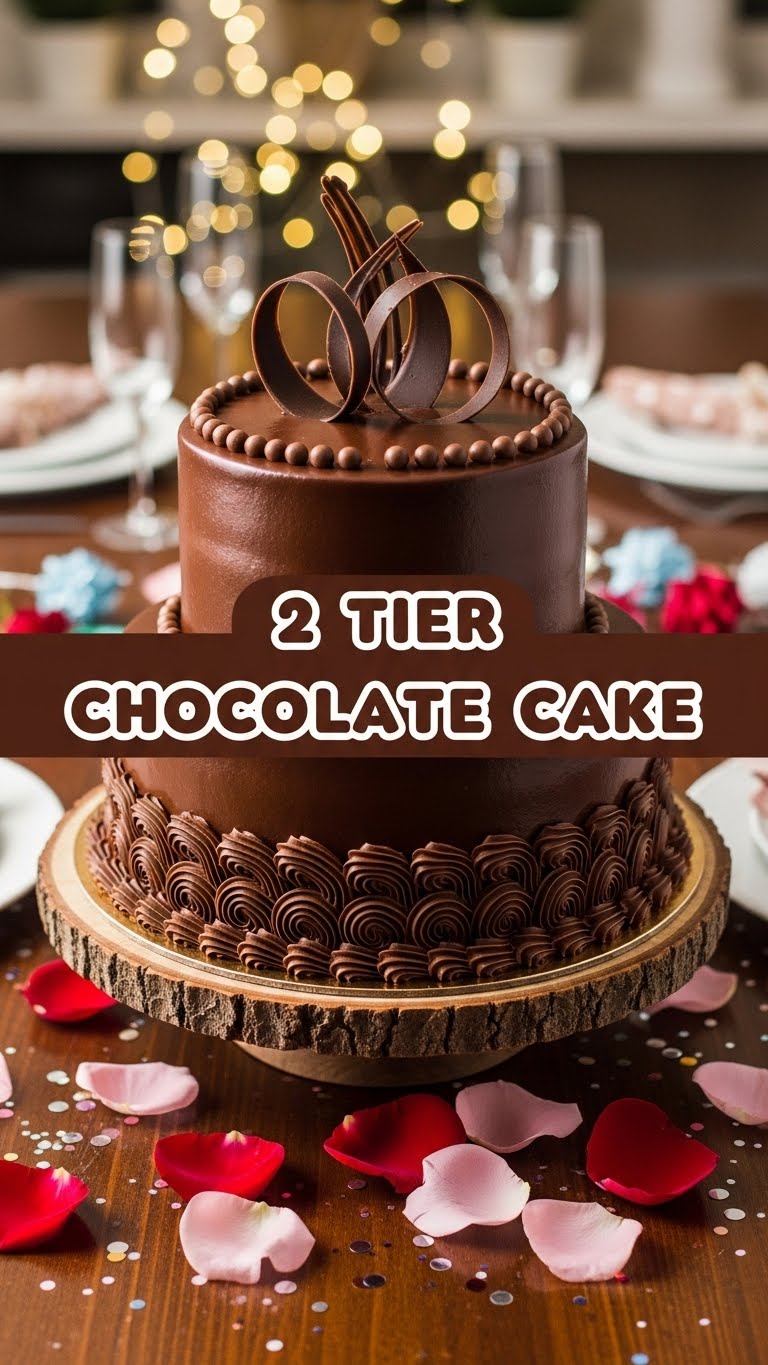
Alright, listen up, buttercup! You’re scrolling, minding your own business, and BAM! That chocolate cake craving hits you like a rogue asteroid. But who has time for a whole day in the kitchen, right? Exactly. We’re about to whip up a two-tier chocolate marvel that says “I tried” but also “I still have a life.” No sweat, maximum deliciousness. Let’s get this party started!
Why This Recipe is Awesome
Because, my friend, this isn’t just *any* chocolate cake recipe. This is the “I can totally pull this off even if my oven tries to eat my baking sheet sometimes” recipe. It’s **idiot-proof**, honestly. I made it, and my baking skills are usually on par with a toddler’s finger painting. Plus, it looks fancy enough to fool your in-laws into thinking you’re a culinary genius, but it’s simple enough that you can still binge-watch your favorite show while it bakes. Win-win, if you ask me!
Ingredients You’ll Need
- All-purpose flour: The backbone of our operation. Don’t even think about using self-rising, unless you want a science experiment.
- Granulated sugar: Because sweetness is next to godliness, or something.
- Unsweetened cocoa powder: The darker, the better for that deep chocolatey goodness. Think evil villain, but delicious.
- Baking soda & Baking powder: Our dynamic duo for lift. Don’t skimp, unless you like flat cakes.
- Salt: Just a pinch! It makes everything taste more *chocolatey*, believe it or not.
- Eggs: Room temperature, please! They mix better. Seriously, it’s a thing.
- Milk: Again, room temp. Whole milk gives the best richness, IMO.
- Vegetable oil: For moistness that lasts. No dry cakes allowed!
- Vanilla extract: A splash of magic. Don’t skip it.
- Hot water (or coffee!): This is the secret weapon for an extra moist, fudgy crumb. Trust me on this.
- For the Frosting (Because naked cakes are sad):
- Unsalted butter: Softened, but not melted. The Goldilocks zone.
- Powdered sugar (confectioners’ sugar): Sifted, unless you want lumpy frosting and regrets.
- Unsweetened cocoa powder: More chocolate! Because why not?
- Milk or cream: To get that perfect spreadable consistency.
- Vanilla extract: Again, for flavor. Duh.
Step-by-Step Instructions
- Prep Your Pans: Preheat your oven to 350°F (175°C). Grease and flour two 8-inch round baking pans. Or line ’em with parchment paper circles if you’re feeling fancy.
- Dry Mix Master: In a large bowl, whisk together the flour, sugar, cocoa powder, baking soda, baking powder, and salt. Make sure there are no lumpy bits. We’re aiming for smooth sailing here.
- Wet Mix Wonders: In another bowl, whisk together the eggs, milk, oil, and vanilla extract until just combined. Don’t overmix; we’re not making scrambled eggs.
- Combine & Conquer: Pour the wet ingredients into the dry ingredients. Mix until just combined. Don’t go crazy, a few lumps are totally fine. Overmixing leads to tough cakes, and we don’t want tough love in our dessert.
- Hot Water Hero: Slowly pour in the hot water (or coffee!) while mixing on low speed until the batter is smooth. The batter will be thin, and that’s exactly what you want!
- Bake It Off: Divide the batter evenly between your prepared pans. Bake for 30-35 minutes, or until a wooden skewer inserted into the center comes out clean.
- Cool Down: Let the cakes cool in the pans for about 10-15 minutes. Then, flip them out onto a wire rack to cool completely. **Patience is a virtue here!** Don’t try to frost warm cakes, unless you enjoy a melted, messy disaster.
- Frosting Fun: While the cakes cool, make your frosting! Beat softened butter until creamy. Gradually add sifted powdered sugar and cocoa powder, alternating with milk/cream and vanilla, until light and fluffy. Add more milk if needed for desired consistency.
- Assemble Your Masterpiece: Once the cakes are completely cool, level them if necessary. Place one cake layer on your serving plate, slather on some frosting. Top with the second cake layer. Frost the top and sides of the entire cake. Go wild!
- Admire & Devour: Slice it up, serve it, and accept all the compliments. You earned ’em!
Common Mistakes to Avoid
- Not preheating the oven: Rookie mistake! Your cake won’t rise properly, and you’ll end up with dense hockey pucks.
- Overmixing the batter: Remember what I said about tough cakes? Yeah, that happens when you go overboard. Mix *just* until combined.
- Ignoring ingredient temperatures: Room temp eggs and milk matter! They emulsify better and create a smoother batter. Cold ingredients can make your batter curdle. Gross.
- Frosting a warm cake: Seriously, don’t do it. Unless you’re going for a “rustic, melted lava flow” look, which, let’s be honest, you’re probably not.
- Not sifting powdered sugar for frosting: Lumps. You’ll get lumps. And nobody likes lumpy frosting.
Alternatives & Substitutions
Life’s too short for strict rules, right? Here are some tweaks:
- Coffee instead of hot water: **Highly recommended!** It deepens the chocolate flavor without making the cake taste like coffee. It’s like a secret handshake for your taste buds.
- Buttermilk: Swap out regular milk for buttermilk for an extra tender crumb. Just know your cake will be slightly more tangy, which some people adore!
- Dairy-free? Use your favorite plant-based milk (almond, soy, oat) and dairy-free butter/oil. Boom! Vegan-friendly, almost. (Don’t forget to check if other ingredients are vegan if that’s your goal!)
- Different Frosting: Not a fan of chocolate on chocolate? (Are we still friends?) Try a classic vanilla buttercream, a cream cheese frosting, or even a raspberry buttercream for a fruity twist.
- Make cupcakes: Don’t have cake pans or just want smaller portions? This batter makes awesome cupcakes! Just adjust baking time (usually 18-22 minutes).
FAQ (Frequently Asked Questions)
- “My cake came out dry! What gives?” Did you overbake it? Or maybe you skipped the hot water/coffee? **Ovens vary, so start checking for doneness a few minutes early.**
- “Can I use margarine instead of butter for the frosting?” Well, technically yes, but why hurt your soul like that? Butter tastes better, textures better, and is just generally superior. IMO.
- “Do I *really* need to use room temperature ingredients?” You don’t *have* to, but your cake will thank you. Seriously, it makes a difference in texture and how well everything combines. Think of it as a little spa treatment for your ingredients.
- “Can I make this cake ahead of time?” Absolutely! The unfrosted cake layers can be wrapped tightly in plastic wrap and stored at room temperature for up to 2 days, or frozen for up to 2 months. Frosting can also be made a day ahead.
- “How do I get flat cake layers without leveling?” Some people swear by using “baking strips” around their pans. Or, you know, just embrace the slight dome and level it. It’s cake, not a perfectly flat landscape.
Final Thoughts
See? That wasn’t so scary, was it? You just conquered a two-tier chocolate cake, you magnificent beast! Now go impress someone—or just yourself, totally valid—with your new culinary skills. You’ve earned every single delicious bite. And if it’s not absolutely perfect, who cares? It’s homemade, it’s chocolate, and it’s made with love (and maybe a little bit of playful cursing). Enjoy!

