So you’re craving something warm, gooey, chocolatey, and utterly irresistible but also, let’s be real, slightly too lazy to commit to a whole cake situation? Same, my friend, same. Because who has time for frosting an entire tiered masterpiece when instant gratification is just a few steps away?
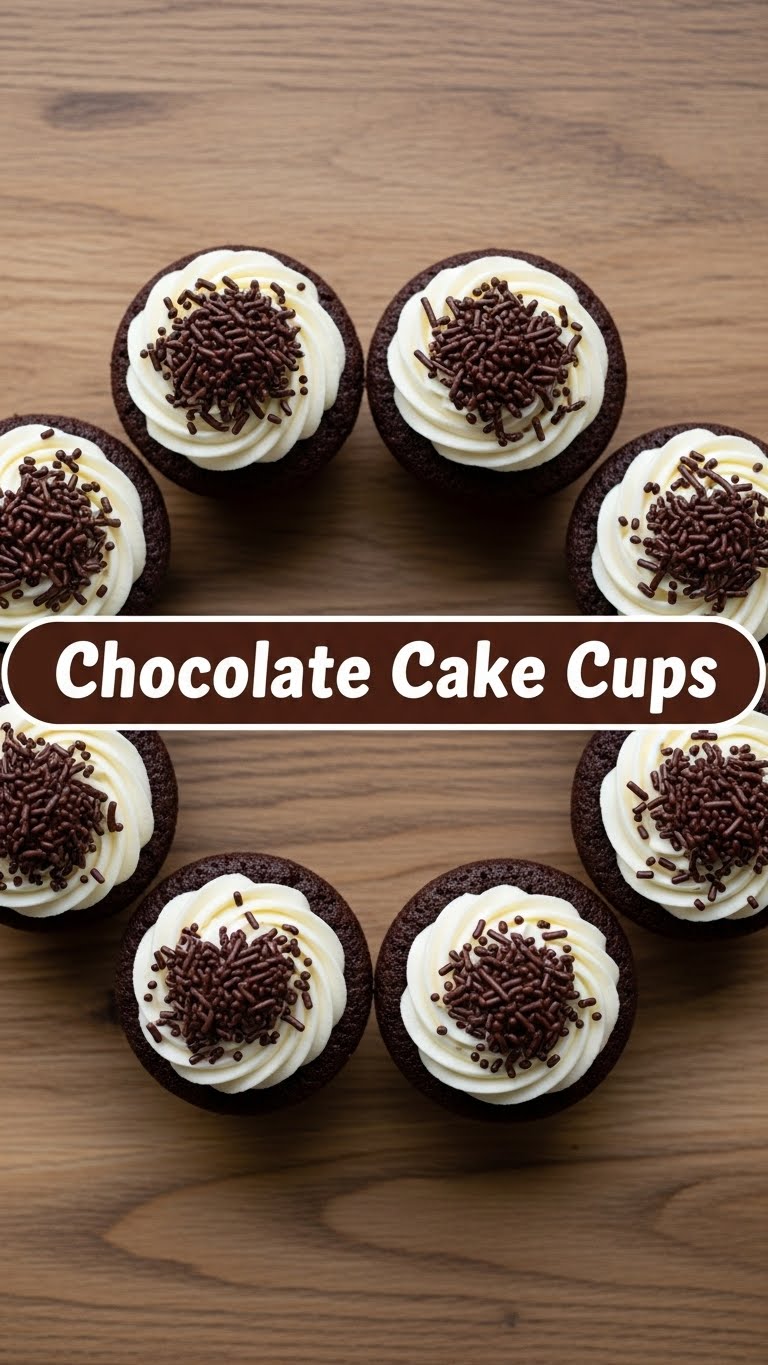
Enter the hero of our story: Chocolate Cake Cups! These aren’t your grandma’s fussy cupcakes; these are your “I need chocolate NOW” cupcakes. Think perfectly portioned, deeply satisfying, and dangerously easy little bundles of joy. Ready to get your bake on without breaking a sweat (or a spirit)? Let’s dive in!
Why This Recipe is Awesome
Honestly, where do I even begin? First off, it’s idiot-proof. Seriously, if I can make these without summoning a kitchen disaster, you absolutely can. Secondly, it’s all about that glorious, glorious portion control. No more guilt-tripping yourself for eating a “slice” that’s basically half a cake. These are individual servings, meaning you get your own little chocolatey hug and don’t have to share. Ever.
Plus, they bake up super fast, which is excellent for those urgent chocolate emergencies. And let’s not forget the presentation—they just look cute, like tiny edible trophies. Perfect for a solo treat, an unexpected guest, or when you just want to feel like a culinary wizard without actually doing any wizardry.
Ingredients You’ll Need
Alright, gather your troops! Most of these are probably chilling in your pantry already, so no frantic grocery store runs required (unless you’re out of chocolate, in which case, emergency!).
- All-Purpose Flour: The backbone of our cakey dreams. Don’t overthink it.
- Granulated Sugar: Sweetness is key, my friend.
- Unsweetened Cocoa Powder: Go for good quality here; it makes a difference. No cheap stuff, please!
- Baking Soda: Our lift-off secret.
- Salt: Just a pinch to make all that chocolate flavor pop.
- Large Egg: One happy egg for structure.
- Milk: Any kind works, dairy or non-dairy. Your choice!
- Vegetable Oil: For that lovely moistness. Or melted butter, if you’re feeling fancy.
- Vanilla Extract: Because everything’s better with a splash of vanilla.
- Hot Water or Hot Coffee: This is the secret weapon for deep, rich chocolate flavor and a moist crumb. Don’t skip it!
- Mini Chocolate Chips (optional): For an extra chocolatey explosion. Because why not?
Step-by-Step Instructions
Ready? Set? Bake! These steps are so simple, you’ll wonder why you ever bought store-bought cupcakes. (Okay, maybe not, but you get the idea.)
- Preheat & Prep: First things first, get your oven to 350°F (175°C). Line a standard muffin tin with paper liners. This recipe usually makes about 12-14 cake cups.
- Whisk Dry: In a large bowl, whisk together the flour, sugar, cocoa powder, baking soda, and salt. Make sure there are no lumps of cocoa lurking!
- Mix Wet: In a separate medium bowl, whisk the egg, milk, oil (or melted butter), and vanilla extract until well combined.
- Combine & Conquer: Pour the wet ingredients into the dry ingredients. Stir gently with a spatula until just combined. Don’t overmix; a few small lumps are totally fine.
- Add Hot Liquid: Now, for the magic! Gradually stir in the hot water or coffee until the batter is smooth and a bit thin. It’s supposed to be like this, so don’t panic! If using, fold in your mini chocolate chips now.
- Fill ‘Em Up: Divide the batter evenly among your prepared muffin cups, filling each about two-thirds full. This prevents overflow and ensures a nice dome.
- Bake Time: Pop them into your preheated oven and bake for 18-22 minutes, or until a wooden skewer inserted into the center comes out clean or with a few moist crumbs.
- Cool Down: Let them cool in the muffin tin for 5-10 minutes before transferring them to a wire rack to cool completely. Impatience is a virtue, but not here, my friend.
Common Mistakes to Avoid
Even the simplest recipes have traps for the unwary! Heed these warnings, and your cake cups will be legendary.
- Thinking you don’t need to preheat: Rookie mistake! A cold oven means uneven baking and sad, dense cakes. Always preheat!
- Overmixing the batter: This is a cardinal sin. Overmixing develops the gluten too much, leading to tough, chewy cake cups instead of light and fluffy ones. Mix until just combined, a few lumps are fine.
- Overfilling the cups: While generous, this will lead to mushroom-top disasters and sticky overflows. Stick to two-thirds full.
- Opening the oven door constantly: Resist the urge to peek every two minutes! It lets out heat and can cause your cakes to sink in the middle. Be patient!
- Not using hot liquid: The hot water/coffee isn’t just for thinning the batter; it helps “bloom” the cocoa powder, enhancing its flavor and resulting in a darker, richer cake.
Alternatives & Substitutions
Feeling creative? Or just missing an ingredient? No worries, we’ve got options! This recipe is pretty forgiving.
- Flour Power: If you’re gluten-free, a 1:1 gluten-free baking flour blend usually works perfectly here.
- Dairy-Free Darling: Swap the regular milk for almond, soy, or oat milk. Easy peasy!
- Oil vs. Butter: Vegetable oil gives a super moist crumb, but melted unsalted butter adds a richer flavor. Use whichever your heart desires (or your pantry contains).
- Flavor Boosters: Add a teaspoon of instant espresso powder to the hot water/coffee for an even deeper chocolate flavor without tasting like coffee. Or throw in some orange zest for a chocolate-orange vibe!
- Toppings Galore: Once cooled, these are begging for frosting! A simple chocolate ganache, a dollop of whipped cream, or even just a dusting of powdered sugar are all excellent choices. Or, you know, just eat them plain. IMO, they’re perfect as is.
FAQ (Frequently Asked Questions)
Got questions? I’ve got (casual) answers!
- Can I use margarine instead of butter/oil? Well, technically yes, but why hurt your soul (and your cake’s texture) like that? For best results, stick to oil or butter.
- Can I make these ahead of time? Absolutely! They’re great for 2-3 days stored in an airtight container at room temperature. Fresh is always best, but they hold up well.
- How do I know when they’re done? The toothpick test is your best friend! Insert a wooden skewer into the center; if it comes out clean or with a few moist crumbs, they’re good to go.
- What if I don’t have paper liners? You can grease and flour your muffin tin thoroughly, but liners make for much easier cleanup and removal. FYI, they’re worth the tiny investment!
- Can I add nuts or other mix-ins? Heck yes! Walnuts, pecans, chopped Oreos, sprinkles… go wild! Just fold them in with the chocolate chips (if using).
- My cake cups sank in the middle, what happened? Usually, this means they were underbaked or the oven door was opened too frequently during baking, causing a sudden temperature drop.
- Can I halve or double this recipe? Yep, it’s pretty scalable! Just ensure you adjust baking times slightly for smaller batches (halving) or potentially need an extra muffin tin for doubling.
Final Thoughts
So there you have it, folks! Your new favorite, ridiculously easy, and utterly delicious Chocolate Cake Cups recipe. Whether you’re baking for yourself (highly recommended) or trying to impress someone with minimal effort (we all do it!), these little beauties are sure to be a hit. Go forth and conquer your chocolate cravings! Now go impress someone—or yourself—with your new culinary skills. You’ve earned it!

