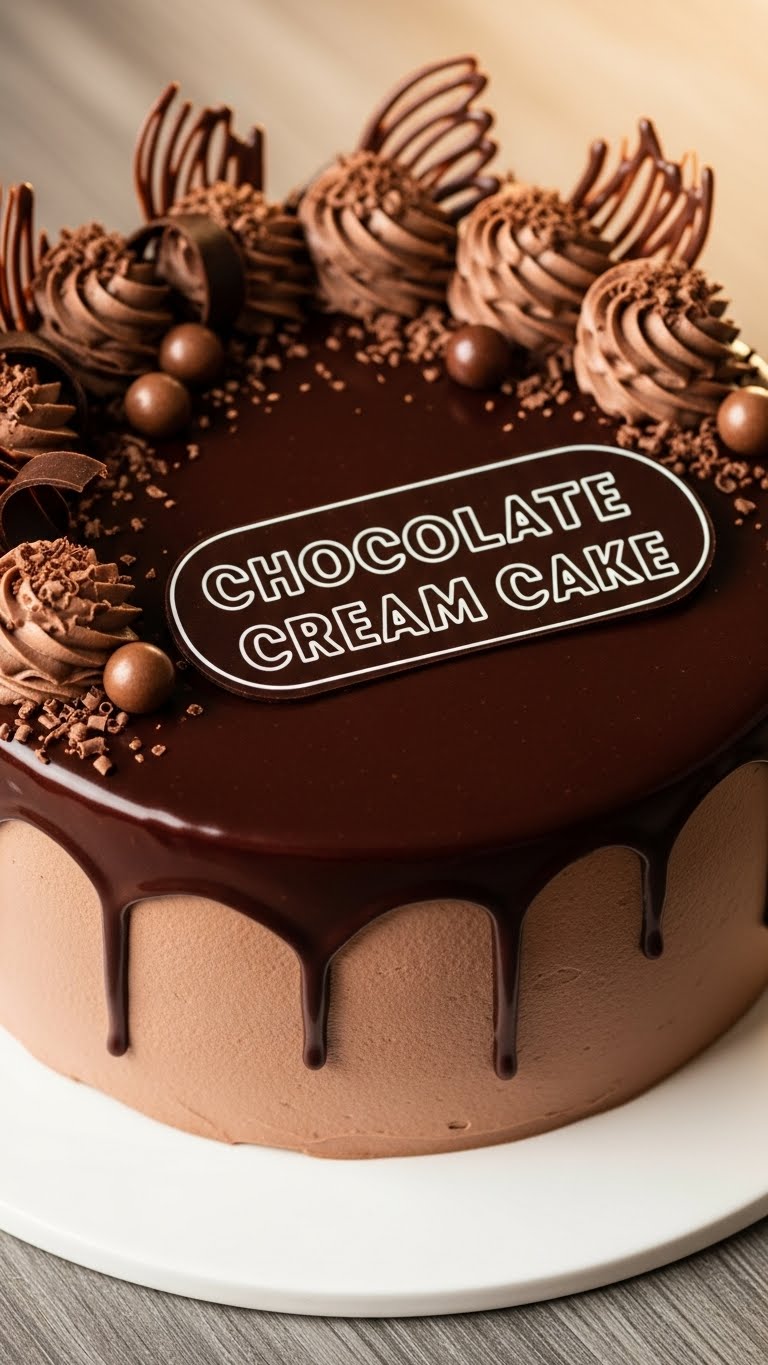
So, you’ve scrolled past enough drool-worthy food pics to know you deserve something decadent, but the thought of a culinary marathon sends shivers down your spine? Friend, I hear you. And I’m here to tell you: your quest for a ridiculously easy, yet utterly show-stopping Chocolate Cream Cake ends *now*.
Why This Recipe is Awesome
Let’s be real, life’s too short for complicated cakes. This bad boy? It’s a chocolate hug in cake form, looks like you spent hours slaving away, but is actually deceptively simple. **Seriously, it’s idiot-proof.** Even if your baking history involves more ‘charred’ than ‘charming,’ you’ve got this. Plus, it’s a total crowd-pleaser. Or, you know, a crowd-pleaser for *you* and your couch. No judgment here.
Ingredients You’ll Need
Gather your chocolatey arsenal! Most of these are likely chilling in your pantry already. (No, literally, put your butter on the counter now, it needs to soften.)
For the Cake:
- **All-Purpose Flour:** 1 ½ cups. The humble backbone of all things cakey.
- **Granulated Sugar:** 1 ½ cups. Because sweetness is not a crime.
- **Unsweetened Cocoa Powder:** ½ cup. Go for the good stuff; your taste buds will thank you.
- **Baking Soda:** 1 ½ teaspoons. Our little magic poof-maker.
- **Salt:** 1 teaspoon. Just a pinch to make everything pop.
- **Eggs:** 2 large. Your binding agents. Happy chickens optional.
- **Milk:** 1 cup. Any kind works, but whole milk makes it extra lush.
- **Vegetable Oil:** ½ cup. Keeps things ridiculously moist.
- **Vanilla Extract:** 2 teaspoons. Essential for all things yummy.
- **Boiling Water:** 1 cup. Don’t skip this, it’s the secret to an incredibly moist cake. Trust me on this one!
For the Cream Cheese Frosting:
- **Cream Cheese:** 8 oz block, softened. Not the tub kind, unless you like a runny mess.
- **Unsalted Butter:** ½ cup (1 stick), softened. Room temperature is KEY!
- **Powdered Sugar:** 3-4 cups, sifted. To avoid lumpy frosting—yuck!
- **Unsweetened Cocoa Powder:** ½ cup. For that chocolatey *zing*.
- **Vanilla Extract:** 1 teaspoon. More vanilla, more happy.
- **Heavy Cream (or Milk):** 2-4 tablespoons. For reaching that perfect spreadable consistency.
Step-by-Step Instructions
- **Get Ready, Get Set, Bake!** Preheat your oven to 350°F (175°C). Grease and flour two 8-inch round cake pans. Don’t be lazy here; parchment circles on the bottom prevent sticking and future frustration.
- **Dry Mix Magic:** In a large bowl, whisk together the flour, sugar, cocoa powder, baking soda, and salt. Make sure there are no lumps, unless you like texture surprises in your cake.
- **Wet Mix Whirlwind:** In a separate medium bowl, beat the eggs, milk, oil, and vanilla extract until well combined.
- **Combine & Conquer:** Pour the wet ingredients into the dry ingredients. Mix on low speed until *just* combined. **Don’t overmix, or your cake will be tough.** We’re going for tender, not tire.
- **The Boiling Water Secret:** Slowly add the boiling water to the batter, mixing until smooth. The batter will be thin – don’t panic! This is precisely what makes it so incredibly moist and luscious.
- **Divide & Bake:** Pour the batter evenly into your prepared cake pans. Bake for 30-35 minutes, or until a wooden skewer inserted into the center comes out clean.
- **Cool Down:** Let the cakes cool in their pans for 10-15 minutes before inverting them onto a wire rack to cool completely. Patience is a virtue, especially here.
- **Frosting Frenzy:** While the cakes are cooling, whip up that frosting! Beat softened cream cheese and butter together until smooth and creamy.
- **Sweeten It Up:** Gradually add the sifted powdered sugar and cocoa powder, beating until combined. Stir in vanilla extract.
- **Creamy Dreamy:** Add heavy cream (or milk) one tablespoon at a time until you reach your desired consistency. It should be thick enough to spread but not stiff.
- **Assemble Your Masterpiece:** Once the cakes are **completely cool** (this is crucial, FYI!), spread a generous layer of frosting on top of one cake layer. Place the second layer on top, and then frost the top and sides of the entire cake.
- **Devour!** Slice and enjoy your magnificent creation. You earned this.
Common Mistakes to Avoid
Nobody’s perfect, but we can try to avoid these rookie blunders:
- **Under-mixing or Over-mixing:** Both are enemies of a good cake. Mix until *just* combined. You want a tender crumb, not a brick.
- **Not sifting powdered sugar:** Lumpy frosting is a sad frosting. Just do it. Your palate will thank you.
- **Frosting warm cakes:** This is the quickest way to turn your beautiful frosting into a melty, sliding disaster. **Wait for the cakes to be COMPLETELY cool.** I’m serious!
- **Forgetting to grease and flour the pans:** Unless you enjoy chiseling cake out of metal, don’t skip this step. Parchment paper circles are your actual best friend.
- **Opening the oven door too soon:** Curiosity killed the cake! Give it at least 20 minutes before peeking, or your cake might sink in the middle.
Alternatives & Substitutions
Feeling adventurous? Or just out of an ingredient? No stress, we can make it work (mostly):
- **Flour Power:** Out of all-purpose? You can sometimes get away with cake flour for an even lighter crumb, but stick to AP for consistency. Gluten-free? Look for a good GF all-purpose blend, but results may vary, IMO.
- **Milk Alternatives:** Lactose intolerant? Almond milk, soy milk, or oat milk work perfectly fine here. The richness might differ slightly, but the cake will still be delicious.
- **Frosting Flavor Fun:** Want a different vibe? Skip the cocoa in the frosting for a classic vanilla cream cheese frosting. Or add a bit of espresso powder for a mocha kick. Raspberry puree (reduced a bit) can also be swirled in for a fruity twist!
- **Oil vs. Butter:** While oil makes for a super moist cake, you *can* swap it for melted butter if you prefer that butter flavor. Just know the texture might be slightly denser.
FAQ (Frequently Asked Questions)
Got questions? I’ve got answers (and maybe some sass):
- **My cake sunk in the middle! What happened?** Oh no! Likely culprits: overmixing, opening the oven door too soon, or your baking soda isn’t fresh. **Always check your leavening agents’ expiry dates!**
- **Can I make this cake ahead of time?** Absolutely! The cake layers can be baked a day in advance, wrapped tightly in plastic wrap, and stored at room temp. The frosting can also be made a day ahead and stored in the fridge (bring to room temp and re-whip before using).
- **How long does this cake last?** If you manage not to eat it all in one sitting (which, let’s be honest, is a challenge), it’s good for 3-4 days covered in the fridge.
- **Do I *have* to use cream cheese in the frosting?** Well, it’s a *Chocolate Cream Cake*, so it’s kinda the star! If you really hate cream cheese (gasp!), you could do a standard buttercream, but it won’t be quite the same dreamy tang.
- **Can I make this in different pan sizes?** Yep! For a 9×13 inch rectangular cake, the baking time might be similar, but keep an eye on it. For cupcakes, reduce baking time to around 18-22 minutes. **Always adjust baking times for different pan sizes.**
- **My frosting is too thin/thick. Help!** Too thin? Add more sifted powdered sugar a tablespoon at a time. Too thick? Add more heavy cream (or milk) a teaspoon at a time until perfect. It’s an art, not a science, sometimes!
- **Can I add chocolate chips to the batter?** Yes! A handful (or two) of mini chocolate chips would be a delightful addition. Who doesn’t love more chocolate?
Final Thoughts
See? Told you it wasn’t rocket science! You’ve just whipped up a glorious, moist, chocolatey masterpiece. Now go impress someone—or yourself—with your new culinary skills. You’ve earned it! Seriously, kick back, grab a big ol’ slice, and bask in the glory of your own delicious creation. And maybe send me a slice? Just kidding… mostly. Happy baking, friend!

