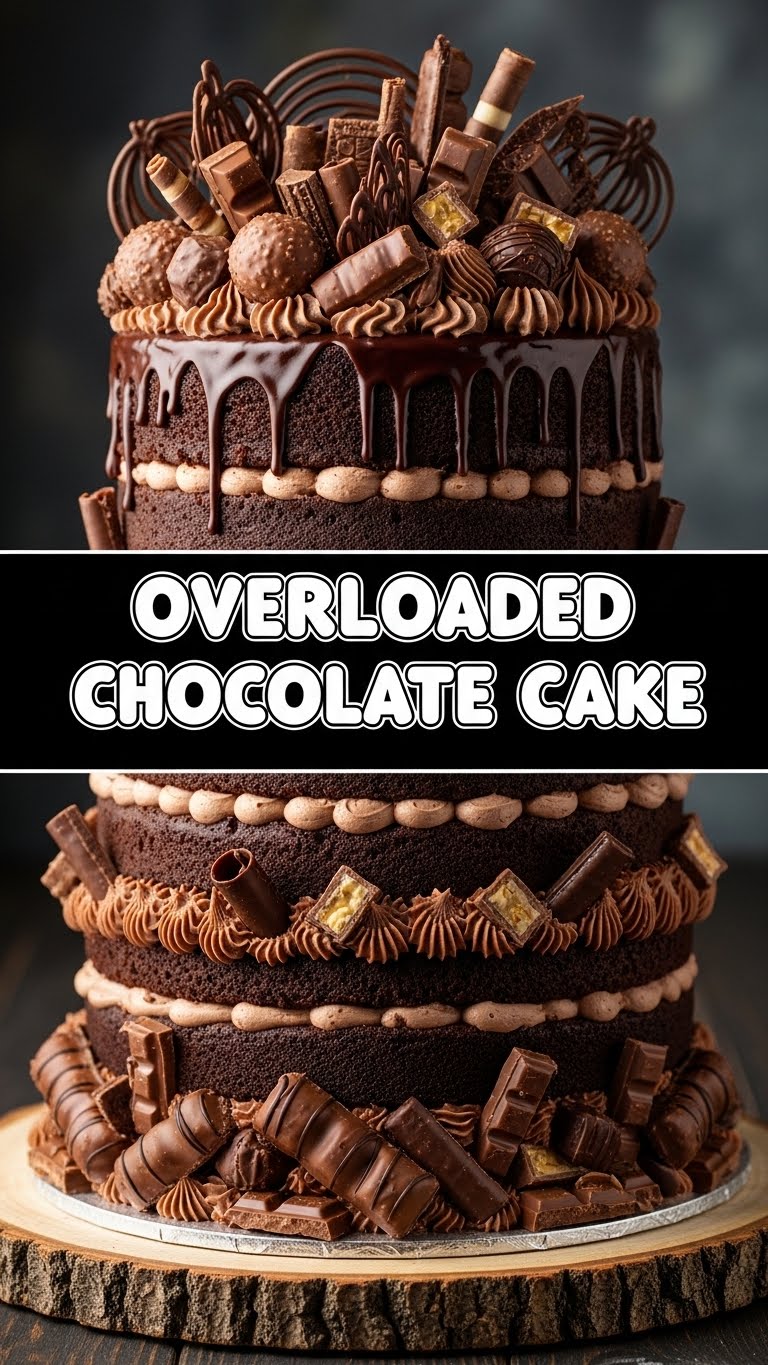
So, you’ve stared into the abyss of your fridge, sighed dramatically, and decided life just isn’t complete without an entire chocolate cake right now? Been there, bought the T-shirt, ate the cake. And guess what? We’re about to make that chocolatey dream a reality, without any of the fussy, “I went to culinary school” vibes. Get ready for the **Overloaded Chocolate Cake** – because sometimes, more *is* absolutely more. Trust me, your sweet tooth is about to send you a thank-you note.
Why This Recipe is Awesome
Okay, let’s be real. This isn’t just *a* chocolate cake recipe; it’s *the* chocolate cake recipe for when you need a hug in dessert form, but also want to feel like a baking wizard without, you know, actually being one. It’s **so easy, it’s almost suspicious**. Seriously, if I, a person who once set off the fire alarm microwaving toast (don’t ask), can nail this, you absolutely can too.
Plus, it’s called ‘Overloaded’ for a reason – we’re not skimping on the good stuff. Expect rich, moist cake, glorious frosting, and enough chocolatey bits to make a cocoa bean blush. It’s basically a party in your mouth, and everyone’s invited. Especially you. It’s also pretty much **idiot-proof**, so no pressure!
Ingredients You’ll Need
Gather your chocolate arsenal, future baking superstar! Here’s what we’re wrangling:
- **For the Cake:**
- **1 ½ cups (180g) All-Purpose Flour:** Your trusty flour. Keep it level, no mountain peaks.
- **1 ½ cups (300g) Granulated Sugar:** The sweet stuff. Don’t skimp unless you’re a masochist.
- **¾ cup (75g) Unsweetened Cocoa Powder:** The good dark kind. This is where the magic starts.
- **1 ½ tsp Baking Soda:** Our first poof-maker.
- **1 tsp Baking Powder:** Our second poof-maker. Don’t mix them up, it’s not a chemistry experiment.
- **1 tsp Salt:** Just a pinch, to make everything else sing.
- **2 Large Eggs:** Happy eggs, room temp if you’re feeling fancy (or just remembered to take them out).
- **¾ cup (180ml) Whole Milk:** Whole milk for extra richness, but 2% works in a pinch. Don’t tell anyone.
- **½ cup (120ml) Vegetable Oil or Melted Unsalted Butter:** For moisture. Butter is always better, IMO.
- **1 tsp Vanilla Extract:** The MVP of flavor. Don’t skip it!
- **¾ cup (180ml) Hot Water or Hot Brewed Coffee:** Our secret weapon for deep chocolate flavor. Coffee doesn’t make it taste like coffee, promise!
- **For the Overload Chocolate Frosting:**
- **½ cup (113g) Unsalted Butter, softened:** Room temp, please!
- **2 cups (240g) Powdered Sugar (Confectioners’ Sugar):** Sifted, unless you like lumpy frosting.
- **½ cup (50g) Unsweetened Cocoa Powder:** More chocolate, because why not?
- **¼ cup (60ml) Whole Milk, plus more if needed:** To get that perfect spreadable consistency.
- **1 tsp Vanilla Extract:** Can you ever have too much vanilla? No.
- **1 cup (170g) Chocolate Chips or Chopped Chocolate:** For the *overloaded* part! (Optional, but highly encouraged).
Step-by-Step Instructions
Alright, apron on, game face ready! Let’s get baking!
- **Get Toasty:** Preheat your oven to **350°F (175°C)**. Grease and flour two 8-inch round cake pans. Or line with parchment paper for less drama. Nobody likes a stuck cake.
- **Dry Mix Magic:** In a large bowl, whisk together the flour, sugar, cocoa powder, baking soda, baking powder, and salt. Pretend you’re a mad scientist. Make sure there are no lumps.
- **Wet Mix Wonders:** In a separate medium bowl, whisk together the eggs, milk, vegetable oil (or melted butter), and vanilla extract until well combined.
- **Combine Forces:** Pour the wet ingredients into the dry ingredients. Mix on low speed with an electric mixer, or with a whisk, until *just* combined. **Do not overmix!** Once you don’t see streaks of flour, stop.
- **The Hot Secret:** Slowly pour in the hot water or hot coffee. The batter will be very thin – don’t panic, that’s totally normal and exactly what we want for a super moist cake. Stir until just combined.
- **Bake Away!** Divide the batter evenly between your prepared cake pans. Bake for 30-35 minutes, or until a wooden skewer inserted into the center comes out clean. Don’t peek too much; you’ll make the cake sad!
- **Chill Out:** Let the cakes cool in their pans for about 10-15 minutes before inverting them onto a wire rack to cool completely. This part is crucial!
- **Frosting Frenzy:** While the cakes cool, let’s make that glorious frosting. In a large bowl, beat the softened butter until creamy. Gradually add the powdered sugar and cocoa powder, alternating with splashes of milk and vanilla. Beat until light and fluffy. If it’s too thick, add more milk, a teaspoon at a time. If it’s too thin, add more powdered sugar. Stir in your chocolate chips or chopped chocolate.
- **Assemble Your Masterpiece:** Once the cakes are **completely cool** (I mean it!), spread a generous layer of frosting on top of the first cake layer. Place the second cake layer on top, and then frost the top and sides of the entire cake. Go wild! Garnish with more chocolate chips, sprinkles, or whatever your heart desires.
Common Mistakes to Avoid
Look, we all make mistakes. But let’s try to avoid these common cake blunders:
- **Overmixing the Batter:** Seriously, once you don’t see streaks of flour, stop. Overmixing develops the gluten too much, leading to a tough, dense cake. We want light and fluffy!
- **Opening the Oven Door Constantly:** Patience, grasshopper. Every time you open the oven, the temperature drops, which can cause your cake to sink in the middle. Resist the urge to peek!
- **Not Preheating the Oven:** Baking is a science. You wouldn’t jump into a cold shower, would you? Neither should your cake. Always ensure your oven is at the correct temperature *before* the cake goes in.
- **Frosting a Warm Cake:** Unless you want chocolate soup running down the sides of your cake, let it cool completely. **Completely!** This is non-negotiable for a neat finish.
- **Using Old Leavening Agents:** Baking soda and powder lose their potency over time. If your cake isn’t rising, check the expiration dates!
Alternatives & Substitutions
Feeling a little adventurous, or just missing an ingredient? No worries, we can hack it!
- **Coffee vs. Hot Water:** No coffee maker? Hot water works perfectly fine and still “blooms” the cocoa, intensifying the chocolate flavor. But FYI, the coffee adds a certain je ne sais quoi that really makes the chocolate sing.
- **Milk Options:** Any milk works here – whole, 2%, skim, even non-dairy alternatives like almond or oat milk. Whole milk gives the best richness, but don’t sweat it if you only have something else.
- **Oil vs. Butter:** Vegetable oil makes for a super moist cake, while melted butter gives a richer, more nuanced flavor. Your call, champ! Both are delicious.
- **Frosting Variations:** Not feeling the buttercream? Go for a cream cheese frosting, a simple chocolate ganache, or even a white chocolate frosting for a striking contrast. It’s *your* overloaded cake, make it your own!
- **Add-ins & Toppings:** This is where the “overloaded” part really shines! Think beyond chocolate chips: chopped nuts (pecans, walnuts), mini marshmallows, sprinkles, a drizzle of caramel, or even crushed candy bars. Go wild!
FAQ (Frequently Asked Questions)
Got questions? I’ve got (casual) answers!
- **Can I make this dairy-free?** Absolutely! Swap whole milk for your favorite non-dairy milk (almond, soy, oat). Use oil instead of butter in the cake, and a dairy-free butter alternative and non-dairy milk for the frosting. Easy peasy!
- **Why the hot coffee/water? Does it make the cake taste like coffee?** Nope, not really! The hot liquid helps to “bloom” the cocoa powder, which means it enhances and deepens the chocolate flavor. It’s a secret weapon for super chocolatey results, without a coffee taste.
- **My cake sank in the middle! What happened?** This is usually due to one of two things: overmixing the batter (which creates too much gluten) or opening the oven door too early/often (which causes a sudden temperature drop). Also, check if your baking soda/powder is fresh!
- **Can I make this in a 9×13 pan?** Yep! Just pour all the batter into one greased and floured 9×13 inch pan. The baking time will be a bit longer, usually around 35-45 minutes. Keep an eye on it and test with a skewer.
- **How long does this glorious cake keep?** Covered tightly at room temperature, it’ll last for 2-3 days. In the fridge, it’s good for up to a week. If it lasts that long, which, let’s be honest, it probably won’t.
- **Can I make the cake layers ahead of time?** You betcha! Once completely cool, wrap them tightly in plastic wrap and store at room temperature for a day or two, or freeze for up to a month. Just thaw before frosting.
Final Thoughts
And there you have it, folks! Your very own, dangerously delicious, **Overloaded Chocolate Cake**. You just went from zero to hero in the kitchen, and all it took was a little mixing, baking, and a whole lot of chocolate. Now go forth, conquer your cravings, and share this masterpiece (or don’t, I won’t judge, I’d probably keep it all for myself). You totally earned that slice… or three. Happy baking!

