So, you’ve baked a cake, right? A glorious, fluffy, delicious cake. But now it’s sitting there, looking a bit… naked. Like it just rolled out of bed without its coffee. And you’re thinking, “How do I make this baby look like it belongs in a fancy bakery window without spending an entire afternoon frosting it with the precision of a brain surgeon?”
Enter the chocolate ganache. Your new best friend. It’s the culinary equivalent of putting on a killer outfit and feeling instantly fabulous. Trust me, if I can do it without setting off a single smoke detector, you totally can too. Let’s get this party started!
Why This Recipe is Awesome
Honestly, this isn’t just a recipe; it’s a superpower. Here’s why this chocolate ganache is about to become your go-to move for all things cake-related:
- It’s practically **idiot-proof**. Seriously, if you can boil water (and not even aggressively), you can make this. I’ve personally proven this multiple times.
- **Only two ingredients** (mostly). Yes, you read that right. Two! No obscure fancy stuff you need a search party to find.
- It makes anything look *fancy*. Drizzle it, pour it, spread it. Instant glow-up for any dessert. Your friends will think you’re a pastry chef. Your secret is safe with me.
- It’s chocolate. Do I really need to elaborate? It’s rich, decadent, and basically a hug in edible form.
Ingredients You’ll Need
Time to gather your edible magic! Quality matters here, so no cutting corners. Your cake deserves the best, and so do you!
- **Good Quality Chocolate** (8-12 oz / 225-340g): This is *not* the time for those questionable chocolate chips you found in the back of your pantry from 2018. Get a good bar of dark chocolate (60-70% cocoa solids for that rich, not-too-sweet vibe) or semi-sweet. Chopping it into small, even pieces helps it melt smoothly.
- **Heavy Cream** (1 cup / 240ml): We’re talking heavy cream, whipping cream, full-fat dairy goodness. **Do not use half-and-half or light cream** unless you want a sad, watery mess. We need that high-fat content for luxuriously smooth ganache.
- **Optional, but highly recommended:**
- **Unsalted Butter** (1 tbsp / 14g): A tiny bit of butter at the end gives your ganache an incredible, glossy sheen. Like it just stepped out of a spa.
- **Vanilla Extract** (½ tsp): Just a whisper to deepen the chocolate flavor. It’s like a secret weapon.
Step-by-Step Instructions
Alright, apron on, game face on (or just your regular face, it’s fine). Let’s make some magic!
- **Chop That Chocolate:** Grab your good quality chocolate and chop it into small, uniform pieces. Think roughly pea-sized. This helps it melt evenly and quickly. Pop it into a heatproof bowl.
- **Heat the Cream:** Pour your heavy cream into a small saucepan. Heat it over medium heat until it just begins to simmer and you see tiny bubbles forming around the edges. **Do not let it boil vigorously!** We’re not making soup here.
- **The Great Pour-Over:** As soon as the cream is simmering, take it off the heat immediately and pour it directly over your chopped chocolate. Make sure all the chocolate is submerged.
- **Patience, Grasshopper:** Now, here’s the hardest part for impatient people (like me). **Let it sit undisturbed for 5 minutes.** Don’t touch it, don’t stir it, just let the hot cream do its melting magic. This step is crucial!
- **Whisk it Real Good (Gently):** After 5 minutes, grab a whisk (or a spoon, no judgment). Start gently stirring the mixture from the center outwards. It’ll look like a mess at first, then suddenly, it’ll transform into a gorgeous, smooth, shiny chocolate river. If using, stir in your butter and vanilla extract now.
- **Cool Down Time:** Now you have ganache! The consistency depends on how you want to use it.
- **For a pourable glaze:** Let it cool at room temperature for about 15-30 minutes until it’s slightly thickened but still pourable.
- **For spreading or piping:** Cover the bowl with plastic wrap (press it directly onto the surface to prevent a skin from forming) and let it cool at room temperature for a couple of hours, or in the fridge for about 30-60 minutes, stirring occasionally, until it reaches a peanut butter-like consistency.
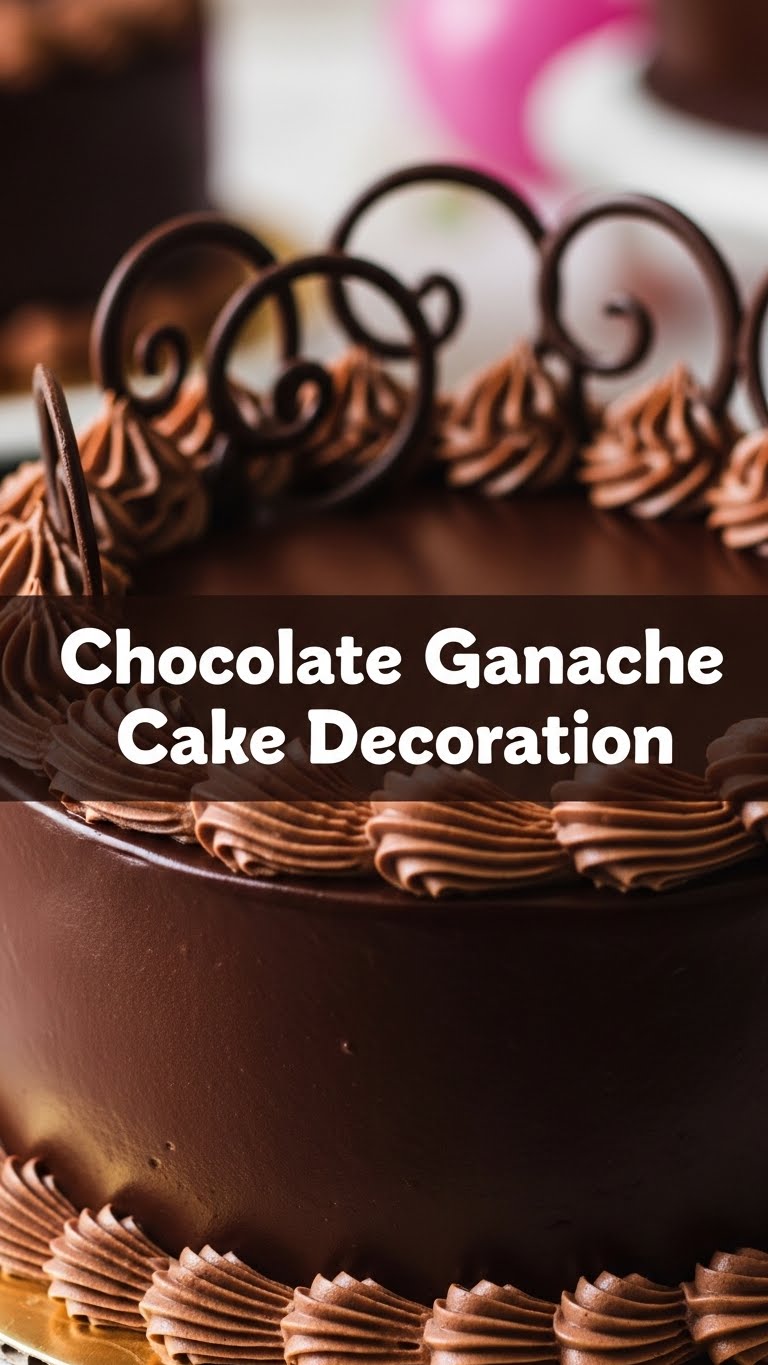
- **Decorate Your Masterpiece!** Once it’s the right consistency, go wild! Pour it over your cake, drizzle it artfully, or use an offset spatula to spread it smoothly. Enjoy the oohs and aahs!
Common Mistakes to Avoid
Because nobody wants a ganache-gone-wrong, here are some pitfalls to sidestep. Learn from my past mistakes, so you don’t have to make your own!
- **Boiling the Cream to Death:** Seriously, don’t do it. Overheated cream can scorch the chocolate, giving you a grainy, sad, separated ganache. Just simmering, tiny bubbles, then off the heat.
- **Stirring Too Soon/Too Vigorously:** Remember that 5-minute sit? It’s important! Stirring too early or too aggressively introduces too much air, which can lead to a dull, not-so-glossy ganache and even cause it to seize. **Gentle is the name of the game.**
- **Using Crappy Chocolate:** I said it once, I’ll say it again. Cheap chocolate has stabilizers that can prevent proper melting and emulsification, resulting in a grainy, sad texture. Invest a little; it’s worth it, IMO.
- **Not Letting it Cool Enough:** If you pour or spread your ganache when it’s too hot, it’ll just slide right off your cake or be too runny to manage. Patience, my friend!
- **Getting Water in It:** Even a tiny drop of water can cause chocolate to seize and become a lumpy, unworkable mess. Make sure your bowl and utensils are completely dry.
Alternatives & Substitutions
Feeling adventurous or have dietary restrictions? Here are some ways to switch things up without losing the ganache magic.
- **Chocolate Swap-Out:**
- **Milk Chocolate:** For a sweeter, milder ganache, use milk chocolate. You might need to adjust the cream ratio slightly (use a bit less cream, as milk chocolate has more fat).
- **White Chocolate:** Totally doable! Use good quality white chocolate. Be extra careful not to overheat it, as white chocolate is more prone to seizing. Use about 1:1 cream to white chocolate for pouring consistency, or 1:2 for a firmer ganache.
- **Dairy-Free Option:**
- **Full-Fat Coconut Milk/Cream:** For a surprisingly good dairy-free ganache, replace the heavy cream with full-fat canned coconut milk or coconut cream. Make sure it’s the full-fat kind, and don’t use the watery stuff. The ganache will have a subtle coconut flavor, which can be delightful!
- **Flavor Boosters:**
- **Coffee:** Add a teaspoon of instant espresso powder to the hot cream for a richer, deeper chocolate flavor that isn’t overtly coffee-like.
- **Liqueurs:** Stir in a tablespoon or two of your favorite liqueur (Grand Marnier, Kahlua, rum, Baileys) after the ganache has come together for an adult twist.
- **Extracts:** Beyond vanilla, try a hint of almond extract, peppermint extract (for mint chocolate!), or even a dash of orange zest.
FAQ (Frequently Asked Questions)
Got questions? I’ve got answers, delivered with a casual shrug and a smile.
- **What kind of chocolate is *really* best?** Dark or semi-sweet chocolate bars (like Ghirardelli, Lindt, Baker’s, or even good quality store brands) are your best bet. Chocolate chips often have stabilizers that make them harder to melt smoothly.
- **Can I make ganache ahead of time?** Absolutely! Once cooled and set, cover it tightly with plastic wrap (pressed onto the surface) and store at room temperature for up to 2 days, or in the fridge for up to 2 weeks. Reheat gently in a double boiler or microwave (in short bursts, stirring often) to bring it back to a pourable consistency.
- **My ganache looks broken/separated and greasy! Help!** Uh oh! This usually happens if it’s too hot, too cold, or stirred too aggressively. Try adding a tablespoon of hot water or hot cream (very slowly, one teaspoon at a time) while whisking continuously until it comes back together. Sometimes, just letting it cool or warm up a bit can help.
- **Can I use half-and-half instead of heavy cream?** Well, technically yes, but why hurt your soul like that? It won’t be as rich, thick, or stable, and might not set properly. Stick to heavy cream for the best results, FYO.
- **How long does ganache last on a cake?** If your cake is covered in ganache and stored at room temperature, it’s generally good for 2-3 days. In the fridge, it’ll last up to a week.
- **What else can I use ganache for?** So many things! It’s amazing as a filling for cupcakes, a dip for fruit (strawberries, hello!), a topping for ice cream, or even rolled into truffles once it’s firm. Don’t limit yourself!
Final Thoughts
See? That wasn’t scary at all, was it? You just whipped up something that looks super impressive with minimal fuss. Your cake is now dressed to the nines, ready for its close-up. Go ahead, take a bite. You earned it. Now go impress someone—or yourself—with your new culinary skills. You’ve earned it!


