So, you’ve got a craving for chocolate that only a truly epic cake can fix, but you’re not trying to win any pastry chef awards, right? Perfect. You’re in the right place. Because today, my friend, we’re whipping up a Chocolate Celebration Cake that’s so good, you might just get a standing ovation from your taste buds. And guess what? It’s shockingly simple. No chef hat required, just a desire for pure, unadulterated chocolate bliss.
Why This Recipe is Awesome
Let’s be real, some “celebration” cakes are more like “tolerate-this-dry-cake” cakes. Not ours! This recipe is your secret weapon for looking like a baking superstar without actually breaking a sweat. It’s rich, it’s moist, it’s intensely chocolatey, and it practically screams “party in your mouth.” It’s also pretty much **idiot-proof**, so even if your culinary skills usually involve calling for takeout, you got this. Seriously. It’s that easy.
Ingredients You’ll Need
Gather your chocolatey arsenal! Most of these are probably already lurking in your pantry.
- All-purpose flour: Because fancy flours are for fancy people, and we’re just here for cake.
- Good quality cocoa powder: This is *not* the time to skimp, people. You want chocolatey, not sad-brown-ish.
- Granulated sugar: To make it sweet, obviously.
- Baking soda & baking powder: Our leavening tag team, making sure your cake isn’t a dense hockey puck.
- Salt: A pinch makes all the chocolate flavors sing. Don’t skip it!
- Large eggs: Our binding heroes.
- Buttermilk: The secret ingredient for super moist cake. Don’t have it? See FAQ!
- Vegetable oil: Adds even more moisture and tenderness.
- Vanilla extract: A splash enhances all the other flavors.
- Hot coffee (or water): This is where the magic happens, intensifying the chocolate! Don’t worry, your cake won’t taste like coffee.
- For the frosting (because naked cake is sad cake):
- Unsalted butter: Softened, for creamy goodness.
- Powdered sugar: For silky smooth frosting.
- Good quality cocoa powder: Again, quality matters!
- Milk (or cream): Just a splash to get the right consistency.
- Vanilla extract: Because vanilla makes everything better.
- A pinch of salt: Balances the sweetness.
Step-by-Step Instructions
Okay, aprons on, let’s get baking! Don’t overthink it, just follow along.
- **Preheat Power:** Get your oven cranked up to 350°F (175°C). Grease and flour two 8 or 9-inch round cake pans. Or, if you’re like me and hate greasing, line them with parchment paper. Smart move!
- **Dry Mix Magic:** In a large bowl, whisk together the flour, cocoa powder, sugar, baking soda, baking powder, and salt. Give it a good whisk until everything is super combined. No lumps allowed!
- **Wet Mix Wonders:** In a separate medium bowl, whisk together the eggs, buttermilk, vegetable oil, and vanilla extract. You want it smooth and creamy.
- **Combine & Conquer:** Pour the wet ingredients into the dry ingredients. Mix with a spatula or whisk until *just* combined. **Do not overmix!** A few lumps are okay.
- **The Hot Stuff:** Carefully pour the hot coffee (or water) into the batter. Stir gently until fully incorporated. The batter will be thin, and that’s exactly what we want.
- **Pan It Up:** Divide the batter evenly between your two prepared cake pans. Give them a gentle tap on the counter to release any air bubbles.
- **Bake Off!** Pop those beauties into your preheated oven. Bake for 30-35 minutes, or until a wooden skewer inserted into the center comes out clean.
- **Cool Down:** Let the cakes cool in their pans for about 10-15 minutes. Then, carefully invert them onto a wire rack to cool completely. **Patience is key here!** Don’t try to frost a warm cake, unless you enjoy a melted, chocolatey mess.
- **Frosting Frenzy (while cakes cool):** In a large bowl, beat the softened butter until creamy. Gradually add the powdered sugar, cocoa powder, salt, vanilla, and milk. Beat until smooth, light, and fluffy. If it’s too thick, add more milk a teaspoon at a time. Too thin? More powdered sugar!
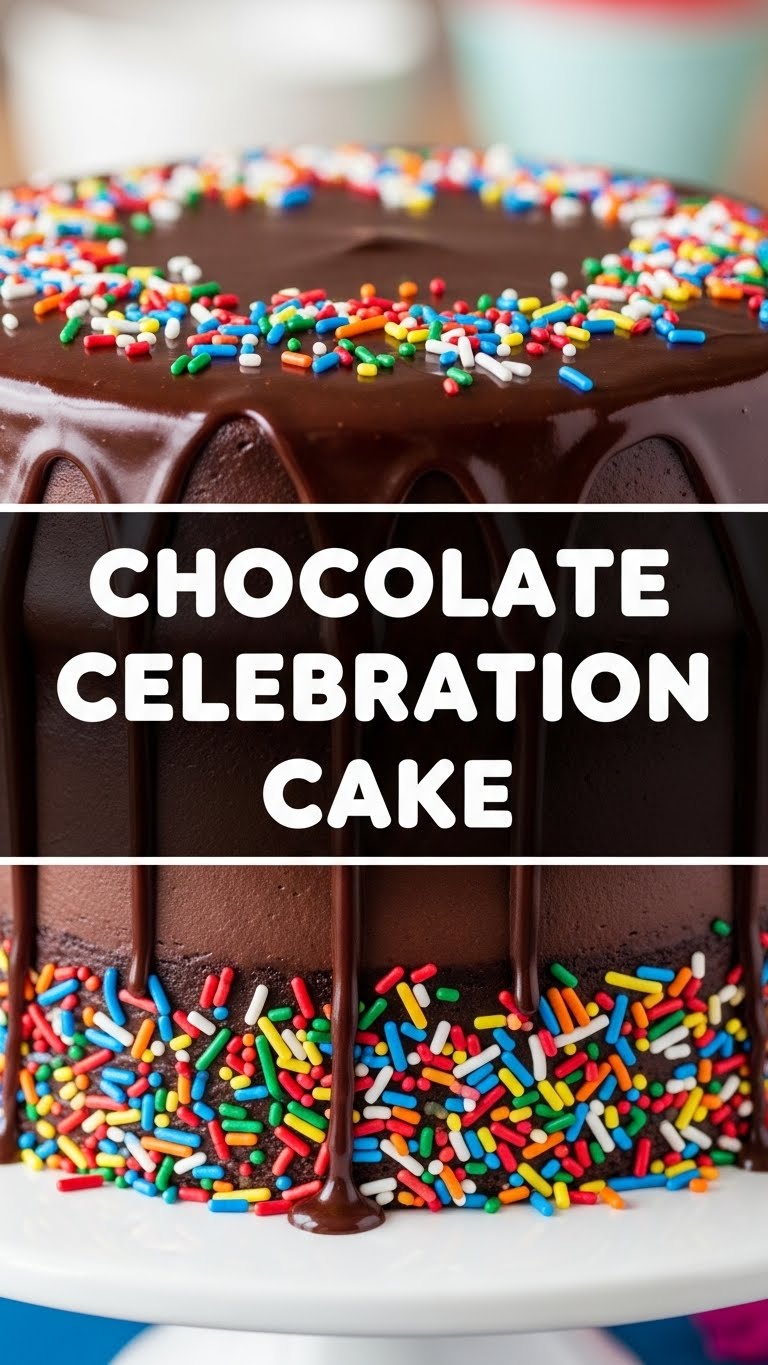
- **Assemble Your Masterpiece:** Once the cakes are completely cool (and I mean COMPLETELY!), place one layer on your serving plate. Spread about a third of the frosting evenly over the top. Gently place the second cake layer on top. Frost the top and sides of the entire cake. Decorate with sprinkles, chocolate shavings, or just dig in!
Common Mistakes to Avoid
We’ve all been there, trust me. Here are a few potholes to dodge on your path to cake glory:
- **Not preheating your oven:** Rookie mistake! Your cake needs a hot, consistent temperature from the get-go to rise properly.
- **Overmixing the batter:** This is the arch-nemesis of a tender cake. Overmixing develops the gluten, making your cake tough and chewy. Mix until *just* combined, then stop. Walk away from the whisk!
- **Not greasing/flouring your pans properly:** Unless you’re aiming for a “permanently stuck to the pan” cake, do this step right. Or, as mentioned, parchment paper is your BFF.
- **Frosting a warm cake:** You’ll end up with a landslide of frosting and a very sad-looking cake. **Wait for it to cool completely.** It’s hard, but necessary.
- **Using stale ingredients:** Old baking powder or soda won’t give your cake the lift it needs. Fresh ingredients make all the difference, FYI.
Alternatives & Substitutions
Life happens, sometimes you don’t have exactly what the recipe calls for. No stress!
- **No buttermilk? No problem!** You can easily make your own. Add 1 tablespoon of lemon juice or white vinegar to a liquid measuring cup, then fill to the 1 cup mark with regular milk. Let it sit for 5-10 minutes until it looks slightly curdled. Voila! Instant buttermilk.
- **No hot coffee?** Just use hot water. The coffee just enhances the chocolate flavor without adding a coffee taste, but hot water works perfectly fine.
- **Want a different frosting?** Go wild! A simple ganache (equal parts hot cream and chocolate, poured over) is always a winner. Or a cream cheese frosting for a tangy twist. My personal opinion? The chocolate buttercream is classic for a reason.
- **Dairy-free?** You can usually swap out dairy milk for plant-based milk (almond, soy, oat) and use a vegan butter substitute. For the buttermilk, use your plant milk + lemon juice trick.
FAQ (Frequently Asked Questions)
- **Can I use margarine instead of butter for the frosting?** Well, technically yes, but why hurt your soul like that? Butter just tastes better and gives a superior texture. IMO, it’s worth the splurge.
- **My cake layers domed in the middle, what gives?** It happens! Often, it means your oven is a little too hot, or the heat isn’t distributing evenly. You can level them with a serrated knife once cooled for easier frosting.
- **How long does this cake last?** Covered tightly at room temperature, it’s usually good for 2-3 days. In the fridge, up to 5 days. Though, honestly, it rarely lasts that long!
- **Can I add chocolate chips to the batter?** Absolutely! Who am I to say no to more chocolate? Stir in about a cup of your favorite chips with the dry ingredients.
- **Is it *really* a celebration if I eat the whole thing myself?** One hundred percent yes! You’re celebrating your good taste, your baking prowess, and your sheer joy for chocolate. Treat yo’ self!
Final Thoughts
There you have it! Your new go-to chocolate cake recipe that’s sure to impress everyone – especially yourself. Baking should be fun, a little messy, and ultimately, delicious. So don’t sweat the small stuff. Just enjoy the process, and definitely enjoy the outcome. Now go impress someone—or yourself—with your new culinary skills. You’ve earned it!

