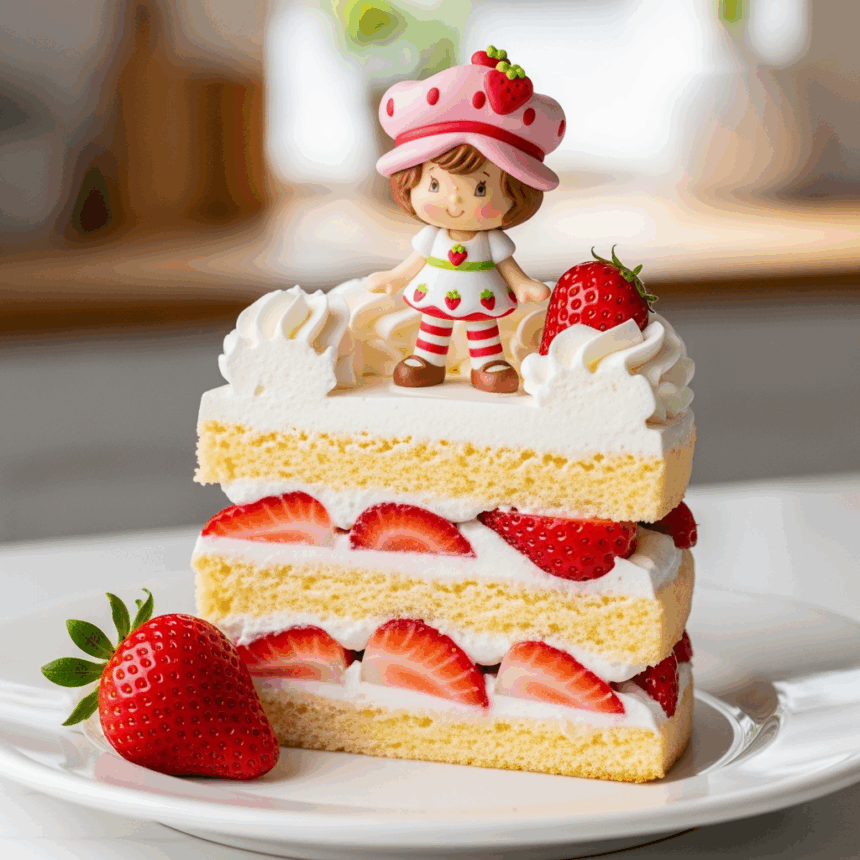
Oh. My. Goodness. Are you ready to create the most adorable (and delicious) strawberry shortcake that’ll make your Instagram followers gasp with envy? Today we’re making a classic strawberry shortcake BUT with a twist—we’re adding an adorable decorative figurine on top! It’s like dessert meets art class, except you get to eat your masterpiece afterward. Win-win!
Why This Recipe is Awesome
Let me count the ways this recipe rocks: First, it’s a strawberry shortcake, which is already happiness on a plate. Second, adding a cute little figurine on top makes it Instagram-worthy without requiring actual artistic talent (phew!). Third, you can customize the figurine to match any theme—birthdays, holidays, or just a random Tuesday when you need something cute in your life. And finally, when your friends ask where you bought it, you get to smugly say, “Oh this? I made it.” *Hair flip*
Ingredients You’ll Need
For the shortcake:
- 2 cups all-purpose flour (the regular stuff, nothing fancy)
- 1/4 cup granulated sugar (sweet, like your personality)
- 1 tablespoon baking powder (the magic that makes it rise)
- 1/2 teaspoon salt (just a pinch, like your patience some days)
- 1/2 cup cold unsalted butter, cubed (COLD butter, people—this is non-negotiable)
- 2/3 cup cold heavy cream (because we’re not counting calories today)
- 1 teaspoon vanilla extract (the good stuff, not the fake stuff)
- 1 large egg (room temperature, please)
For the filling:
- 4 cups fresh strawberries, hulled and sliced (frozen works in emergencies, but fresh is best)
- 1/4 cup granulated sugar (adjust to your sweet tooth)
- 2 cups heavy whipping cream (cold from the fridge)
- 1/4 cup powdered sugar (the fancy dust that makes everything better)
- 1 teaspoon vanilla extract (again, the real stuff)
For the decorative figurine:
- 1/2 cup white fondant (store-bought is fine, we’re not martyrs)
- Food coloring (pick colors that match your mood or occasion)
- Small food-safe sculpting tools (or toothpicks work in a pinch)
- Edible markers for details (optional but fun)
Step-by-Step Instructions
For the shortcake:
- Preheat your oven to 400°F (205°C). Line a baking sheet with parchment paper. Don’t skip this step unless you enjoy scraping cake off your pan!
- In a large bowl, whisk together flour, sugar, baking powder, and salt. Think of it as creating a sandy beach for your butter to vacation in.
- Add the cold butter cubes to your dry ingredients and use a pastry cutter (or two forks if you’re not fancy) to cut the butter until the mixture resembles coarse crumbs. It should look like chunky sand at this point.
- In a separate small bowl, whisk together the cold cream, vanilla, and egg. Pour this into your flour-butter beach and stir until just combined. Do. Not. Overmix. Seriously, put the spoon down when it comes together.
- Turn the dough onto a lightly floured surface and gently form into a round disc about 1-inch thick. Cut into 8 wedges (like a pizza) or use a round biscuit cutter for circles.
- Place shortcakes on your prepared baking sheet, brush tops with a little extra cream, and sprinkle with sugar because… why not?
- Bake for 15-18 minutes until golden brown. They should look like they got a nice tan at that beach we were talking about earlier.
For the strawberry filling:
- Place sliced strawberries in a bowl, sprinkle with sugar, and let them hang out for about 30 minutes. They’re getting juicy and flavorful—kinda like gossip hour.
- In a cold bowl (yes, you can actually chill your bowl in the freezer for 10 minutes first), whip the heavy cream, powdered sugar, and vanilla until stiff peaks form. This means when you lift your beaters, the cream stands up proudly like it just won an argument.
For the decorative figurine:
- Divide your fondant into portions based on how many colors you want for your figurine. Knead food coloring into each portion until you reach your desired shade.
- Shape the main body of your figurine first—this could be a little animal, cartoon character, or whatever your heart desires. Use your sculpting tools to add details.
- Create smaller parts (like arms, legs, ears) and attach them to the main body using a tiny bit of water as “glue.” Let your figurine dry slightly while you assemble the cake.
- If using edible markers, add facial features or details once the fondant has firmed up a bit.
Assembly:
- Cut your shortcakes horizontally through the middle. Think of it as giving them an equator.
- Place bottom halves on plates, top with a generous spoonful of macerated strawberries and their juice.
- Add a dollop of whipped cream on top of the strawberries. Be generous—this isn’t the time for modesty.
- Place the top half of the shortcake on the whipped cream, then add another layer of strawberries and a final cloud of whipped cream.
- Gently place your fondant figurine on top of the whipped cream. Ta-da! It’s like your dessert now has a mascot!
Common Mistakes to Avoid
Let’s keep you from face-planting into these common shortcake disasters:
- Using warm butter in your shortcake. Unless you want a pancake instead of a biscuit, keep that butter COLD.
- Overworking the dough. This isn’t bread; you’re not trying to develop gluten. Mix until just combined, then step away from the bowl!
- Skipping the strawberry maceration time. Those 30 minutes of “berry relaxation” are what create that lovely syrupy juice. Patience, young padawan.
- Making your figurine too heavy. Remember, it needs to sit on top of whipped cream without sinking into oblivion.
- Assembling too far in advance. Unless you enjoy soggy shortcake (and if you do, we need to talk), assemble just before serving.
Alternatives & Substitutions
Life happens. Ingredients go missing. Here’s how to roll with it:
- No fresh strawberries? Other berries work great—raspberries, blueberries, or a mix. Peaches are amazing too when in season.
- Gluten concerns? Swap in your favorite gluten-free flour blend. You might need to adjust the liquid slightly, but it’ll work.
- No fondant for the figurine? Use marzipan instead. Or go totally different with a chocolate figurine made from melted chocolate piped onto parchment paper and allowed to set.
- Dairy-free needs? Coconut cream can replace heavy cream in both the shortcake and whipped topping. Use cold coconut oil instead of butter in the shortcake. IMO, the coconut flavor actually complements the strawberries beautifully.
- No time for homemade shortcake? I won’t tell if you use store-bought pound cake or even those little sponge cake cups. Your figurine will still steal the show.
FAQ (Frequently Asked Questions)
How far in advance can I make the components?
The shortcakes can be baked a day ahead and stored in an airtight container. The figurine can (and should) be made 1-2 days ahead so it has time to firm up. But the whipped cream and final assembly? That’s a just-before-serving situation.
Can I use Cool Whip instead of making whipped cream?
Can you also wear socks with sandals? Technically yes, but why would you when real whipped cream takes literally two minutes to make and tastes approximately 500% better?
My figurine keeps falling over. Help?
Try giving it a wider base or “planting” it slightly deeper in the whipped cream. If all else fails, use a toothpick as internal support—just warn your guests about the hidden surprise!
Can I make mini versions for a party?
Absolutely! Use a smaller biscuit cutter for the shortcakes and make tiny figurines. They’ll be adorably bite-sized and probably even cuter than the original.
Is the figurine really edible?
Yes, fondant is technically edible, though many people choose to set it aside. If you want a more delicious option, try modeling chocolate or marzipan instead.
Why did my whipped cream deflate?
Probably because you over-whipped it (it turned grainy) or under-whipped it (too soft). The sweet spot is stiff peaks that hold their shape but still look smooth and glossy.
Final Thoughts
Congratulations! You’ve just created a dessert that’s both delicious AND has a cute little resident on top. This strawberry shortcake with its decorative figurine is perfect for birthdays, baby showers, Tuesday afternoons, breakups, job promotions, or literally any time you need to remind yourself that joy can be found in a simple dessert.
Remember, the best part about this recipe is that even if your figurine looks like it was made by a kindergartener during an earthquake, it will still taste amazing. And let’s be honest—once everyone sees you’ve made an actual edible decoration, they’ll be too impressed to criticize your artistic skills.
Now go forth and create! Your strawberry shortcake masterpiece awaits, and so does the flood of compliments you’re about to receive. You’ve got this!
