So, you just binged another season of that show, and now your sweet tooth is screaming, but the thought of a complicated recipe makes you want to crawl back under the covers? Been there, done that, bought the oversized hoodie. But what if I told you there’s a chocolate cake so ridiculously easy, yet so unbelievably decadent, it feels like you’re cheating? Yep, we’re talking Chocolate Ganache Cake, baby. And trust me, if I can make this without setting off the smoke alarm, you totally can too.
Why This Recipe is Awesome (aka, why you’re about to become a dessert god/goddess)
Okay, let’s be real. We all want to look like we spent hours slaving away in the kitchen, but who actually has that kind of time (or patience)? This recipe is your secret weapon, your culinary magic trick. Here’s why it’s about to become your new best friend:
- It’s genuinely simple. No fancy techniques, no needing to understand the chemical reactions happening, just mix and bake.
- **It’s practically fool-proof.** Even if your baking skills usually stop at toast, you’ll nail this. Seriously, it’s that forgiving.
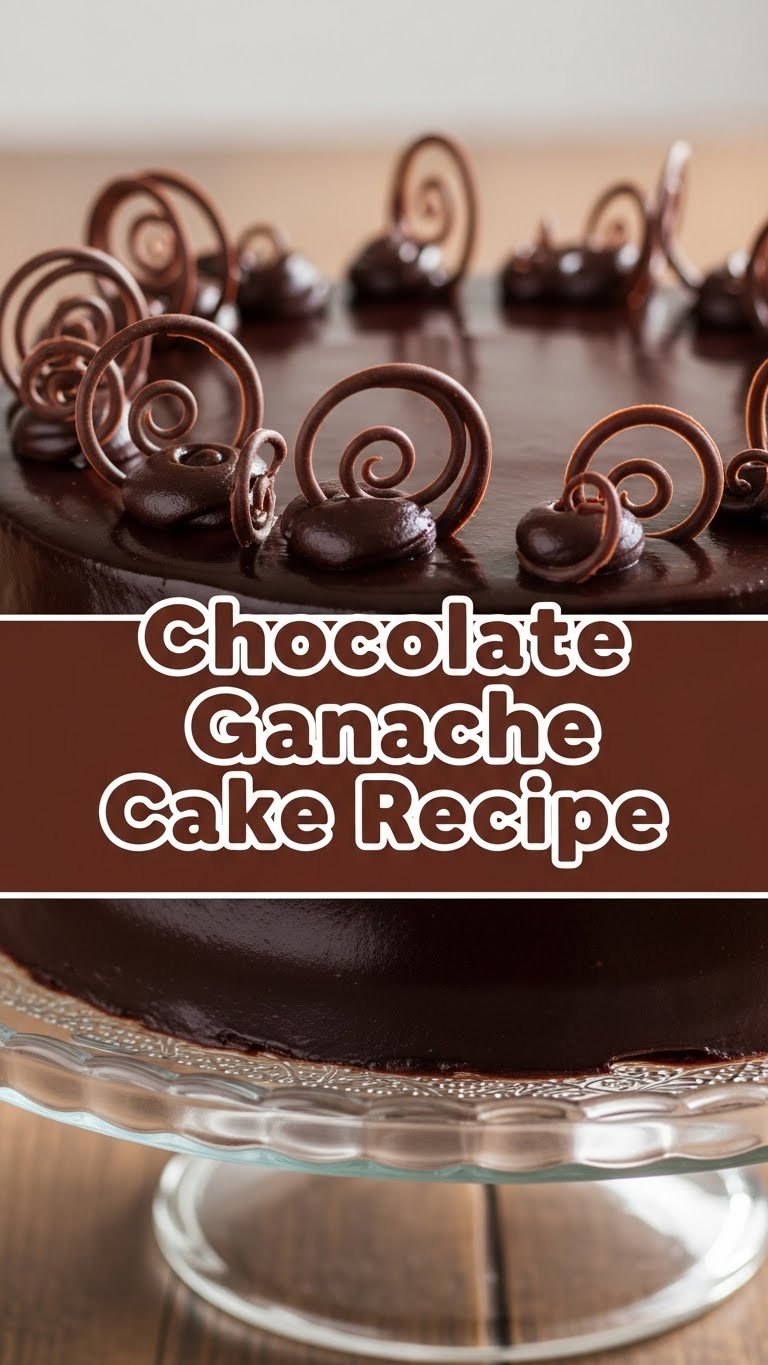
- That glossy, rich ganache? It makes the cake look like it just sashayed off the cover of a fancy food magazine. People will think you’re a pastry chef.
- It’s a chocolate explosion without the existential dread of a multi-tiered wedding cake. Pure joy, minimal effort. You’re welcome.
Ingredients You’ll Need
Gather your troops! Most of these are probably chilling in your pantry already. If not, a quick grocery run won’t hurt, especially if it involves grabbing an extra chocolate bar for “quality control.”
For the Cake:
- 1 ½ cups (180g) all-purpose flour: The backbone of our operation. Don’t overthink it.
- 1 ½ cups (300g) granulated sugar: For that sweet, sweet bliss.
- ¾ cup (65g) unsweetened cocoa powder: The darker, the better, IMO. This is where the chocolate magic truly begins.
- 1 ½ teaspoons baking soda: Our trusty lift-off agent.
- 1 teaspoon baking powder: More lift! We want fluffy, not dense.
- 1 teaspoon salt: Don’t skip this! It enhances all the other flavors.
- ¾ cup (180ml) milk: Any kind works, but whole milk gives it that extra hug.
- ⅓ cup (80ml) vegetable oil: Keeps it ridiculously moist. Yes, I said moist.
- 2 large eggs: Room temperature, please! They mix better.
- 1 teaspoon vanilla extract: The MVP of flavor. Don’t skimp on the good stuff.
- ¾ cup (180ml) boiling water or hot coffee: This is the secret weapon for ultimate moistness and a ridiculously deep chocolate flavor. Trust me.
For the Ganache:
- 1 cup (240ml) heavy cream: The richer, the better. No light stuff here; this is a treat!
- 8 ounces (225g) good quality dark chocolate: Chips or a chopped bar. Quality matters here – it’s the ganache’s soul!
Step-by-Step Instructions
Let’s get down to business! Follow these easy steps, and you’ll be a chocolate cake champion in no time.
For the Cake:
- Preheat & Prep Like a Pro: Get that oven fired up to 180°C (350°F). Grease and flour two 8 or 9-inch round cake pans. Or, if you’re fancy, line the bottoms with parchment paper. This prevents sticking, which is the worst kind of surprise.
- The Dry Stuff: In a large bowl, whisk together your flour, sugar, cocoa powder, baking soda, baking powder, and salt. Make sure there are no lumpy bits!
- The Wet Stuff: Add the milk, vegetable oil, eggs, and vanilla extract to your dry ingredients. Beat it on medium speed until everything is just combined and looks relatively smooth. Don’t overmix!
- The Secret Weapon Unleashed: Carefully (it’s hot!) pour in the boiling water or hot coffee. The batter will look thin, almost like soup, but don’t panic! Mix on low speed until everything is smooth and incorporated. This is normal.
- Bake It Up: Divide the glorious batter evenly between your two prepared cake pans. Pop them in the preheated oven and bake for 30-35 minutes. **A good trick: insert a toothpick into the center; if it comes out clean, they’re done!**
- Chill Out: Let the cakes cool in their pans for a good 10-15 minutes. This helps them firm up. Then, carefully invert them onto a wire rack to cool completely. **This part is CRUCIAL!** Warm cakes and ganache are a recipe for disaster (and a melted mess).
For the Ganache:
- Chop, Chop: If you’re using a chocolate bar, get it finely chopped. Small pieces melt faster and more evenly. Place all your chocolate into a heatproof bowl.
- Heat the Cream: Pour your heavy cream into a small saucepan and heat it over medium heat until it’s just simmering around the edges. Don’t let it boil vigorously!
- The Magic Pour: Immediately pour the hot cream over the chopped chocolate in your bowl. Let it sit there, undisturbed, for about 5 minutes. This gives the chocolate time to melt properly.
- Stir to Perfection: After its little rest, gently stir the chocolate and cream from the center outwards until it’s completely smooth, shiny, and beautiful. No lumps, please!
- Cool & Thicken: Now, the hardest part: patience. Let the ganache cool on your counter, stirring occasionally, until it thickens to a spreadable consistency. This can take anywhere from 30 minutes to an hour, depending on your kitchen’s temperature. **It should be thick enough to spread without dripping everywhere but still pourable.**
Assemble Your Masterpiece:
- First Layer Down: Place one of your completely cooled cake layers on your chosen serving plate or cake stand. Dollop about one-third of your luscious ganache onto the top and spread it evenly to the edges.
- Second Layer Up: Carefully place the second cake layer on top. Now, for the grand finale: pour the remaining ganache over the top of the cake, letting it drip artfully down the sides. Don’t fuss too much; those drips look amazing!
- Set It and Forget It (for a bit): Pop your glorious cake into the fridge for about 30 minutes to an hour to allow the ganache to firm up. This also makes slicing much cleaner.
- Devour: Slice, serve, and accept all the compliments heading your way. You’ve earned it!
Common Mistakes to Avoid
Nobody’s perfect, but we can learn from past chocolate-related mishaps. Steer clear of these rookie errors!
- Overmixing the Batter: This is a cardinal sin! Too much mixing develops gluten, leading to a tough, dry cake. Mix until just combined, then stop.
- Not Preheating the Oven: Thinking you can skip this step? Rookie mistake! An even, preheated oven is key for proper rise and texture.
- Opening the Oven Door Too Early: Your cake needs consistent heat to set. Resist the urge to peek before the timer is almost up, or your cake might get shy and sink.
- Not Letting the Cakes Cool Completely: This is a big one. Warm cakes + ganache = melted chocolate soup cascading down your counter. Exercise patience, my friend.
- Impatient Ganache-Making: Don’t stir the ganache immediately after pouring the cream. Let the hot cream do its job melting the chocolate first, then stir gently.
- Using Cheap Chocolate for Ganache: You’re making a ganache cake! Treat yourself and your taste buds. Low-quality chocolate won’t melt as smoothly and the flavor just won’t be as rich. Your cake deserves better.
Alternatives & Substitutions
Feeling adventurous or just working with what you’ve got? Here are some simple tweaks:
- Coffee for Boiling Water: This is my go-to secret. Using hot coffee instead of boiling water in the cake batter makes the chocolate flavor insanely deep and rich. Don’t worry, it won’t taste like coffee, just more intensely chocolatey. It’s a game-changer!
- Chocolate Type: While dark chocolate ganache is classic and beautiful, you can definitely use semi-sweet chocolate for a slightly milder (and sweeter) flavor. I wouldn’t recommend milk chocolate for ganache, though – it’s often too sweet and a bit less stable.
- Dairy-Free Delight: For a dairy-free version, swap out regular milk for your favorite plant-based milk (almond, oat, or soy work great) and use a neutral oil. For the ganache, use a good quality full-fat coconut cream (chill a can overnight, then scoop out the thick cream on top) and dairy-free chocolate chips.
- A Little Extra Something: Want to get fancy? Add a teaspoon of instant espresso powder to the dry cake ingredients for an even deeper chocolate note. Or, for the adults, a splash of liqueur like Kahlúa, Grand Marnier, or even a good whiskey in the ganache can add a lovely kick.
FAQ (Frequently Asked Questions)
Got questions? I’ve got (casual) answers!
- Can I make this cake ahead of time? Absolutely! The cake layers can be baked a day in advance. Just wrap them tightly in plastic wrap once completely cooled and store them at room temperature. The ganache can also be made ahead, stored in the fridge, and gently reheated/stirred when you’re ready to assemble.
- My ganache is too thin/thick, help! Oh no! If it’s too thin, just let it cool longer on the counter, stirring occasionally, or pop it in the fridge for 10-15 minute bursts (stirring after each burst). Too thick? Gently warm it over a double boiler (or in short bursts in the microwave) until it loosens up to a spreadable consistency.
- What if I only have one cake pan? No worries! You can bake one layer at a time. Just make sure the pan is cooled, cleaned, and re-prepped before pouring in the second half of the batter. It’ll just take a bit longer.
- Can I use regular chocolate chips for the ganache? Yep, absolutely! Just try to use a good quality brand that melts smoothly. Ghirardelli or Guittard chips usually work great.
- How long does this cake last? Covered tightly at room temperature, it’s generally good for 2-3 days. If you keep it in the fridge, it’ll last up to 5 days, but good luck making it last that long!
- Is it really that easy? My friend, yes, it truly is. Stop doubting your amazing culinary potential! This cake is here to prove that you are a baking superstar.
Final Thoughts
So there you have it, your ticket to chocolate nirvana without the culinary headache. This Chocolate Ganache Cake isn’t just a recipe; it’s a declaration that delicious doesn’t have to be difficult. It’s rich, it’s impressive, and it’s something you can totally brag about (I fully encourage it). Now go forth and impress someone – or, let’s be real, just yourself – with your new baking prowess. You’ve earned that slice (or three!). Happy baking, you rockstar!


