Ever had one of those days where you just *need* something decadent, but the thought of spending hours in the kitchen makes you want to curl up with a bag of chips instead? Yeah, me too. But what if I told you there’s a cake that looks like you slaved over it for days, tastes like a dream, and is actually, truly, wonderfully straightforward? Enter the Chocolate Matcha Cake: your new favorite obsession that marries the deep richness of chocolate with the earthy, vibrant zing of matcha. It’s a flavor party, and everyone’s invited!
Why This Recipe is Awesome
Okay, let’s get real. This isn’t just *any* cake recipe. This is the kind of recipe you pull out when you want to impress someone (or just yourself, no judgment here) without breaking a sweat. It’s got that fancy cafe vibe but in your own kitchen. Think about it:
- It’s a two-in-one flavor explosion. Chocolate lovers and matcha fanatics, unite!
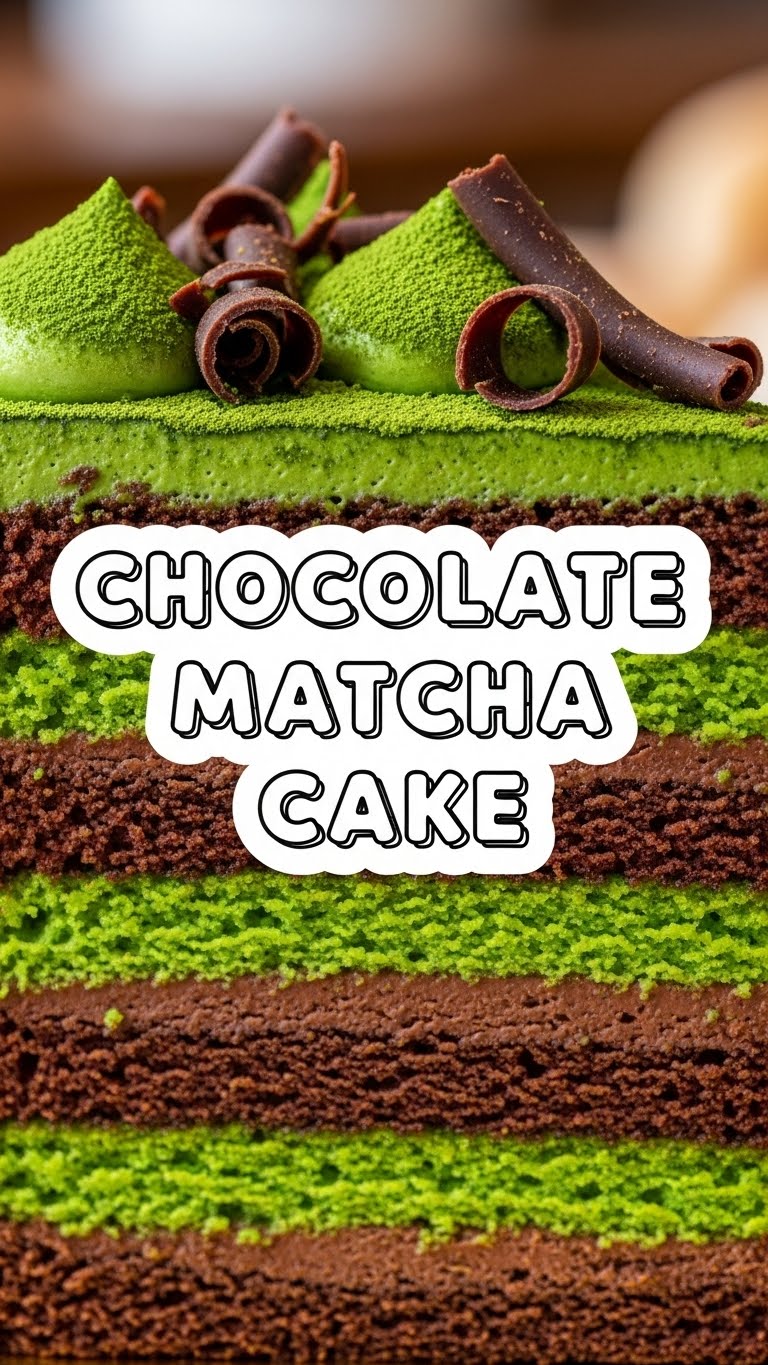
- Visually stunning. The contrasting green and brown layers? *Chef’s kiss*.
- **It’s surprisingly forgiving.** Even if your baking skills are usually on par with a toddler’s art project, you can totally nail this.
- It smells incredible while it bakes. Your neighbors might just invite themselves over, FYI.
Ingredients You’ll Need
No obscure, hard-to-find stuff here. Just the good ol’ basics with a couple of superstar additions:
- **All-Purpose Flour:** The foundation of your cakey dreams.
- **Granulated Sugar:** Sweetness, because life’s too short for bitter cake.
- **Unsweetened Cocoa Powder:** Go for good quality! This is where the chocolate magic happens.
- **Good Quality Matcha Powder:** Don’t skimp here! This is the star of the other layer, and cheap matcha tastes like disappointment.
- **Baking Powder & Baking Soda:** Your leavening dynamic duo. They make the cake light and fluffy, not dense like a brick.
- **Salt:** Just a pinch to make all those other flavors sing.
- **Large Eggs:** Binders and moisteners. Room temp is best, trust me.
- **Whole Milk:** Adds richness and moisture.
- **Vegetable Oil:** For a super moist crumb that stays soft for days.
- **Vanilla Extract:** The unsung hero of almost every good dessert.
- **Hot Water:** For a little extra magic in the chocolate batter.
- **For the Frosting (optional, but highly recommended):** Unsalted butter (softened), powdered sugar, milk/cream, vanilla extract, and a little more matcha.
Step-by-Step Instructions
Ready to get baking? Let’s do this! Remember, **read all steps first** before you even crack an egg.
- **Prep Your Pans & Oven:** Preheat your oven to 350°F (175°C). Grease and flour two 8-inch round cake pans. Or, if you’re smart like me, line the bottoms with parchment paper. It’s a lifesaver!
- **Mix Dry Ingredients (Chocolate):** In a large bowl, whisk together 1 ½ cups flour, 1 ¾ cups sugar, ¾ cup cocoa powder, 1 ½ tsp baking soda, 1 ½ tsp baking powder, and 1 tsp salt. Give it a good whisk to get rid of any lumps.
- **Mix Wet Ingredients (Chocolate):** In another bowl, combine 2 large eggs, 1 cup milk, ½ cup vegetable oil, and 2 tsp vanilla extract. Whisk until well combined.
- **Combine Chocolate Batters:** Pour the wet ingredients into the dry ingredients. Mix on low speed until just combined. Then, carefully stir in 1 cup of hot water. The batter will be thin – don’t panic, it’s supposed to be!
- **Bake Chocolate Layers:** Divide the chocolate batter evenly between your two prepared pans. Bake for 30-35 minutes, or until a toothpick inserted into the center comes out clean. Let them cool in the pans for 10 minutes, then invert onto a wire rack to cool completely.
- **Repeat for Matcha Layer (or bake separately):** Now for the green goodness! In a clean bowl, whisk together 1 ½ cups flour, 1 ½ cups sugar, 2-3 tablespoons matcha powder (depending on your matcha love), 1 ½ tsp baking soda, 1 ½ tsp baking powder, and ½ tsp salt.
- **Mix Wet Ingredients (Matcha):** In a separate bowl, whisk 2 large eggs, 1 cup milk, ½ cup vegetable oil, and 2 tsp vanilla extract.
- **Combine Matcha Batters:** Pour the wet ingredients into the dry matcha mix and stir until just combined. Divide the matcha batter between two *clean* 8-inch round cake pans (or if you only have two pans, wait until the chocolate ones are out and cleaned, then bake the matcha layers).
- **Bake Matcha Layers:** Bake for 30-35 minutes, or until a toothpick comes out clean. Cool similarly to the chocolate layers.
- **Frost & Assemble:** Once all cake layers are completely cool (this is crucial, unless you want frosting soup!), make your favorite buttercream and mix in a little matcha powder for a green tint. Layer chocolate, frosting, matcha, frosting, chocolate, frosting, matcha. Or alternate as you wish! Get creative, this is your masterpiece!
Common Mistakes to Avoid
We all make mistakes, but let’s try to avoid these rookie errors, shall we?
- **Not Greasing & Flour-ing/Parchment-lining Your Pans:** Seriously, unless you enjoy archaeological digs to extract cake from metal, prep your pans properly.
- **Overmixing the Batter:** This is a big no-no. Overmixing develops the gluten too much, leading to a tough, dry cake. Mix until *just* combined.
- **Opening the Oven Door Too Early:** You know that curious peek? Resist! It drops the oven temperature and can make your cake sink. Wait until the minimum baking time is up.
- **Trying to Frost Warm Cake:** This isn’t just a mistake, it’s a crime against deliciousness. **Always wait until your cakes are completely cool.** Or you’ll have a runny, sad mess.
- **Skimping on Matcha Quality:** Cheap matcha tastes grassy and bitter. Invest in ceremonial or high-grade culinary matcha for the best flavor and color. Your taste buds will thank you.
Alternatives & Substitutions
Feeling rebellious? Here are some tweaks you can make:
- **Milk:** You can totally swap whole milk for a plant-based milk (almond, oat) if you’re dairy-free or just prefer it. The texture might be *slightly* different, but still delish.
- **Oil:** Melted butter can replace vegetable oil for a richer flavor, though the oil gives a super moist cake. Your call!
- **Frosting:** Not a buttercream person? A simple chocolate ganache on the chocolate layers and a cream cheese frosting on the matcha layers (or vice versa!) would be divine. Or just a dusting of powdered sugar if you’re feeling minimalist.
- **Flavor Boosts:** Add a shot of espresso to the chocolate batter for an even deeper flavor, or a touch of almond extract to the matcha batter for something unexpected.
FAQ (Frequently Asked Questions)
- **Can I make this as a bundt cake?** You absolutely can! Just ensure your bundt pan is thoroughly greased and floured, and adjust baking time as needed – it might take a bit longer.
- **My cake sunk in the middle, what happened?** Oh, the horror! Usually, this means the oven wasn’t hot enough, the batter was overmixed, or you opened the oven door too soon. Keep those oven doors closed, folks!
- **Can I use instant coffee instead of cocoa powder?** Uh, no. That would be a coffee cake, not a chocolate cake. Totally different vibe.
- **Is ceremonial grade matcha necessary?** For the best flavor and vibrant green color, yes. Culinary grade is fine, but make sure it’s good quality. Cheap matcha can taste like hay. Don’t do that to yourself.
- **How long does this cake last?** If stored in an airtight container at room temp, it’s good for 3-4 days. In the fridge, maybe up to a week. But honestly, it rarely lasts that long in my house!
- **Can I freeze the cake layers?** Yes! Once completely cool, wrap them tightly in plastic wrap and then foil. They’ll last up to 2-3 months. Just thaw at room temperature before frosting.
Final Thoughts
See? That wasn’t so scary, was it? You just made a show-stopping, flavor-packed Chocolate Matcha Cake. You’re basically a kitchen wizard now. So go ahead, slice into that beauty, grab a huge piece (or two, I’m not judging), and bask in the glory of your culinary triumph. You’ve earned it. Now go impress someone – or yourself – with your new skills. Happy baking, friend!


