So you’re craving something ridiculously tasty but too lazy to spend forever slaving away in the kitchen, huh? Same, friend, *same*. We’re talking about that sweet spot where maximum deliciousness meets minimum effort. And let me tell you, I’ve found it. It lives in the glorious realm of the Chocolate Chip Ice Cream Cake. Prepare yourself for pure, unadulterated, chill-out-and-enjoy culinary genius.
Why This Recipe is Awesome
Because it’s basically a hug in dessert form, and you barely have to lift a finger. Seriously, this isn’t one of those recipes where you read “easy” and then end up covered in flour and regret. This is *actually* easy. It’s practically idiot-proof; even I didn’t mess it up, and my kitchen skills sometimes peak at microwaving popcorn. It’s perfect for impressing guests (who will think you’re a dessert wizard), for a birthday, or, let’s be real, for a Tuesday night when you just need something decadent. No oven required for the main event, just your freezer doing all the heavy lifting. Win-win!
Ingredients You’ll Need
Gather your troops! Here’s what’s standing between you and dessert glory:
- Chocolate Chip Cookies: About 30-36 of ’em. Store-bought is your best friend here. Don’t be a hero unless you really want to.
- Unsalted Butter: ½ cup (which is one stick), melted. Because everything’s better with butter.
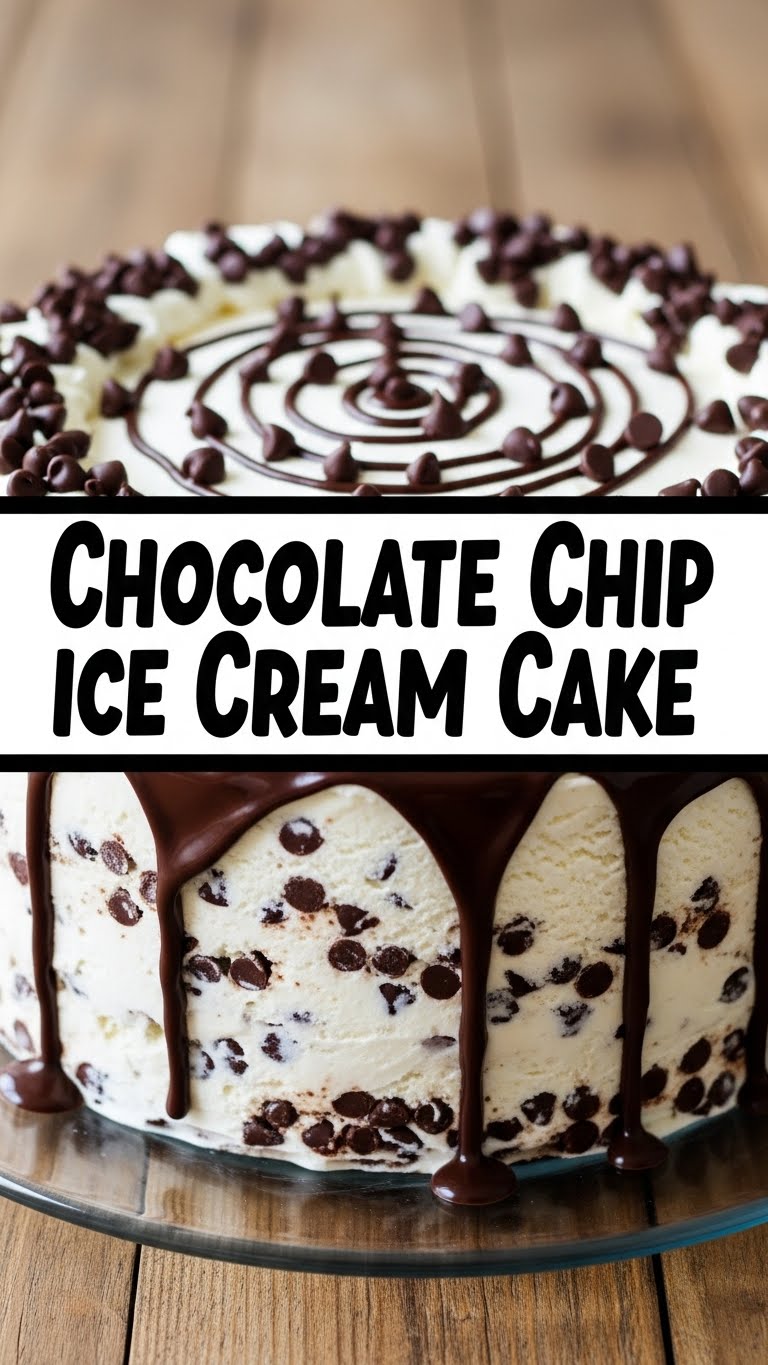
- Chocolate Chip Ice Cream: 1.5 quarts (about 6 cups). Or vanilla, or cookie dough, or whatever your heart desires. But, you know, chocolate chip makes sense here.
- Hot Fudge Sauce: 1 jar (about 12-16 oz). The gooey-er, the better.
- Whipped Topping: 1 large tub (8 oz), like Cool Whip. Or make your own if you’re feeling fancy (but remember the “lazy” part?).
- Mini Chocolate Chips: ¼ cup (or more, no judgment) for sprinkling. Because you can never have too many.
- Sprinkles (optional): For a party vibe!
Step-by-Step Instructions
Alright, let’s get this party started. Grab an 8 or 9-inch springform pan, my friend.
- Crush Those Cookies: In a food processor, pulse your chocolate chip cookies until they’re fine crumbs. No food processor? Stick ’em in a Ziploc bag and bash ’em with a rolling pin or a can. It’s therapeutic!
- Make the Crust: Pour the melted butter over the cookie crumbs and mix until it’s all nicely combined. It should look like wet sand.
- Press and Chill: Press the cookie mixture evenly into the bottom of your springform pan. Use the back of a spoon or your hands. Pop it in the freezer for at least 15-20 minutes to set up. Don’t skip this step!
- Soften the Ice Cream: While the crust is chilling, take your chocolate chip ice cream out of the freezer. Let it soften on the counter for about 10-15 minutes until it’s spreadable but not totally melted.
- Layer It Up: Spoon the softened ice cream over your chilled crust. Spread it out evenly.
- First Freeze: Put the pan back in the freezer for at least 30 minutes, or until the ice cream layer is firm.
- Sauce It: Warm your hot fudge sauce slightly (microwave for 30 seconds or so) until it’s pourable. Drizzle it generously over the firm ice cream layer. Don’t use hot fudge right out of the fridge; it won’t spread well.
- Second Freeze: Back to the freezer! Let it chill for at least 1-2 hours, or until the fudge is firm.
- Whip It Good: Spread the whipped topping over the fudge layer. Make it look pretty!
- Decorate and Final Freeze: Sprinkle with mini chocolate chips and any other fun toppings. Cover loosely with plastic wrap and freeze for at least 4-6 hours, or even better, overnight. This gives it maximum firmness and makes slicing a dream.
- Serve It Up: When you’re ready to serve, remove the cake from the freezer and let it sit at room temperature for about 5-10 minutes. This makes slicing easier. Run a thin knife around the edge of the pan before releasing the springform sides. Slice, serve, and bask in the glory!
Common Mistakes to Avoid
Nobody’s perfect, but we can learn from past blunders! Here are a few things to watch out for:
- Not Freezing Enough: This is probably the biggest rookie mistake. If your layers aren’t firm before adding the next one, you’ll end up with a sloshy, melty mess. Patience is a virtue, especially with ice cream cake!
- Over-Softening the Ice Cream: You want it spreadable, not liquid. If it’s too soft, it’ll melt into your crust and make things messy.
- Using Cold Fudge: Trying to spread thick, cold fudge will just tear up your ice cream layer. Warm it gently so it drizzles smoothly.
- Not Covering Properly: Ice cream can absorb freezer smells. Cover your cake loosely with plastic wrap to keep it fresh and tasting fantastic.
- Skimping on Toppings: Why? Just why? This is your moment to go wild. More chocolate chips are always a good idea.
Alternatives & Substitutions
Feeling adventurous, or just working with what you’ve got? No problem, chef!
- Cookie Crust: Not a chocolate chip cookie fan (gasp!)? You can use Oreos, graham crackers, Nilla Wafers, or even ginger snaps for a different flavor profile.
- Ice Cream Flavor: Seriously, the world is your oyster here. Mint chip, strawberry, coffee, cookie dough, even rainbow sherbet for a super fun twist. Go wild!
- Sauces: Instead of hot fudge, try caramel sauce, peanut butter sauce, dulce de leche, or even a berry compote.
- Toppings Galore: Beyond chocolate chips, think chopped nuts, candy bar pieces, fresh berries (add right before serving), sprinkles, or even a drizzle of magic shell. IMO, the more toppings, the merrier.
- Pan Swap: No springform? You can use a regular 9×13 inch baking dish. Just know you won’t get those pretty clean edges, and you’ll have to scoop it out.
FAQ (Frequently Asked Questions)
- Can I make this ahead of time? Heck yes! This cake is practically *designed* for make-ahead convenience. Whip it up a day or two before your event, keep it frozen, and you’re golden.
- How long will it last in the freezer? If properly covered, it’ll last up to a week. But let’s be real, it won’t last that long. It’s too delicious.
- Do I really need a springform pan? While not *strictly* necessary, it makes releasing the cake so much easier and gives you those beautiful, clean sides. If you don’t have one, a regular round cake pan lined with parchment paper with an overhang (to lift it out) can work in a pinch.
- Can I use homemade cookies/ice cream? Absolutely, if you’re feeling ambitious! But remember, the whole point here is ease. Store-bought is perfectly acceptable and delicious for this recipe.
- What if my ice cream is too hard to spread? Just let it sit out a little longer. Nobody likes wrestling with rock-hard ice cream. Give it another 5-10 minutes.
- Can I add multiple ice cream flavors? Ooh, now you’re talking! Yes, you totally can. Just make sure each layer freezes solid before adding the next.
Final Thoughts
There you have it! A dessert that’s ridiculously easy, utterly delicious, and guaranteed to put a smile on everyone’s face. You’ve now mastered the art of the Chocolate Chip Ice Cream Cake without breaking a sweat. So go on, impress someone—or just yourself—with your new culinary superpowers. You’ve earned it, you magnificent dessert creator!


