So you’re craving something ridiculously tasty but too lazy to spend forever in the kitchen, huh? Same, friend, same. We’ve all been there – staring into the abyss of an empty fridge, knowing we *should* make something, but the couch beckons. Well, today, my chocolate-loving compadre, we’re diving headfirst into the glorious, gooey world of **Chocolate Molten Cake**. And trust me, it’s easier than trying to get a toddler to eat their veggies.
Why This Recipe is Awesome
Let’s be real, life is chaotic. So, your dessert should be an oasis of calm, not another stressful project. This molten cake recipe? It’s your culinary zen garden. Here’s why it’s about to become your new best friend:
- **It’s ridiculously quick.** We’re talking 20 minutes from “I want cake” to “OMG, I’m eating cake.” No faffing about with complicated layers or endless cooling times.
- **It’s idiot-proof.** Seriously, if I, a person who once set off the fire alarm microwaving popcorn, can make this perfectly, so can you. It’s practically magic.
- **It looks fancy AF.** Imagine serving this up. Your guests (or just your significant other, or just *you*) will think you’re a five-star pastry chef. Little do they know, you basically just melted some chocolate and whispered sweet nothings to an oven.
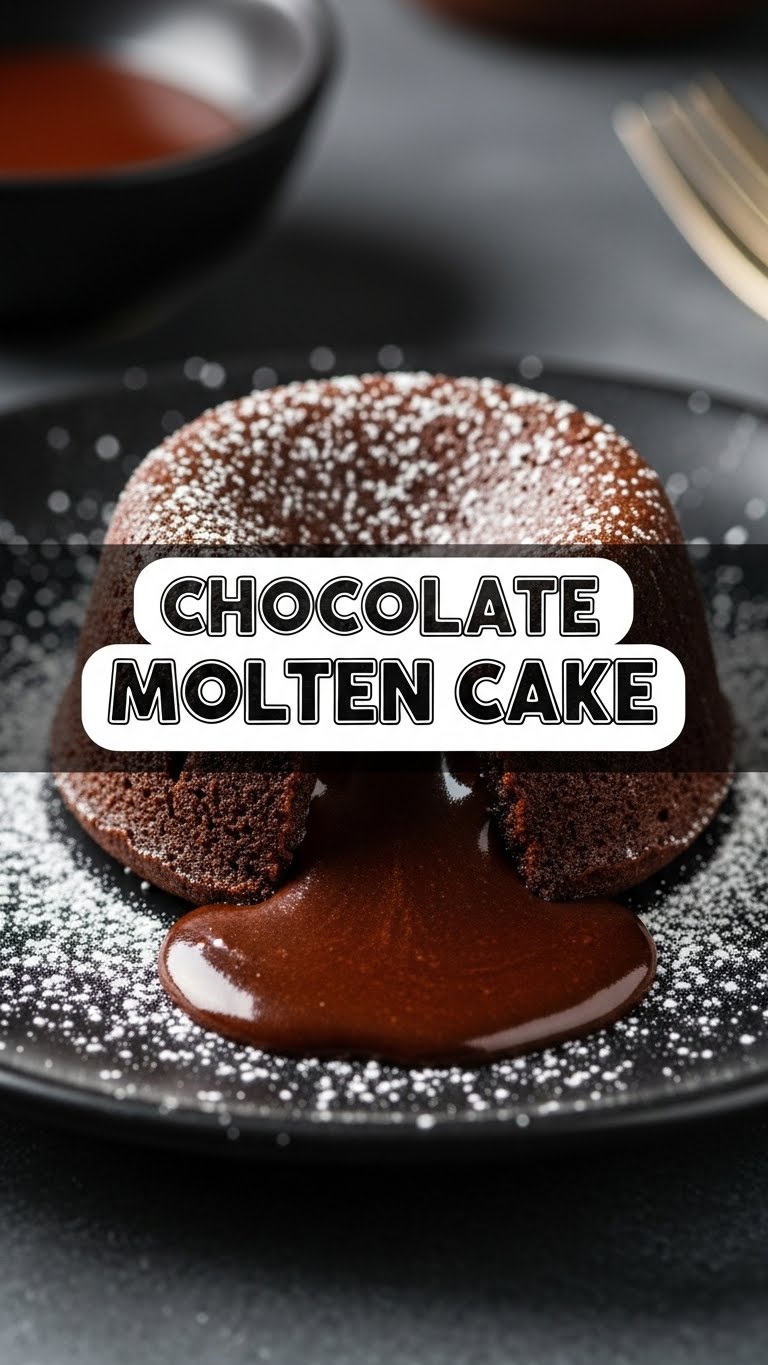
- **That molten center.** Need I say more? It’s a warm, chocolatey river of pure bliss. It’s what dreams are made of.
Ingredients You’ll Need
Gather ’round, my little kitchen wizard! Here’s your treasure map to molten chocolate glory. Keep it simple, keep it real.
- **1/2 cup (1 stick) unsalted butter:** The real deal, folks. Don’t you dare reach for margarine unless you want to hurt your soul.
- **6 ounces good quality bittersweet or semi-sweet chocolate:** This is the star of the show. **Don’t skimp here!** Think Ghirardelli, Lindt, or whatever makes your heart sing. Cheap chocolate makes cheap cake, and you deserve better.
- **2 large eggs:** The binders of our chocolatey destiny.
- **2 large egg yolks:** Extra richness, extra gooeyness. Because we’re extra like that.
- **1/4 cup granulated sugar:** Just a whisper of sweetness to balance that deep chocolate flavor.
- **2 tablespoons all-purpose flour:** Just enough to give it a little structure without turning it into a brick. We want molten, not dense!
- **A pinch of salt:** Enhances all the flavors. It’s like the unsung hero of baking.
- **Optional, but highly recommended:** A tiny bit of cocoa powder for dusting your ramekins.
Step-by-Step Instructions
Alright, apron on (or not, we don’t judge), let’s make some magic happen!
- **Preheat Your Oven & Prep Your Ramekins:** Crank that oven to **425°F (220°C)**. This high heat is key to getting those perfectly crisp edges and gooey centers. Next, grab four 6-ounce ramekins. **Generously butter them all up**, making sure to get every nook and cranny. For an extra non-stick, chocolaty touch, dust them lightly with cocoa powder. Tap out any excess. This step is non-negotiable, unless you like eating cake directly from the dish with a spoon (which, tbh, is also a valid life choice).
- **Melt the Chocolate & Butter:** In a heatproof bowl set over a small saucepan of simmering water (a “double boiler”), or carefully in the microwave in 30-second intervals, melt your butter and chopped chocolate together. Stir until smooth and glorious. Let it cool slightly while you move to the next step.
- **Whisk the Eggs & Sugar:** In a separate medium bowl, whisk together your whole eggs, egg yolks, and sugar until the mixture is light, pale, and slightly frothy. This usually takes about 1-2 minutes.
- **Combine the Mixtures:** Pour the slightly cooled chocolate-butter mixture into the egg mixture. Whisk them together until just combined. Don’t go crazy here; we don’t want to introduce too much air.
- **Fold in the Dry Ingredients:** Gently fold in the flour and that pinch of salt. **Mix just until no streaks of flour remain.** Overmixing is the enemy of molten lava cake – it develops gluten and makes your cake tough. We want tender and gooey!
- **Fill ‘Em Up!** Divide the batter evenly among your four prepared ramekins. Don’t fill them to the very brim; leave a little room for expansion.
- **Bake to Perfection:** Carefully place the ramekins on a baking sheet (to catch any potential overflow, though it’s rare) and slide them into your preheated oven. Bake for **12-14 minutes.** How do you know they’re done? The edges should be set and slightly firm, but the center should still be jiggly when you gently shake the ramekin. **This jiggly center is your molten gold!**
- **Serve Immediately:** This is crucial! Let them cool for just 1 minute in the ramekins (seriously, no longer). Then, carefully invert each cake onto a serving plate. A little dust of powdered sugar, a scoop of vanilla ice cream, or some fresh berries are highly encouraged.
Common Mistakes to Avoid
Nobody’s perfect, but we can avoid common pitfalls that turn molten dreams into solid disappointments. Learn from my past mistakes, my friend:
- **Not preheating the oven:** Rookie mistake! That high, immediate heat is what gives you that magical contrast of baked exterior and gooey interior. Don’t rush it.
- **Overmixing the batter:** It’s not a smoothie, it’s a cake batter! Overmixing develops gluten, which means tough, chewy cake instead of light, tender goodness. Mix until *just* combined.
- **Overbaking:** This is the cardinal sin of molten cakes. Bake it too long, and you’ll have a perfectly delicious little chocolate brownie, but no molten center. Keep an eye on that jiggle!
- **Using cold ramekins:** If your ramekins are fresh out of the fridge, the batter will bake unevenly. Room temp is best, or give them a quick warm-up in the oven for a minute.
- **Using crummy chocolate:** Again, you get what you pay for. A quality chocolate makes all the difference in flavor.
Alternatives & Substitutions
Feeling a little adventurous? Want to customize your molten masterpiece? Let’s get creative!
- **Chocolate Swap:** While bittersweet is my personal fave for that intense chocolate hit, you can absolutely use semi-sweet for a sweeter profile. You could even try a high-quality milk chocolate for a milder, creamier flavor, though the “molten” might be a bit less dramatic.
- **Flavor Boosters:** A tiny bit of **espresso powder** (1/2 tsp) mixed with the dry ingredients will deepen the chocolate flavor without tasting like coffee. Or, for a zesty twist, add a teaspoon of **orange zest** to the melted chocolate. Feeling spicy? A tiny pinch of **cayenne pepper** can add a fun, unexpected kick!
- **Gluten-Free?** No problem! Substitute the all-purpose flour with a 1:1 gluten-free baking blend that contains xanthan gum.
- **No Ramekins?** If you’re in a pinch, you can use oven-safe custard cups, small oven-safe coffee mugs, or even a muffin tin (just grease and cocoa the wells well, and bake for a shorter time, about 8-10 minutes).
FAQ (Frequently Asked Questions)
Got questions? I’ve got answers! (Mostly.)
Q: Can I make the batter ahead of time?
A: Absolutely! You can whisk up the batter, cover it, and pop it in the fridge for up to 24 hours. Just give it a little stir before dividing it into ramekins, and you might need to add an extra minute or two to the baking time since the batter will be cold.
Q: How do I know when it’s perfectly molten?
A: The edges should look set and slightly puffed, but the very center should still jiggle like a bowl of Jell-O when you give the ramekin a gentle nudge. If it looks completely solid, you’ve probably overbaked it, my friend. Don’t cry, just learn for next time!
Q: Can I use margarine instead of butter?
A: Well, technically yes, but why hurt your soul like that? Butter provides a richer flavor and better texture. IMO, stick to butter for the best results.
Q: My cake didn’t release from the ramekin! What happened?
A: Ah, the dreaded stuck cake! This usually means you didn’t butter and cocoa your ramekins generously enough. Next time, go wild with the butter and don’t skip the cocoa dusting – it creates a lovely non-stick layer.
Q: Can I reheat leftover molten cake?
A: You *can*, but it won’t be quite as “molten.” Pop it in the microwave for 10-20 seconds, or a low oven for a few minutes. It’ll still be delicious, just more like a warm, fudgy cake.
Q: What if I don’t like bittersweet chocolate?
A: No stress! Use semi-sweet chocolate for a sweeter, milder flavor. You’re the boss of your dessert experience!
Final Thoughts
So there you have it, folks! The secret to making a show-stopping, ridiculously delicious Chocolate Molten Cake without breaking a sweat (or a bunch of dishes). It’s quick, it’s easy, and it’s guaranteed to satisfy any chocolate craving you might have. Now go forth and conquer that kitchen! You’ve officially earned your culinary genius badge. Go impress someone—or yourself—with your new skills. You’ve earned it!


