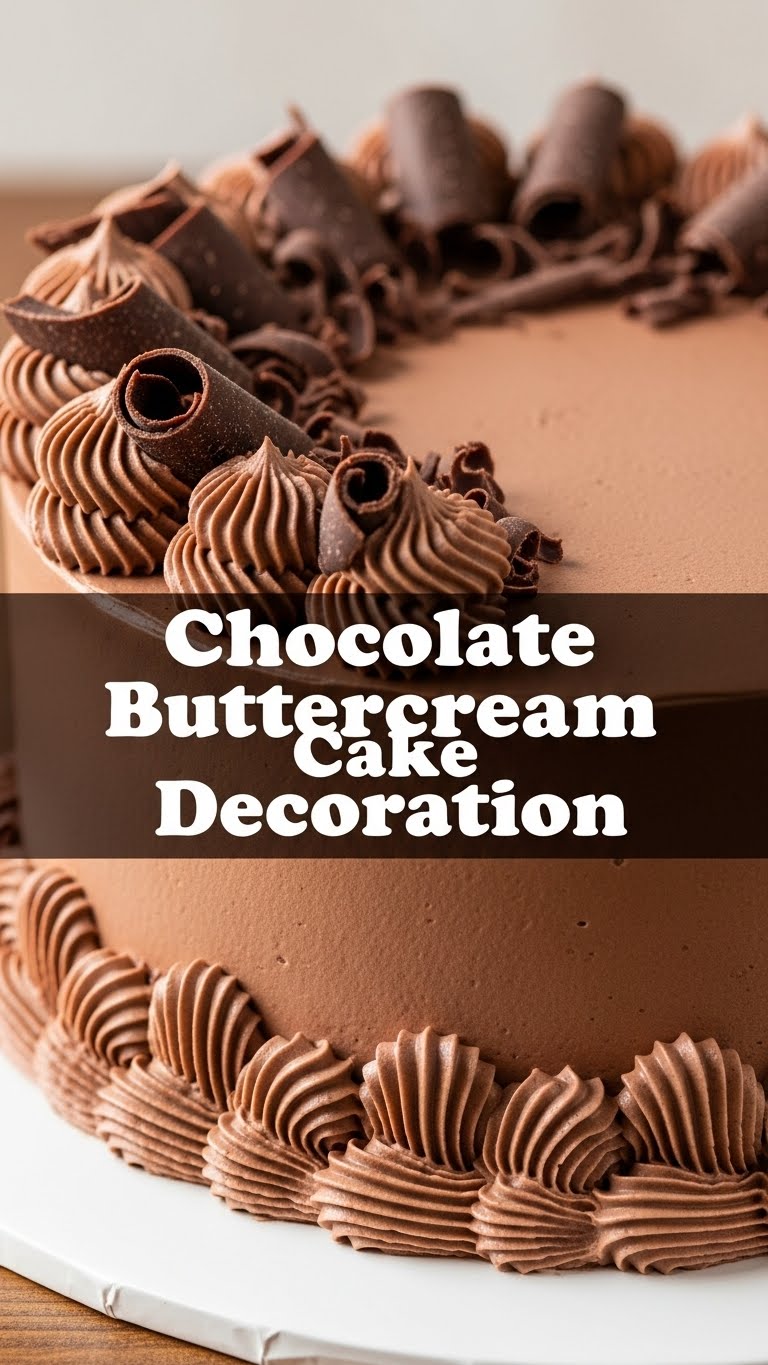
Okay, listen up, buttercup! Ever scrolled through Instagram, saw those impossibly perfect cakes, and thought, “Gah, I could never”? Or maybe you *can* bake a decent cake but decorating feels like a task for someone with a culinary degree and way more patience than you? Same. My friend, today we’re tackling the Everest of dessert decoration – chocolate buttercream – but we’re doing it the “fun-and-not-stressing-out” way. Get ready to turn your cakes from “meh” to “OMG, you made that?!” without breaking a sweat (or a whisk). Let’s get this party started!
Why This Recipe is Awesome
Why bother with this recipe, you ask? Because it’s basically the culinary equivalent of that comfy sweatpants outfit you wear on a Saturday – totally reliable, makes you feel good, and always delivers. Seriously, it’s idiot-proof. If I, a person who once set off the smoke detector making toast, can nail this, so can you. It’s rich, chocolatey, perfectly pipeable (yes, that’s a word now), and transforms any sad-looking cake into a masterpiece. Plus, the aroma while you’re making it? Pure happiness. It’s also super versatile, so you can go wild or keep it simple. Your cake, your rules!
Ingredients You’ll Need
Gather ’round, fellow kitchen adventurers! Here’s your treasure map of ingredients for this glorious chocolatey goodness. No exotic rainforest berries required, just the good stuff.
- Unsalted Butter (room temperature): About 2 sticks (1 cup / 226g). And by “room temperature,” I mean actually room temperature, not “I just took it out of the fridge five minutes ago, that counts, right?” Nope. Soft, but not melted. It’s crucial, trust me on this one.
- Powdered Sugar (also known as Confectioners’ Sugar): Around 3-4 cups (360-480g). Sifted, please! Unless you enjoy gritty frosting, which, you do you, but I won’t judge. Okay, maybe a little.
- Unsweetened Cocoa Powder: 3/4 cup (75g), also sifted. This is where the magic happens, turning plain old buttercream into a chocolate dream. Don’t skimp on quality!
- Heavy Cream or Milk: 3-5 tablespoons. Your choice, depending on how rich and creamy you want to go. Heavy cream makes it feel extra fancy.
- Vanilla Extract: 1-2 teaspoons. The unsung hero that enhances all the other flavors. Don’t skip it!
- Pinch of Salt: Just a tiny bit, like a quarter teaspoon. It balances the sweetness and makes the chocolate pop. Think of it as the secret ingredient that says, “Hey, I know what I’m doing.”
Step-by-Step Instructions
Alright, apron on? Let’s get mixing! These steps are so easy, you could probably do them in your sleep. (Please don’t, that sounds messy.)
- Cream the Butter: In a large mixing bowl (or your stand mixer if you’re fancy like that), beat your room temperature butter on medium speed for about 2-3 minutes until it’s super pale and fluffy. It should look like a cloud, a buttery, delicious cloud.
- Add the Cocoa: Sift in your unsweetened cocoa powder over the butter. Mix on low speed until just combined. Scrape down the sides of the bowl to make sure everything gets acquainted.
- Powder Power: Gradually add the sifted powdered sugar, about 1 cup at a time, mixing on low speed after each addition until incorporated. This prevents a sugar cloud explosion in your kitchen. Once all the sugar is in, increase the speed to medium-high and beat for another 2-3 minutes.
- Liquid Gold: Pour in 3 tablespoons of heavy cream (or milk) and the vanilla extract. Add the pinch of salt. Beat on medium-high speed for another 3-5 minutes until the buttercream is light, fluffy, and looks utterly divine.
- Adjust Consistency: If your buttercream seems too thick, add more cream or milk, one teaspoon at a time, until it reaches your desired consistency. Too thin? Add a tablespoon or two more sifted powdered sugar. You want it smooth and spreadable, but firm enough to hold its shape for piping.
- Decorate! Now for the fun part! Load your beautiful chocolate buttercream into a piping bag or grab an offset spatula and go wild. Cover that cake like it’s the last cake on earth.
Common Mistakes to Avoid
Nobody’s perfect, but we can try to avoid the obvious face-palms, right? Here are a few traps to sidestep on your journey to buttercream bliss:
- Cold Butter Syndrome: Trying to use cold butter is like trying to convince a cat to take a bath – it’s going to be chunky, uncooperative, and a total mess. Always, always use softened, room temperature butter.
- Skipping the Sift: Think sifting powdered sugar and cocoa is optional? Oh, sweet summer child. Lumps are not your friend, especially when trying to pipe pretty designs. Sift. Just do it.
- Over-mixing (Once Sugar is Added): While creaming butter needs enthusiasm, once the sugar is in, too much mixing can incorporate too much air, making your buttercream fragile and prone to cracking. Mix until fluffy, then stop.
- Ignoring Consistency: Your buttercream looks like soup? Or cement? Don’t just shrug! Adjust it. A little more liquid or sugar makes all the difference. Consistency is king for decoration.
Alternatives & Substitutions
Feeling experimental? Or maybe you’re out of one tiny ingredient? No stress, we got options!
- Chocolate Type: Instead of unsweetened cocoa, try Dutch-processed cocoa for a darker, less bitter flavor profile. Or, if you’re feeling extra fancy and have a good food processor, melt some high-quality dark chocolate (cooled!) and fold it into the finished buttercream for a richer ganache-like flavor. (Just make sure it’s cooled completely, or you’ll melt your butter!)
- Dairy-Free Delight: Swap butter for a good quality dairy-free butter alternative (like Miyoko’s Kitchen or Earth Balance sticks) and use a dairy-free milk or cream. Just be aware that some brands might change the texture slightly.
- Flavor Boosts: Feeling vanilla is too vanilla? (Pun intended.) Add a shot of espresso powder for a mocha vibe, a splash of almond extract, or a touch of orange zest for a chocolate orange dream. Play around! It’s your cake, after all.
FAQ (Frequently Asked Questions)
Got questions? I’ve got (mostly sarcastic) answers!
- “My buttercream is too runny! What did I do wrong?” Did you use melted butter, you rebel? Or maybe added too much milk? No worries. Just add more sifted powdered sugar, one tablespoon at a time, until it firms up.
- “Can I make this ahead of time?” Absolutely! Store it in an airtight container in the fridge for up to a week. When you’re ready to use it, let it come to room temperature and then re-whip it with your mixer for a few minutes to get that fluffiness back. You might need a tiny splash of milk or cream.
- “Why does my buttercream taste grainy?” Ah, the age-old question. Did you skip sifting the powdered sugar? Probably! Or maybe you didn’t mix it enough to dissolve those sugar crystals. Keep whipping, or next time, S-I-F-T.
- “How much does this recipe make?” This batch typically makes enough to generously frost and decorate a 2-layer 8 or 9-inch cake, or about 24 cupcakes. If you’re going wild with piping, maybe make 1.5x the recipe just to be safe. Better too much than too little, right?
- “Can I use margarine instead of butter?” Well, technically yes, but why hurt your soul like that? Margarine has a different fat content and flavor. For the best, creamiest, most delicious buttercream, stick to real butter. Your taste buds will thank you.
- “What if I don’t have a stand mixer?” No stand mixer, no problem! A good old-fashioned hand mixer will work just fine. You’ll just get an arm workout in the process. Consider it a bonus!
Final Thoughts
So there you have it, folks! Your new favorite chocolate buttercream recipe, served with a side of sass and zero pretense. See? You didn’t even break a sweat, and now you’re armed with the knowledge to make any cake look like it just stepped out of a fancy patisserie. Go forth, conquer those cakes, and don’t forget to take a picture before you devour it all. You’ve earned it! Now go impress someone – or, let’s be real, just yourself – with your new culinary skills. Happy decorating!

