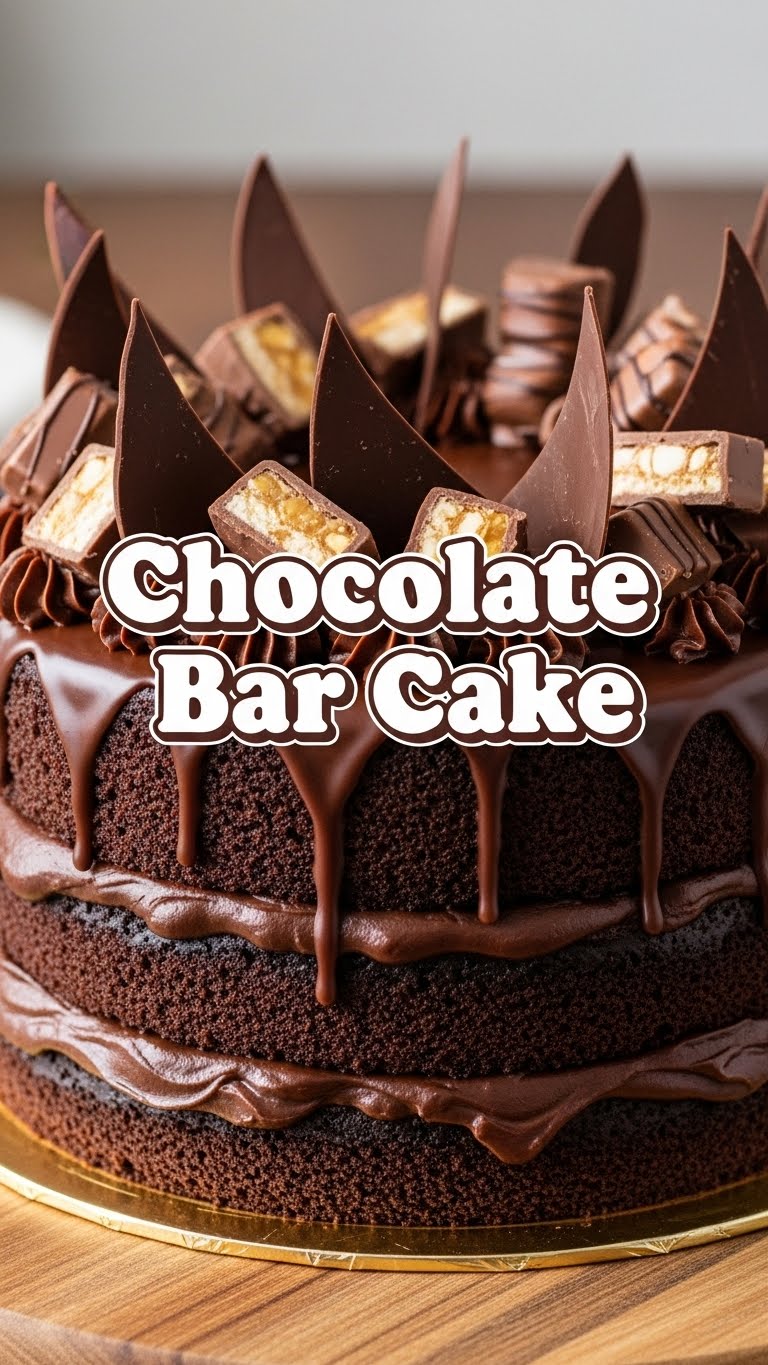
So you’re craving something tasty but too lazy to spend forever in the kitchen, huh? Same. And by ‘same,’ I mean I’ve perfected the art of maximum deliciousness with minimum effort. Today, we’re diving headfirst into a concoction so ridiculously easy and utterly decadent, it should probably be illegal: The Chocolate Bar Cake. Yes, you heard that right. We’re taking actual chocolate bars and turning them into cake. Prepare for your life to change.
Why This Recipe is Awesome
Listen up, buttercup. This isn’t just a cake; it’s a lifestyle choice. Why is it awesome? Because it’s idiot-proof. Seriously, even I, a serial burner of toast, managed not to mess this up. It’s fast, it’s fudgy, and it requires zero fancy equipment or obscure ingredients. Plus, it’s basically an excuse to buy a bunch of your favorite chocolate bars and claim it’s ‘for baking.’ Win-win, right?
Ingredients You’ll Need
Okay, gather ’round, ingredient whisperers. Here’s your hit list:
- 200g (about 7 oz) chocolate bars of your choice: Go wild! Snickers, Mars, Kit Kat, Cadbury Dairy Milk… whatever makes your heart sing. Or just whatever’s on sale.
- 125g (1/2 cup + 1 tbsp) unsalted butter: The good stuff. Not that weird spreadable stuff.
- 150g (3/4 cup) granulated sugar: Sweetness personified.
- 2 large eggs: Room temp, because apparently, they just behave better that way. Science!
- 125g (1 cup) all-purpose flour: The backbone of any good cake.
- 1 tsp baking powder: Helps things get all fluffy and happy.
- Pinch of salt: Just a tiny bit to make everything else taste even better. Don’t skip it!
- Optional toppings: More chocolate bars (duh), sprinkles, ice cream, a spoon. Your call.
Step-by-Step Instructions
Preheat & Prep: First things first, get that oven nice and toasty at 180°C (350°F). Grease and flour (or line with parchment paper, you fancy pants) an 8×8 inch square baking pan. Don’t be lazy here; nobody likes a stuck cake.
Melt the Good Stuff: Grab a microwave-safe bowl (or a double boiler if you’re feeling extra chef-y). Roughly chop up your glorious chocolate bars and toss them in with the butter. Microwave in 30-second bursts, stirring in between, until it’s all melty and gloriously smooth. Or use the double boiler method, gently stirring until melted. Don’t overheat it! Burnt chocolate is a sad, sad thing.
Mix the Wet: In a separate, larger bowl, whisk the sugar and eggs together until light and fluffy. This usually takes a couple of minutes. You want it pale yellow, not just barely mixed.
Combine the Magic: Pour that warm, melted chocolate-butter goodness into your egg mixture. Stir it gently until just combined. Don’t overmix! We’re making cake, not concrete.
Add the Dry: Sift the flour, baking powder, and salt directly into the wet ingredients. Fold it in carefully with a spatula until there are no dry streaks left. Again, don’t overmix! Overmixing develops gluten, making your cake tough. And nobody wants a tough cake.
Bake It Up: Pour the batter into your prepared pan and smooth the top. Pop it into the preheated oven for 25-30 minutes. The edges should look set, and a toothpick inserted into the center should come out with moist crumbs, not wet batter.
Cool Down: Let the cake cool in the pan for about 10-15 minutes before carefully transferring it to a wire rack to cool completely. Patience, young padawan. I know it’s hard, but it’s worth it. Slice and serve!
Common Mistakes to Avoid
- Forgetting to preheat the oven: Rookie mistake, my friend. A cold oven equals uneven baking and a generally sad cake. Just do it.
- Overmixing the batter: We talked about this! Unless you want a hockey puck disguised as a cake, fold gently. Your arm won’t fall off, promise.
- Opening the oven door constantly: Resist the urge! Every time you open that door, the temperature drops, messing with your cake’s rise. Peek through the glass, IMO.
- Not letting it cool (enough): I know the smell is intoxicating, but cutting into a hot cake can make it crumbly and hard to handle. Give it a minute. Or ten.
Alternatives & Substitutions
- Chocolate Bars: Honestly, this is where the fun begins. Use any kind! White chocolate, dark chocolate, milk chocolate, peanut butter cups, mini Daim bars… Experiment! My personal fave? A mix of Mars and Snickers for that extra caramel chew.
- Butter: You can technically use margarine, but why hurt your soul like that? If you’re out of unsalted, salted butter works fine; just skip the pinch of salt in the dry ingredients.
- Flour: All-purpose is best here, but if you’re feeling adventurous, you could try a gluten-free blend, though the texture might vary a bit.
- Toppings: Go wild! A dusting of cocoa powder, a dollop of whipped cream, a scoop of vanilla bean ice cream, or more chopped chocolate bars on top while it’s still warm for a melty, gooey crust.
FAQ (Frequently Asked Questions)
- Can I use any kind of chocolate bar? Absolutely! That’s the beauty of it. What’s your vice? M&Ms? Twix? Just remember that solid bars will melt differently than those with nougat or caramel, but they’ll all be delicious.
- My cake looks a bit sunken in the middle. What happened? Oh, the dreaded sinkhole! Could be a few things: overmixing the batter, opening the oven door too early, or maybe your baking powder is past its prime. Next time, try not to peek and make sure your ingredients are fresh.
- Do I have to bring the eggs to room temperature? Technically no, but it really does help! Room temperature eggs emulsify better with sugar and butter, leading to a smoother, more even batter and a lighter cake texture. Trust me on this one.
- How long does this cake last? If you manage not to devour it all in one sitting (impressive!), it’ll keep covered at room temperature for 3-4 days. In the fridge, maybe a bit longer, but it’s best fresh.
- Can I double the recipe? You betcha! Just use a larger pan (like a 9×13 inch) and adjust baking time accordingly. It might take a bit longer, so keep an eye on it.
- Can I add nuts or fruit? Ooh, good idea! Absolutely! Toss in a handful of chopped walnuts, pecans, or even some dried cranberries with your dry ingredients. Just make sure they’re coated in a little flour first to prevent them from sinking to the bottom.
Final Thoughts
And there you have it, folks! Your new go-to recipe for when you need chocolatey comfort without the fuss. This Chocolate Bar Cake isn’t just a dessert; it’s a statement. A statement that says, “I love delicious things, and I’m smart enough to make them easily.” Now go impress someone—or yourself, which is arguably more important—with your new culinary skills. You’ve earned it!

