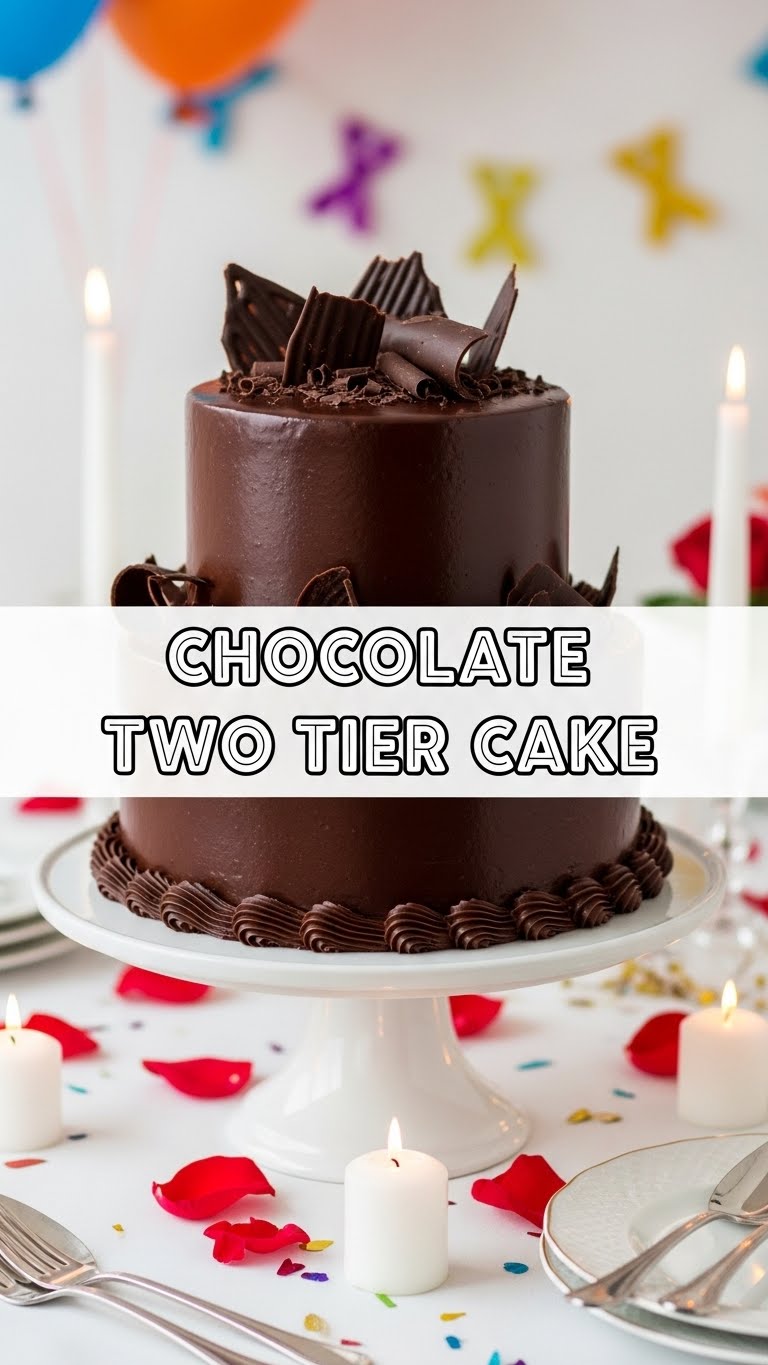
Ever had one of those days where you just *need* chocolate? Not just a humble bar, but a whole statement piece? Something that screams, “I’m fancy, but also incredibly delicious and I probably made this while wearing sweatpants”? Yeah, me too. And that, my friend, is where our glorious Chocolate Two-Tier Cake swoops in to save the day (and your sanity).
Why This Recipe is Awesome
Okay, so let’s be real. Two-tier cakes sound intimidating, like something only Martha Stewart or a professional pastry chef with a hundred fancy tools could pull off. **WRONG.** This recipe is surprisingly straightforward. It’s designed for the enthusiastic home baker who wants to impress without spending 12 hours sobbing over a collapsed sponge.
It’s rich, it’s chocolatey, and it yields two perfect layers of moist, tender cake slathered in dreamy chocolate buttercream. You’ll look like a culinary genius, even if you just followed my instructions blindly. Plus, the sheer joy of cutting into a cake you *actually built* is unmatched. **Consider it edible architecture.**
Ingredients You’ll Need
Get ready to raid your pantry! Here’s what you’ll need to make this chocolatey masterpiece. No exotic stuff, promise!
- For the Cake:
- 2 cups (250g) All-Purpose Flour (The regular stuff, nothing fancy. Sift it if you’re feeling extra.)
- 1 ¾ cups (350g) Granulated Sugar (Because sugar makes everything better, duh.)
- ¾ cup (75g) Unsweetened Cocoa Powder (Good quality makes a difference, FYI.)
- 2 tsp Baking Soda (The magic lift!)
- 1 tsp Baking Powder (More magic lift!)
- 1 tsp Salt (Balances all that sweetness.)
- 1 cup (240ml) Buttermilk (Or make your own – see Alternatives!)
- ½ cup (120ml) Vegetable Oil (Keeps it moist, baby.)
- 2 Large Eggs (Room temp is best, but don’t stress if you forget.)
- 1 tsp Vanilla Extract (The secret weapon for depth of flavor.)
- 1 cup (240ml) Hot Brewed Coffee (No, it won’t taste like coffee, it just boosts the chocolate! Trust me!)
- For the Chocolate Buttercream Frosting:
- 1 cup (226g) Unsalted Butter, softened (Real butter, please. Your cake deserves it.)
- 3-4 cups (360-480g) Powdered Sugar (Sifted to avoid lumpy frosting, unless you like that texture.)
- ¾ cup (75g) Unsweetened Cocoa Powder (Again, quality matters!)
- ½ tsp Salt (Cuts through the sweetness.)
- 2 tsp Vanilla Extract (More yummy vanilla!)
- ¼ – ½ cup (60-120ml) Whole Milk or Heavy Cream (Add slowly till you get that perfect consistency.)
Step-by-Step Instructions
- Prep Your Pans & Oven: Preheat your oven to 350°F (175°C). Grease and flour two 8-inch round cake pans. Or line with parchment circles. Whatever makes your life easier!
- Mix the Dry Stuff: In a large bowl, whisk together the flour, sugar, cocoa powder, baking soda, baking powder, and salt. Give it a good whisk to break up any clumps.
- Combine the Wet Stuff: In a separate bowl, whisk together the buttermilk, oil, eggs, and vanilla extract until well combined.
- Bring Them Together: Pour the wet ingredients into the dry ingredients. Mix on low speed (or by hand) until just combined. Don’t overmix, or your cake will be tough!
- Add the Coffee: Slowly pour in the hot coffee, mixing until the batter is smooth. Yes, it’s a very thin batter – don’t panic!
- Bake, Baby, Bake: Divide the batter evenly between your two prepared pans. Bake for 30-35 minutes, or until a toothpick inserted into the center comes out clean.
- Cool Down: Let the cakes cool in the pans for about 10-15 minutes, then invert them onto a wire rack to cool completely. **Patience is a virtue here!**
- Make the Frosting Magic: While the cakes cool, beat the softened butter in a large bowl with an electric mixer until light and fluffy. This takes a few minutes, so let it really whip.
- Add Dry Frosting Ingredients: Gradually add the sifted powdered sugar, cocoa powder, and salt to the butter, mixing on low until incorporated.
- Finishing Touch on Frosting: Add the vanilla extract and slowly pour in the milk/cream, one tablespoon at a time, until your frosting reaches a spreadable, fluffy consistency. Beat on medium-high for another 2-3 minutes until light and airy.
- Assemble Your Masterpiece: Once the cakes are *completely* cool, level them if needed. Place one layer on your serving plate or cake stand. Spread a generous layer of frosting on top. Carefully place the second cake layer on top. Frost the top and sides of the entire cake. Decorate with sprinkles, chocolate shavings, or just keep it gloriously simple.
- Devour: Slice, serve, and accept all the compliments!
Common Mistakes to Avoid
We’ve all been there, staring at a baking disaster. Here are a few rookie errors to dodge:
- Overmixing the Batter: This is a big one. **Too much mixing develops gluten, leading to a tough, dense cake.** Mix until just combined, then stop. Walk away.
- Not Cooling Cakes Completely: Frosting on a warm cake is a recipe for a sliding, melting, soupy mess. Unless you’re going for a deconstructed look, **wait until those cakes are stone cold.**
- Ignoring Pan Prep: Thinking you can skip greasing and flouring (or parchment)? Oh, sweet summer child. Nothing is sadder than a beautiful cake stuck to the bottom of the pan. **Prepare your pans properly!**
- Underbaking/Overbaking: Use that toothpick! If it comes out with wet batter, it needs more time. If it comes out completely clean but the cake looks shrunken and dry, you might have overdone it. **Aim for moist crumbs.**
- Not Sifting Powdered Sugar: Unless you *enjoy* those little lumps of sugar in your smooth buttercream, take the extra minute to sift. Trust me.
Alternatives & Substitutions
Life happens, and sometimes you don’t have exactly what the recipe calls for. No stress! Here are some easy swaps:
- Buttermilk Substitute: No buttermilk? No problem! Add 1 tablespoon of white vinegar or lemon juice to a measuring cup, then fill the rest with regular milk (any kind works) until you reach 1 cup. Let it sit for 5-10 minutes until it looks slightly curdled. Voila! Instant buttermilk.
- No Coffee? No Problem… Kinda: You *can* use hot water instead of hot coffee. The cake will still be delicious, but the coffee really does enhance the chocolate flavor without making it taste like coffee. **IMO, don’t skip the coffee if you can help it!**
- Oil for Butter (in cake): While butter adds lovely flavor, some recipes use oil exclusively for extra moisture. For this specific recipe, the oil is already there to help with moisture, so stick to the listed butter.
- Different Frosting: Feeling adventurous? Try a cream cheese frosting, a rich chocolate ganache, or even a mocha buttercream. This cake is a great canvas for whatever frosting your heart desires.
- Gluten-Free: Yes, you can absolutely make this gluten-free! Swap the all-purpose flour for your favorite 1:1 gluten-free baking blend.
FAQ (Frequently Asked Questions)
Got questions? I’ve got (casual) answers!
- Can I make this cake ahead of time?
Absolutely! The cake layers can be baked a day or two in advance, wrapped tightly in plastic wrap, and stored at room temp (or frozen for up to a month!). The frosting can be made a day ahead and stored in the fridge; just re-whip it before using. - How do I make it two tiers? What special equipment do I need?
Ah, the “two-tier” refers to two *layers* of the same size, not two *different sized* cakes stacked. No special equipment needed beyond your two 8-inch round pans! If you were going for a multi-level, different-sized cake, that’s a whole other beast requiring dowels and cake boards. But for *this* recipe, it just means two lovely layers. - My cake came out dry. What went wrong?
Most likely, it was overbaked. Ovens can vary, so always keep an eye on it after the 25-minute mark. Also, **measure flour correctly by spooning it into the measuring cup and leveling**, don’t scoop directly from the bag. - Can I use margarine instead of butter in the frosting?
Well, technically yes, but why hurt your soul (and your cake’s flavor) like that? For the best texture and taste, **real butter is non-negotiable for buttercream.** - How long does this cake last?
Covered loosely at room temperature, it’s generally good for 2-3 days. In the fridge, it can last a bit longer, maybe up to 5 days. But let’s be honest, it probably won’t last that long anyway. 😉 - My frosting is too thin/thick! Help!
Easy fix! If it’s too thin, add more sifted powdered sugar (a tablespoon at a time). If it’s too thick, add a tiny splash more milk or cream (half a teaspoon at a time). Adjust slowly until it’s perfect!
Final Thoughts
And there you have it, your ultimate guide to a show-stopping, “I totally baked this myself and yes it was easy” chocolate cake. This isn’t just a dessert; it’s a mood, a statement, and a guaranteed crowd-pleaser. So go forth and bake something amazing! You’ve got this, champ! Now go impress someone—or yourself—with your new culinary skills. You’ve earned it!

