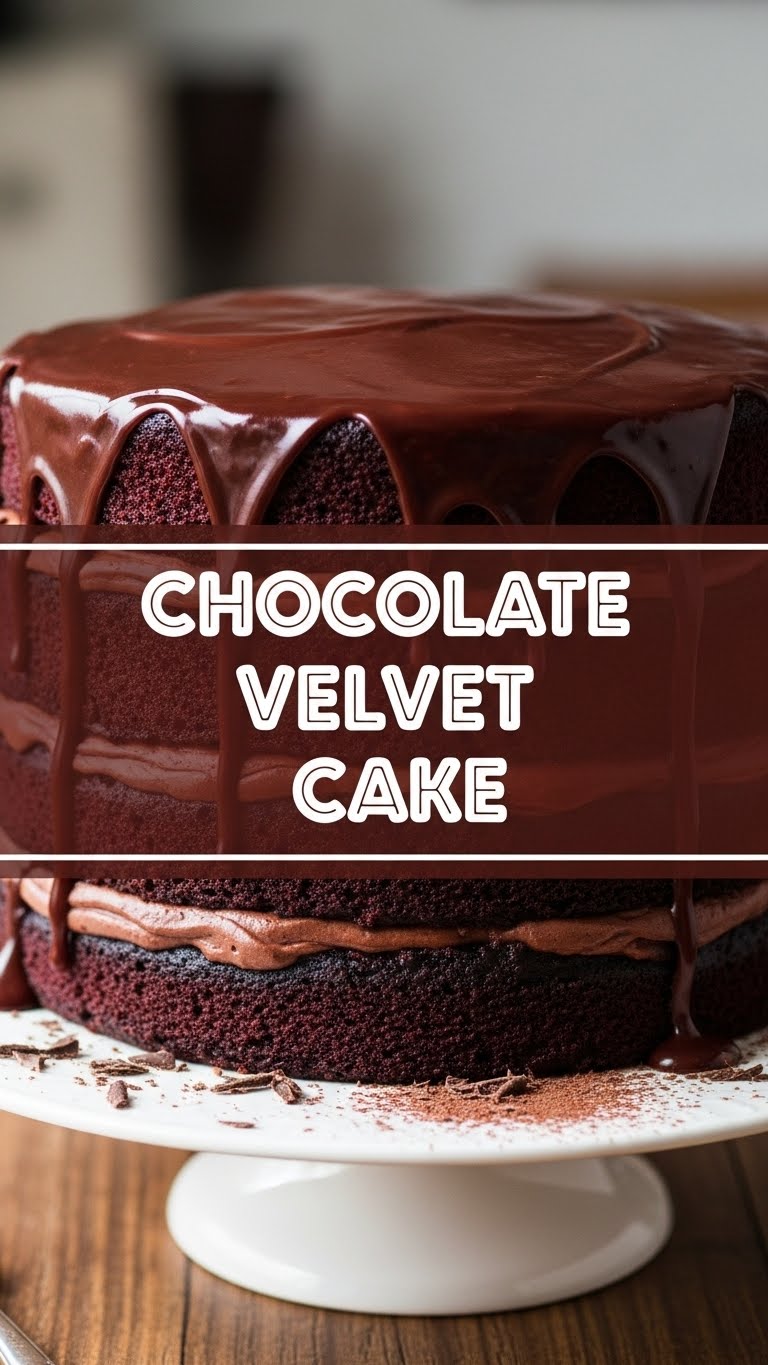
So, you’ve scrolled through enough food porn on Instagram to work up a serious craving for something rich, chocolatey, and utterly decadent, but the thought of spending an entire day in the kitchen makes your soul tired? Trust me, I get it. We’re about to make magic, friend, and it involves very little actual magic (just some basic baking skills, which, let’s be honest, you totally have). Get ready for a Chocolate Velvet Cake that’s so good, it’ll make you question all your life choices… in the best way possible.
Why This Recipe is Awesome
Because it’s practically foolproof, that’s why! Seriously, if I can make this without setting off the smoke detector, you’re golden. This isn’t one of those fussy, delicate cakes that demands you whisper sweet nothings to it as it bakes. This is a robust, chocolatey dream that comes together faster than you can say “another slice, please.” It’s moist, it’s rich, it’s got that deep chocolate flavor without being overwhelmingly sweet, and it’s got a texture so smooth, you’ll wonder if you accidentally swapped flour for actual velvet. Plus, it makes your kitchen smell like a fancy patisserie, and who doesn’t want that?
Ingredients You’ll Need
- **All-Purpose Flour:** Just your basic flour. Don’t get fancy unless you really want to.
- **Granulated Sugar:** Sweetness, darling. Lots of it.
- **Unsweetened Cocoa Powder (Dutch-processed, if you have it):** This is where the chocolate magic happens. Dutch-processed gives it that darker, less bitter flavor, but regular works too if you’re not a snob.
- **Baking Soda & Baking Powder:** The dynamic duo that makes your cake rise like your hopes for a perfect slice.
- **Salt:** Crucial! It balances all that sweetness and makes the chocolate pop. Don’t skip it, unless you like bland cake (you don’t).
- **Eggs (large):** The glue of the baking world. Make sure they’re room temperature for better mixing.
- **Buttermilk:** This is the secret to that velvet texture and moistness. Seriously, don’t skimp.
- **Vegetable Oil (or another neutral oil):** For supreme moistness that lasts. Butter adds flavor, but oil adds an unbeatable texture.
- **Vanilla Extract:** Because everything is better with a splash of vanilla.
- **Hot Coffee (or hot water):** The ultimate chocolate enhancer. It deepens the chocolate flavor without making your cake taste like a latte. **This is a game-changer.**
Step-by-Step Instructions
- **Get Prepped:** Preheat your oven to a cozy 350°F (175°C). Grease and flour two 9-inch round cake pans. You can also line the bottoms with parchment paper if you’re feeling extra cautious (I usually am).
- **Whisk the Dry Stuff:** In a large bowl, whisk together the flour, sugar, cocoa powder, baking soda, baking powder, and salt. Make sure there are no lumps—nobody wants a mouthful of dry flour.
- **Combine Wet Ingredients (Mostly):** In a separate medium bowl, lightly whisk the eggs, buttermilk, vegetable oil, and vanilla extract until just combined.
- **Mix Wet into Dry:** Pour the wet ingredients into the dry ingredients. Stir with a spoon or spatula until *just* combined. Don’t go crazy here; overmixing is the enemy of tender cake.
- **Add the Hot Stuff:** Carefully pour the hot coffee (or water) into the batter. Stir until the batter is smooth and a bit thin. Yes, it will look runny, don’t panic! This is what makes it super moist.
- **Bake It Up:** Divide the batter evenly between your two prepared cake pans. Pop them in the oven and bake for 30-35 minutes, or until a wooden skewer inserted into the center comes out clean.
- **Cool Down:** Let the cakes cool in their pans on a wire rack for about 10-15 minutes. Then, carefully invert them onto the wire rack to cool completely. **Patience is a virtue here; trying to frost a warm cake is a one-way ticket to frosting disaster.**
Common Mistakes to Avoid
- **Overmixing the Batter:** This is probably the biggest no-no. It develops the gluten too much, leading to a tough, dense cake. Mix until *just* combined, okay?
- **Not Greasing Your Pans Properly:** Ever had half your cake stuck to the pan? Yeah, it’s not fun. Grease AND flour, or use parchment paper. Seriously.
- **Baking in a Cold Oven:** Thinking you don’t need to preheat the oven? Rookie mistake. Your cake needs that initial burst of heat to rise properly.
- **Failing to Use Room Temperature Eggs/Buttermilk:** Cold ingredients don’t emulsify as well with the rest of the batter, affecting the texture. Plan ahead!
- **Cutting into a Warm Cake:** This is a crime against humanity (and cake). It will crumble, and your frosting will melt. Let it cool completely, even if it feels like forever.
Alternatives & Substitutions
Feeling a little rebellious, or just missing an ingredient? No worries, I’ve got you:
- **No Buttermilk? No Problem!** Mix 1 cup of regular milk with 1 tablespoon of white vinegar or lemon juice. Let it sit for 5-10 minutes until it curdles slightly. Voila, homemade buttermilk!
- **Coffee vs. Water:** While hot coffee seriously elevates the chocolate flavor (trust me on this, it’s magical), hot water works perfectly fine if you’re caffeine-averse or just out of coffee.
- **Oil Swap:** While vegetable oil is great for texture, you can use melted coconut oil (neutral kind), canola oil, or even a very light olive oil. Avoid strong-flavored oils, obvs.
- **Gluten-Free Flour:** You can totally try a 1:1 gluten-free baking blend for this. Just follow the package instructions, as some blends absorb liquid differently.
- **Chocolate Chips?** Not in the batter, my friend, this is a velvet cake, not a chip cookie. But if you’re making a ganache or a chocolate frosting, go wild with good quality chocolate chips!
FAQ (Frequently Asked Questions)
Can I use margarine instead of butter? Well, technically yes, but why hurt your soul like that? Butter just tastes better, IMO.
My cake sunk in the middle! What happened? Probably overmixing or opening the oven door too early. Keep that oven door shut until the last 10 minutes, okay?
How do I store this masterpiece? In an airtight container at room temp for up to 3 days, or in the fridge for up to a week. It freezes well too, wrapped tightly, for about a month.
Can I make this as cupcakes? Absolutely! Fill cupcake liners about two-thirds full and bake for 18-22 minutes. Keep an eye on them; cupcake ovens vary.
What kind of frosting should I use? A classic cream cheese frosting is divine, but a chocolate buttercream or a simple ganache would also be ridiculously good. Don’t overthink it, just make it delicious!
Is this cake actually red velvet? Nope! While similar in moistness, traditional red velvet gets its color from, well, red food coloring. This is pure, unadulterated chocolate goodness.
Final Thoughts
There you have it, folks! Your new go-to chocolate cake recipe that’s as impressive as it is easy. So go on, whip this up, make your house smell incredible, and then indulge in a slice (or three, I’m not judging). You’ve totally earned it. Now go impress someone—or yourself—with your new culinary skills. Happy baking!
