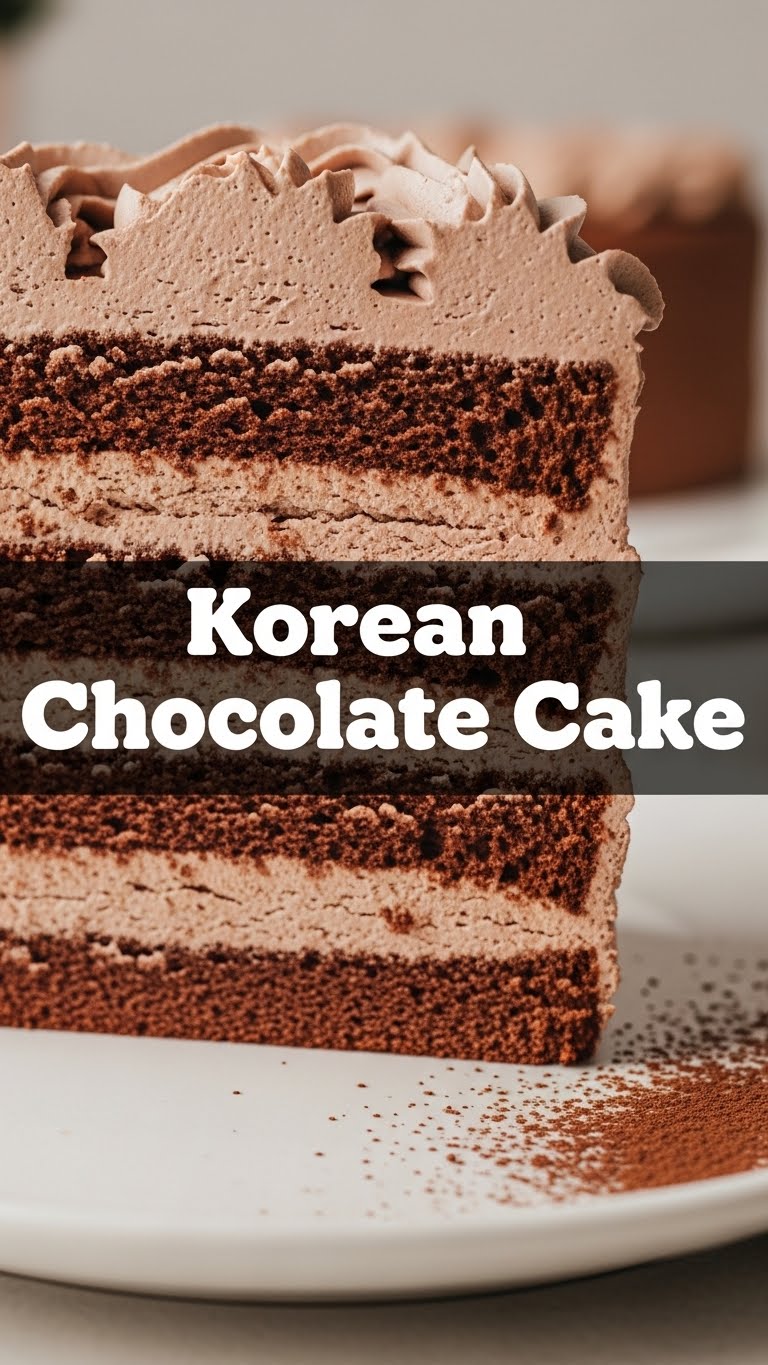
So, you’re scrolling through your phone, probably thinking, “My life needs more chocolate… and less effort.” Been there, friend, like, every single Tuesday. And guess what? I’ve got your back with a recipe that’s so ridiculously easy and delicious, you’ll wonder why you ever bought those fancy bakery cakes. This isn’t just *a* chocolate cake; it’s *the* Korean Chocolate Cake – because everything sounds cooler with “Korean” in front of it, right?
Why This Recipe is Awesome
Listen, if I can make this without setting off the smoke alarm (which, let’s be real, is a regular occurrence in my kitchen), then you, my friend, are absolutely golden. This Korean Chocolate Cake recipe is truly **idiot-proof**. Seriously, it practically bakes itself. It’s ridiculously moist, perfectly chocolatey without being overly sweet, and it comes together faster than you can decide what to binge-watch next. Plus, it’s a one-bowl wonder, which means less dish duty. You’re welcome. Your future self will thank you.
Ingredients You’ll Need
Gather ’round, fellow culinary adventurers! Here’s your treasure map of deliciousness. You probably have most of these lurking in your pantry already, so no excuses!
- All-Purpose Flour: Just your regular flour. Nothing fancy, unless you’re feeling extra bougie.
- Granulated Sugar: For sweetness, obviously. Don’t skimp, unless you’re trying to make a health cake (in which case, wrong recipe, friend).
- Unsweetened Cocoa Powder: The darker, the better, IMO. This is where the chocolate party happens!
- Baking Soda & Baking Powder: Our dynamic duo for lift. Don’t confuse them; they’re like Batman and Robin, similar but distinct powers.
- Salt: A pinch makes all the difference. It’s like the secret ingredient in every good drama.
- Large Eggs: Room temp if you can remember, but if not, no biggie. We’re chill here.
- Whole Milk: Or any milk you have on hand. Don’t stress too much.
- Vegetable Oil: For that beautiful, tender crumb. Trust me, oil makes cakes unbelievably moist.
- Vanilla Extract: A splash of liquid magic.
- Hot Water or Hot Coffee: This is the secret weapon for deep chocolate flavor. Coffee enhances chocolate like nothing else! If you don’t like coffee, hot water works just fine.
- For the Whipped Cream Frosting (Optional, but highly recommended):
- Heavy Cream: Needs to be super cold!
- Powdered Sugar: For sweetness and smooth texture.
- A dash of vanilla extract: Because why not?
- Optional: A tablespoon of cocoa powder: If you want chocolate whipped cream!
Step-by-Step Instructions
Alright, let’s get this party started! Seriously, it’s easier than assembling IKEA furniture (and way more delicious).
- Get Your Oven Ready: First things first, preheat your oven to **350°F (175°C)**. Grease and flour (or line with parchment paper) an 8-inch round cake pan. Don’t skip this, unless you enjoy scraping cake out of a pan.
- Dry Mix Magic: In a large bowl, whisk together your flour, sugar, cocoa powder, baking soda, baking powder, and salt. Give it a good whisk until everything is super combined. No lumps allowed!
- Wet Mix Wonder: In a separate (or the same, if you’re feeling rebellious) bowl, lightly beat your eggs. Then add in the milk, vegetable oil, and vanilla extract. Whisk ’em up!
- Combine & Conquer: Pour the wet ingredients into the dry ingredients. Stir gently until *just* combined. **Don’t overmix!** A few lumps are okay; overmixing leads to tough cake, and we’re aiming for fluffy, tender perfection.
- The Hot Secret: Now, slowly pour in your hot water or hot coffee. Stir until the batter is smooth and a bit thin. This is the magic that creates a super moist cake!
- Bake It Up: Pour your beautiful batter into your prepared cake pan. Pop it into the preheated oven and bake for **30-35 minutes**, or until a toothpick inserted into the center comes out clean.
- Cool Down: Once baked, let the cake cool in the pan for about 10-15 minutes. Then, gently invert it onto a wire rack to cool completely. Patience, young grasshopper! **A fully cooled cake is crucial for frosting.**
- Whip Up Your Frosting (If you dare!): While the cake cools, combine your super cold heavy cream, powdered sugar, and vanilla (and cocoa if using) in a bowl. Beat with an electric mixer on high speed until stiff peaks form. Try not to eat it all with a spoon.
- Decorate & Devour: Once the cake is completely cool, slather on that glorious whipped cream frosting. Or don’t! It’s also amazing plain. Slice it up, grab a fork, and enjoy your masterpiece.
Common Mistakes to Avoid
Let’s save you from some common baking blunders, shall we? Because nobody likes a cake fail, especially when chocolate is involved.
- Forgetting to Preheat: Rookie mistake! Your oven needs to be at the right temperature *before* the cake goes in. Otherwise, you get uneven baking and a sad, dense cake.
- Overmixing the Batter: This is a big one. As soon as the dry ingredients are just incorporated with the wet, stop. Overmixing develops the gluten, leading to a tough, chewy cake. We want tender, not tire-like.
- Not Cooling Completely: Trying to frost a warm cake is like trying to ice-skate uphill. Your frosting will melt and slide right off, creating a chocolatey puddle of regret. **Seriously, cool it down.**
- Ignoring Pan Prep: If you skip greasing and flouring (or parchment paper), you risk your beautiful cake sticking to the pan. And that’s just heartbreak on a plate.
Alternatives & Substitutions
Feeling a little rebellious, or just missing an ingredient? No stress! Here are some ideas:
- Milk: Don’t have whole milk? Skim, 2%, almond, or soy milk will work just fine. The cake might be *slightly* less rich, but still delicious.
- Oil: Canola oil or melted coconut oil are great substitutes for vegetable oil. Butter *can* be used, but oil really makes this cake extra moist, so stick with it if you can.
- Frosting: Not a whipped cream fan? A simple ganache (melted chocolate + heavy cream) would be divine. Or, honestly, a dusting of powdered sugar is also perfection, especially if you want to keep it super light.
- Coffee: If you really hate coffee (gasp!), just use hot water. The coffee just deepens the chocolate flavor without making it taste like coffee, but hot water works perfectly too!
FAQ (Frequently Asked Questions)
Got questions? I probably do too! Here are a few I can answer right now:
Can I make this cake ahead of time? Absolutely! The unfrosted cake can be wrapped tightly and stored at room temperature for up to 2 days, or in the fridge for 3-4 days. You can also freeze it for up to 3 months. Just thaw before frosting!
What if I don’t have an 8-inch pan? A 9-inch pan works too, but your cake will be a bit thinner and might bake a few minutes faster. Keep an eye on it!
Can I make cupcakes with this recipe? Oh, heck yes! Line a cupcake tin with liners and fill them about two-thirds full. Bake for roughly 18-22 minutes. Instant party in a cup!
My cake seems a bit dry, what happened? Hmm, probably overbaked, or perhaps you overmixed the batter. Remember: a toothpick should come out with moist crumbs, not completely dry. And stop mixing as soon as everything is combined!
Is this cake suitable for vegans? Not as written, since it uses eggs and milk. But with a few swaps (flax eggs, plant-based milk, vegan oil, and skipping the dairy whipped cream), you could likely adapt it!
Can I add chocolate chips to the batter? You’re speaking my language! Yes, absolutely. Fold in about 1/2 cup of your favorite chocolate chips at the end. More chocolate is never a bad idea.
Final Thoughts
See? You just made a ridiculously delicious, super moist Korean Chocolate Cake, and you didn’t even break a sweat (unless you were running to the store for cocoa powder, in which case, fair enough). Now go impress someone—or yourself—with your new culinary skills. You’ve earned it! Grab a slice, put your feet up, and pat yourself on the back. You’re a kitchen wizard, Harry!
