So, you’ve scrolled past a gazillion reels of gorgeous desserts and now your sweet tooth is staging a full-on rebellion, huh? Same, friend, *same*. And let’s be real, adulting is hard enough without having to decipher a recipe written for a Michelin-star chef. You just want something delicious, impressive, and maybe, just maybe, achievable without turning your kitchen into a disaster zone.
Why This Recipe is Awesome
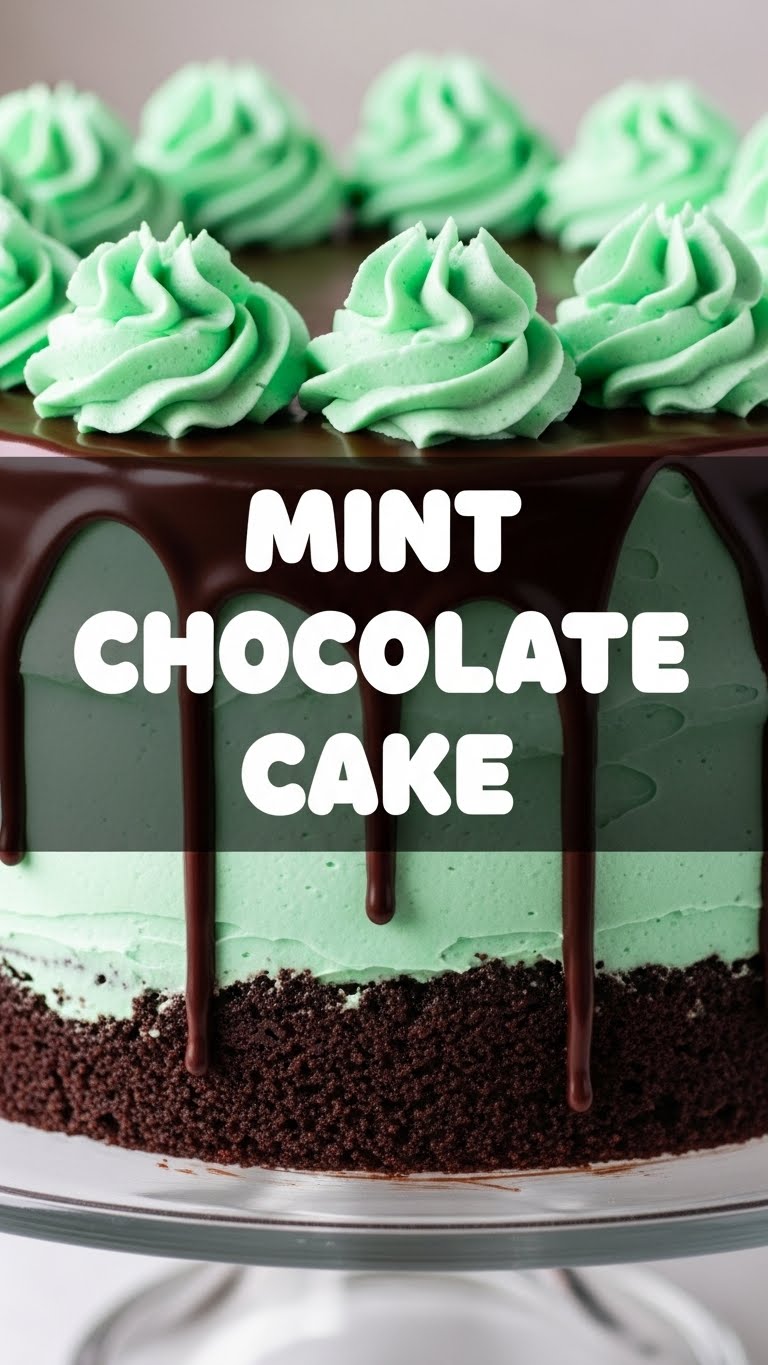
Enter the Mint Chocolate Cake! This isn’t just any cake; it’s a moist, fudgy chocolate dream kissed by a cool, refreshing mint frosting. It’s basically a fancy after-dinner mint in cake form, but like, *way* better. And here’s the kicker: it’s pretty darn simple to make. Seriously, it’s almost idiot-proof. Even I, Queen of Occasionally Burning Water, have nailed this one multiple times. No fancy equipment, no intimidating techniques—just pure, unadulterated mint-choc happiness. Get ready to impress everyone, including yourself, without breaking a sweat (or a whisk).
Ingredients You’ll Need
Alright, gather your goodies! You probably have most of this stuff lurking in your pantry already. (If not, time for a grocery run, champ!)
For the Super Moist Chocolate Cake:
- All-Purpose Flour: 1 ¾ cups. The foundation of our cakey masterpiece.
- Granulated Sugar: 1 ¾ cups. Sweetness overload, in the best way.
- Unsweetened Cocoa Powder: ¾ cup. Go for Dutch-processed if you can; it makes for a richer, darker cake.
- Baking Soda: 1 teaspoon. Our little leavening hero.
- Baking Powder: 1 teaspoon. Another leavening hero, they work together!
- Salt: 1 teaspoon. Balances out all that sweetness. Don’t skip it!
- Large Eggs: 2, at room temperature. Give them a warm bath if you forget to take them out.
- Whole Milk: 1 cup, also at room temperature.
- Vegetable Oil: ½ cup. Keeps our cake super moist.
- Vanilla Extract: 2 teaspoons. Essential for all things delicious.
- Boiling Water: 1 cup. Yes, boiling! It helps bloom the cocoa and makes the cake extra fudgy.
For the Dreamy Mint Buttercream Frosting:
- Unsalted Butter: 1 cup (2 sticks), softened. Seriously, softened. Not melted, not rock hard.
- Powdered Sugar (Confectioners’ Sugar): 3-4 cups, sifted. Start with 3, add more if needed for consistency.
- Heavy Cream (or Milk): 2-4 tablespoons. Just enough to get it silky smooth.
- Mint Extract: 1 teaspoon. Or peppermint, if that’s what you have. (Don’t overdo it unless you want toothpaste cake!)
- Green Food Coloring: A few drops (optional, but makes it look super festive!).
- Pinch of Salt: Just to cut through the sweetness.
Step-by-Step Instructions
Deep breaths, you got this. This is where the magic happens!
Part 1: The Chocolate Cake
- Preheat and Prep: Go ahead and preheat your oven to 350°F (175°C). Grab two 8 or 9-inch round cake pans. Grease ’em, flour ’em, or line ’em with parchment paper. No stickage allowed!
- Dry Mix Fun: In a large bowl, whisk together your flour, sugar, cocoa powder, baking soda, baking powder, and salt. Make sure there are no lumps—we’re going for smooth sailing here.
- Wet Mix Wonders: In another medium bowl, whisk together the eggs, milk, oil, and vanilla extract until they’re well combined.
- Combine ‘Em Up: Pour the wet ingredients into the dry ingredients. Mix on low speed with an electric mixer (or by hand with a whisk) until *just* combined. Don’t overmix! We want tender cake, not tough cake.
- The Hot Water Hug: Carefully pour the boiling water into the batter. Stir gently until it’s fully incorporated. The batter will be thin—that’s totally normal, so don’t freak out.
- Bake It Up: Divide the batter evenly between your prepared cake pans. Pop them in the preheated oven for 30-35 minutes, or until a toothpick inserted into the center comes out clean.
- Cool Down: Let the cakes cool in the pans for about 10-15 minutes. Then, carefully invert them onto a wire rack to cool completely. This step is crucial before frosting! Seriously, don’t rush it unless you want a melted mess.
Part 2: The Mint Buttercream Frosting
- Butter Blitz: In a large bowl, using an electric mixer, beat the softened butter on medium speed until it’s light and fluffy, about 2-3 minutes.
- Sugar Shower: Gradually add the sifted powdered sugar, one cup at a time, beating well after each addition. Your kitchen might look like a snowstorm hit, but it’s worth it.
- Liquid Gold & Minty Fresh: Pour in the heavy cream (start with 2 tablespoons), mint extract, and a pinch of salt. Beat on medium-high speed for another 2-3 minutes until the frosting is super light, fluffy, and spreadable. If it’s too thick, add more cream, one tablespoon at a time. If it’s too thin, add more powdered sugar.
- Go Green (Optional): Add a few drops of green food coloring if you want that classic mint choc chip vibe. Mix until evenly colored.
Part 3: Assemble Your Masterpiece!
- Level Up: If your cakes have domed tops, you can level them with a serrated knife for a flatter, neater cake. (This is totally optional, FYI, sometimes rustic is just as good!)
- Frosting Time: Place one cooled cake layer on your serving plate. Spread a generous layer of mint buttercream over the top.
- Stack ‘Em: Gently place the second cake layer on top.
- Final Frost: Cover the top and sides of the entire cake with the remaining buttercream. Get creative with your swirls or go for a smooth, minimalist look.
- Decorate (Optional): Sprinkle with chocolate shavings, mini chocolate chips, or even some crushed mint candies for extra flair.
- Serve & Enjoy: Slice, serve, and bask in the glory of your mint chocolate creation!
Common Mistakes to Avoid
Look, we all make mistakes. It’s how we learn! But here are a few face-palm moments you can totally sidestep:
- Overmixing the Batter: I know, I sound like a broken record, but seriously, stop mixing as soon as the wet and dry ingredients are combined. Overmixing develops the gluten, leading to a tough, dry cake. Nobody wants that!
- Not Using Room Temperature Ingredients: Cold eggs and milk don’t emulsify as well with the other ingredients, leading to a less uniform batter and potentially a denser cake. Take them out a good 30 minutes before you start.
- Opening the Oven Door Early: Peek-a-boo! You’re letting all that precious heat out, which can cause your cake to sink in the middle. Resist the urge until at least 25 minutes in.
- Frosting a Warm Cake: This is rookie mistake number one. You will end up with a sliding, melting, sad cake. Be patient! Let those cakes cool completely.
- Eyeballing Extracts: Especially with mint. A tiny bit too much mint extract and your cake will taste like toothpaste. Start with the recommended amount, taste a tiny bit of frosting (don’t double dip!), and add *tiny* increments if needed.
Alternatives & Substitutions
Life happens, ingredients run out, or maybe you just want to shake things up. Here are some ideas!
- Cocoa Powder: If you don’t have Dutch-processed, regular unsweetened cocoa powder works fine. Your cake just might be a tad lighter in color and flavor.
- Milk: Any milk works here! Whole milk gives the best richness, but 2%, 1%, or even non-dairy milk (almond, soy, oat) will do in a pinch. Just make sure it’s unflavored.
- Oil: Vegetable oil is pretty neutral, but canola or even a light olive oil (not extra virgin!) can work. Coconut oil (melted) also makes a nice substitute.
- Mint Extract: Peppermint extract is a common swap, but it’s stronger, so use a little less. Or, for a super subtle fresh hint, try adding a tablespoon of finely chopped fresh mint leaves to the frosting (just know you’ll get little green flecks!).
- Food Coloring: Totally optional! Your frosting will still taste amazing, even if it’s white. Or try a natural green like spirulina powder for a more earthy tone (use sparingly!).
- Dairy-Free? Swap butter for a good quality plant-based butter and milk for your favorite non-dairy alternative. Most cakes are pretty forgiving!
FAQ (Frequently Asked Questions)
Got questions? I’ve got (casual) answers!
- “My cake is dry! What went wrong?” Oh no! Probably overmixed the batter, or baked it a smidge too long. Next time, stick to the mixing instructions and keep an eye on that toothpick test!
- “Can I make this into cupcakes?” Heck yeah, you can! Just line your muffin tins and fill about two-thirds full. Baking time will be shorter, around 18-22 minutes. Keep an eye on them!
- “How long does this cake last?” Covered tightly at room temperature, it’s usually good for 2-3 days. In the fridge, up to a week. But honestly, it rarely lasts that long in my house!
- “Can I freeze the cake?” Absolutely! You can freeze unfrosted cake layers wrapped tightly in plastic wrap for up to a month. Thaw at room temp before frosting. You can also freeze a fully frosted cake (cover well!) for about 2-3 weeks, but the frosting texture might be slightly softer when thawed.
- “My frosting is too runny/too thick!” Easy fix! Too runny? Add more sifted powdered sugar, a tablespoon at a time, until it firms up. Too thick? Add more heavy cream (or milk), a teaspoon at a time, until it loosens. You’re the boss!
- “What if I don’t have boiling water?” You need hot liquid to “bloom” the cocoa powder for that deep chocolate flavor. If you don’t have boiling, very hot tap water will work, but boiling is ideal.
Final Thoughts
Boom! You just made a Mint Chocolate Cake that looks like it came straight out of a fancy bakery, but tastes even better because *you* made it. Seriously, high five! Go ahead, pat yourself on the back, and maybe grab a giant slice (or two). You’ve basically leveled up your dessert game and earned all the bragging rights. Now go impress someone—or yourself—with your new culinary skills. You’ve definitely earned it!


