So you’re craving something that screams “fancy dessert” but low-key whispers “I made this in 20 minutes because I deserve nice things without the fuss,” huh? Same, friend, same. Get ready to dive headfirst into the molten glory that is a Lava Chocolate Cake! Forget those stuffy, complicated recipes. We’re doing this the easy, fun way. Because life’s too short for boring desserts and even shorter for baking stress. Let’s get melty!
Why This Recipe is Awesome
Okay, spill the beans: have you ever seen a dessert look this impressive, yet be so ridiculously simple to make? Nope, I didn’t think so. This lava cake recipe is basically **idiot-proof**. And trust me, if *I* can pull off a perfect gooey center every single time, you’re practically a pastry chef already. Seriously, it’s quick, uses minimal ingredients you probably already have, and the payoff is a rich, warm, chocolatey explosion that will make you question all your life choices before this moment. Plus, it’s personal-sized, so no sharing required. You’re welcome.
Ingredients You’ll Need
Gather ’round, my sweet-toothed comrades! Here’s the small but mighty squad you’ll need for your molten masterpiece. No weird stuff, just pure chocolatey goodness:
- **1/2 cup (1 stick) unsalted butter:** The good stuff. Don’t skimp. This is where the magic begins.
- **6 ounces good quality semi-sweet chocolate, chopped:** And by “good quality,” I mean something you’d actually eat on its own. Not the questionable stuff from the back of your pantry. This is the **star of the show**, so choose wisely!
- **2 large eggs, plus 2 large egg yolks:** That extra yolk is your secret weapon for ultimate gooeyness. Shhh, don’t tell anyone.
- **1/4 cup granulated sugar:** Just enough sweetness to balance the chocolate party.
- **Pinch of salt:** Because even chocolate needs a little seasoning to truly shine.
- **2 tablespoons all-purpose flour:** Don’t worry, it’s just enough to hold it all together without making it cake-like. We want lava, not a brick!
- **1 teaspoon vanilla extract:** A little splash of happiness. Or, if you’re feeling feisty, a shot of espresso powder for extra depth – your call!
Step-by-Step Instructions
Ready? Set? Bake! These steps are so easy, you could probably do them in your sleep (but maybe don’t, for safety reasons).
- **Preheat and Prep:** Crank that oven to **425°F (220°C)**. Grab two 6-ounce ramekins. Lightly butter the insides, then dust them with a little cocoa powder or flour. This ensures your cakes pop out like supermodels on a runway.
- **Melt the Chocolate Magic:** In a microwave-safe bowl (or a double boiler if you’re feeling fancy), combine your butter and chopped chocolate. Microwave in 30-second bursts, stirring in between, until it’s smooth and gloriously melted. Set aside to cool slightly.
- **Whisk It Real Good:** In another medium bowl, whisk together your eggs, egg yolks, sugar, and salt until light and creamy. You’re looking for pale yellow, not bright yellow. Get those arm muscles working!
- **Combine the Gooeyness:** Slowly pour the slightly cooled chocolate mixture into the egg mixture, whisking constantly. You want to mix it well, but don’t go crazy.
- **Fold in the Flour (Gently!):** Sift in your flour (and espresso powder, if using) and vanilla extract. Gently fold it in with a spatula until just combined. **Do not overmix!** We’re making lava, remember? Not a dense brownie.
- **Fill ‘Em Up:** Divide the batter evenly between your prepared ramekins. They should be about two-thirds full.
- **Bake ‘Em Till They’re Almost Done:** Pop those beauties into the preheated oven for about **12-14 minutes**. You’re looking for edges that are set, but the center should still be jiggly. That jiggle is your lava, folks!
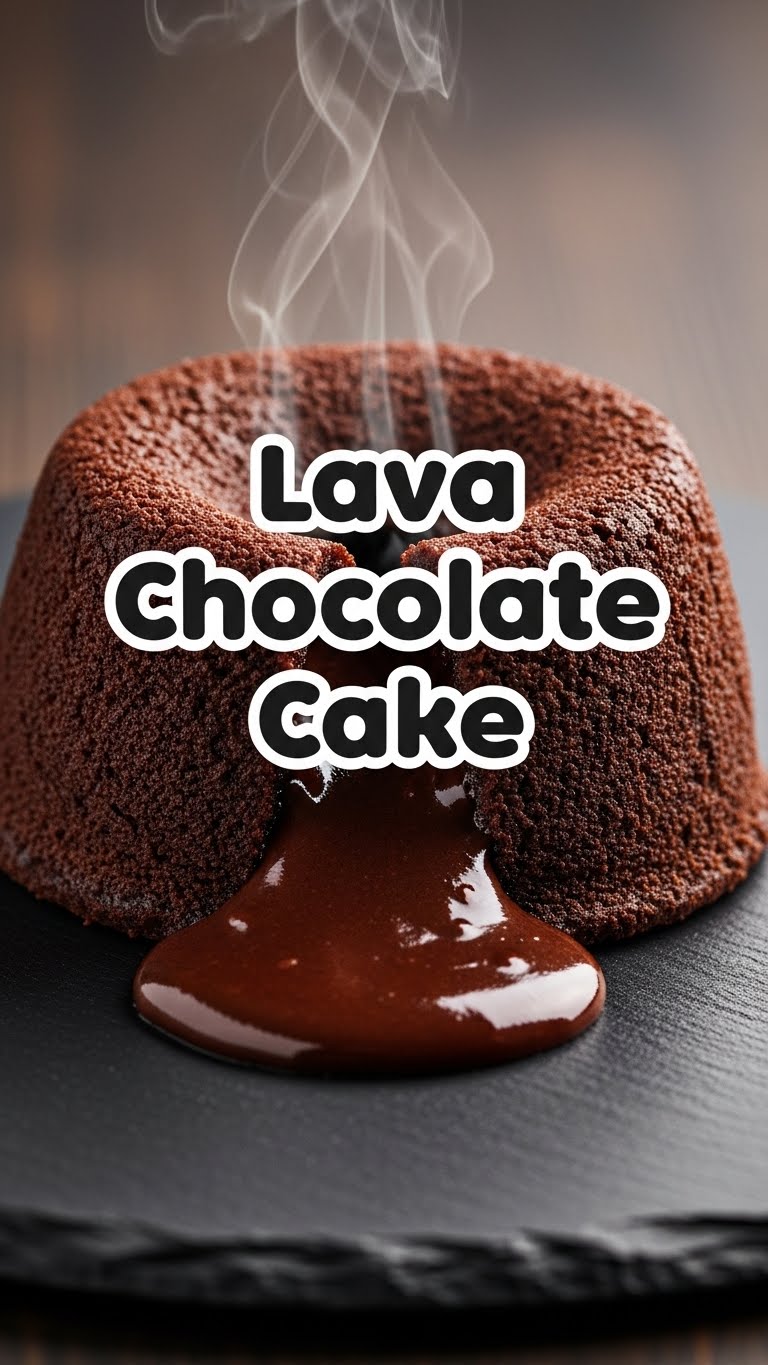
- **The Grand Finale:** Carefully remove the ramekins from the oven. Let them cool for just a minute or two, then place a serving plate upside down over each ramekin and, with a swift motion, invert. Lift the ramekin, and voilà! Top with a scoop of ice cream, berries, or just eat it plain. You do you.
Common Mistakes to Avoid
Listen up, buttercup! Even the easiest recipes have pitfalls. Don’t be that person. Here are a few rookie errors to steer clear of:
- **Overbaking:** This is the #1 lava cake killer. You go a minute too long, and suddenly you have a regular chocolate cake. Delicious, yes, but not the molten dream we’re after. **Watch that oven like a hawk!**
- **Not prepping your ramekins properly:** Forgetting to butter and dust means your cake will stage a rebellion and stick stubbornly to the dish. Who wants to scoop out a lava cake? Nobody.
- **Using cheap chocolate:** Remember what I said about the “star of the show”? Bad chocolate means bad lava. Period. Your taste buds will thank you for splurging a little here.
- **Impatience:** I know, I know, you want to devour it immediately. But giving it a minute to set after baking makes it easier to invert. Trust the process!
Alternatives & Substitutions
Feeling creative? Or just missing an ingredient? No stress! Here are some ways to shake things up:
- **Chocolate Choices:** I love semi-sweet, but if you’re a dark chocolate fiend, go for it! Just know it’ll be less sweet. For a sweeter treat, you could even use milk chocolate, but it might be a bit too rich for some.
- **Flavor Boosts:** Swap out the vanilla for mint extract for a mint chocolate lava cake. Or add a tablespoon of orange zest to the batter for a sophisticated citrusy kick. So good, IMO.
- **Gluten-Free Fun:** You can totally use a 1:1 gluten-free flour blend instead of regular flour. Just make sure it’s a good quality blend for baking.
- **No Ramekins? No Problem!** Mini muffin tins can work in a pinch, just reduce the baking time significantly (think 7-9 minutes). Or even small oven-safe teacups if you’re truly desperate and adventurous!
FAQ (Frequently Asked Questions)
Got questions? I’ve got answers! (Mostly.)
- **Can I use margarine instead of butter?** Well, technically yes, but why hurt your soul like that? Butter tastes better, performs better, and frankly, makes a superior lava cake. #ButterLover
- **Can I make these ahead of time?** You can definitely make the batter and chill it for up to 24 hours. Just give it a quick stir before pouring into ramekins and add a minute or two to your baking time. FYI!
- **How do I know when it’s perfectly done?** The edges should look set and slightly puffed, but when you gently jiggle the ramekin, the center should still wobble like a plate of Jell-O. That wobble is your golden ticket to molten bliss.
- **My cake didn’t have much lava, what happened?** Likely overbaked, my friend! Next time, pull it out when that center still has a good jiggle. Every oven is a diva, so yours might bake faster or slower.
- **What if I don’t have good quality chocolate?** TBH, the better the chocolate, the better the lava. If you use something waxy or overly sweet, your lava might not be as smooth or flavorful. It’s the core ingredient, so don’t skimp here.
- **What are some good toppings?** Oh, the possibilities! Vanilla ice cream, fresh berries, a dusting of powdered sugar, a dollop of whipped cream, or even a drizzle of raspberry coulis. Go wild!
Final Thoughts
And there you have it, folks! Your very own, incredibly impressive, yet secretly super easy, Lava Chocolate Cake. You’ve just unlocked a new level of dessert mastery. Now go impress someone—or better yet, just yourself—with your new culinary skills. You’ve earned this gooey, chocolatey triumph! Enjoy every single molten bite!


