So you’re craving something tasty but too lazy to spend forever in the kitchen, huh? Same. What if I told you we could whip up a cake that looks like it came straight from a fancy patisserie, but actually just requires a bit of stirring and a whole lot of love (and chocolate, obviously)? Meet your new best friend: The Drip Chocolate Cake. It’s majestic, gloriously messy in the best way, and dangerously delicious. Let’s get baking, shall we?
Why This Recipe is Awesome
Okay, let’s be real. We all want to look like a baking guru without actually *being* a baking guru. This recipe is your secret weapon, my friend. Here’s why it’s about to become your go-to:
- It looks ridiculously impressive, but it’s actually super easy to make. Seriously, even if you’ve been known to burn water, you got this.
- It’s a chocolate explosion! Cake, frosting, AND a decadent drip? Yes, please. This isn’t just a cake; it’s a chocolate experience.
- Perfect for any occasion, or no occasion at all. Just a Tuesday night? Treat yo’ self!
- The “drip” effect covers a multitude of frosting sins. Messy is part of the charm here!
- Instant mood booster. Need I say more?
Ingredients You’ll Need
Gather your troops! No need for fancy equipment, just your standard kitchen arsenal and a good vibe. We’re breaking this down into cake, frosting, and that glorious drip.
For the Seriously Moist Chocolate Cake:
- 2 cups All-Purpose Flour: The backbone of our cakey dreams.
- 2 cups Granulated Sugar: Sweetness is non-negotiable.
- ¾ cup Unsweetened Cocoa Powder: The deeper the better!
- 2 tsp Baking Soda: Our lift-off agent.
- 1 tsp Baking Powder: Back-up lift-off agent. Teamwork!
- 1 tsp Salt: Don’t skip it; it brings out all that chocolate flavor.
- 1 cup Milk: Any kind works, whole milk gives it a little extra richness.
- ½ cup Vegetable Oil: For that ultimate moistness.
- 2 Large Eggs: Room temp if you can remember, but no stress if not.
- 2 tsp Vanilla Extract: The MVP of flavor.
- 1 cup Hot Water or Hot Coffee: Shhh, this is the secret weapon! Coffee enhances chocolate like nobody’s business.
For the Dreamy Chocolate Buttercream Frosting:
- 1 cup (2 sticks) Unsalted Butter: Softened, please!
- 3-4 cups Powdered Sugar: Sifted, unless you like lumps (you don’t).
- ½ cup Unsweetened Cocoa Powder: More chocolate, more happiness.
- ¼ cup Milk or Cream: To get that perfect spreadable consistency.
- 1 tsp Vanilla Extract: More vanilla, because why not?
For the Glorious Chocolate Ganache Drip:
- 1 cup Semi-Sweet Chocolate Chips: Or finely chopped good quality chocolate. Quality matters here, FYI!
- ½ cup Heavy Cream: The smoother the better.
Step-by-Step Instructions
Alright, apron on, good tunes playing, let’s do this! These steps are short, sweet, and to the point.
- Get Prepped: Preheat your oven to 350°F (175°C). Grease and flour two 8 or 9-inch round cake pans. Or line with parchment. Whatever works for you.
- Mix the Dry Stuff: In a large bowl, whisk together the flour, sugar, cocoa powder, baking soda, baking powder, and salt. Make sure there are no lumpy surprises!
- Combine the Wet Crew: In another bowl, whisk together the milk, oil, eggs, and vanilla extract until well combined.
- Unite Them: Pour the wet ingredients into the dry ingredients. Mix on low speed (or by hand) until just combined. Don’t overmix, we’re not making glue!
- Add the Magic: Carefully pour in the hot water or hot coffee. The batter will be thin, and that’s totally okay! Mix until smooth.
- Bake It Up: Divide the batter evenly between your prepared cake pans. Bake for 30-35 minutes, or until a wooden skewer inserted into the center comes out clean.
- Cool Down: Let the cakes cool in the pans for about 10-15 minutes before inverting them onto a wire rack to cool completely. This step is CRUCIAL!
- Whip the Frosting: While cakes cool, make the buttercream. In a large bowl, beat the softened butter until creamy. Gradually add the powdered sugar and cocoa powder, alternating with milk/cream, and beat until light and fluffy. Stir in vanilla.
- Frost Away: Once the cakes are completely cool, level them if needed (a serrated knife works wonders!). Place one cake layer on your serving plate, spread with a generous layer of frosting. Top with the second cake layer and frost the entire cake. Don’t worry about perfection; the drip will hide some sins!
- Make the Ganache: Place chocolate chips in a heatproof bowl. Heat the heavy cream in a small saucepan or microwave until it just begins to simmer. Pour the hot cream over the chocolate chips. Let sit for 5 minutes, then whisk gently until smooth and glossy.
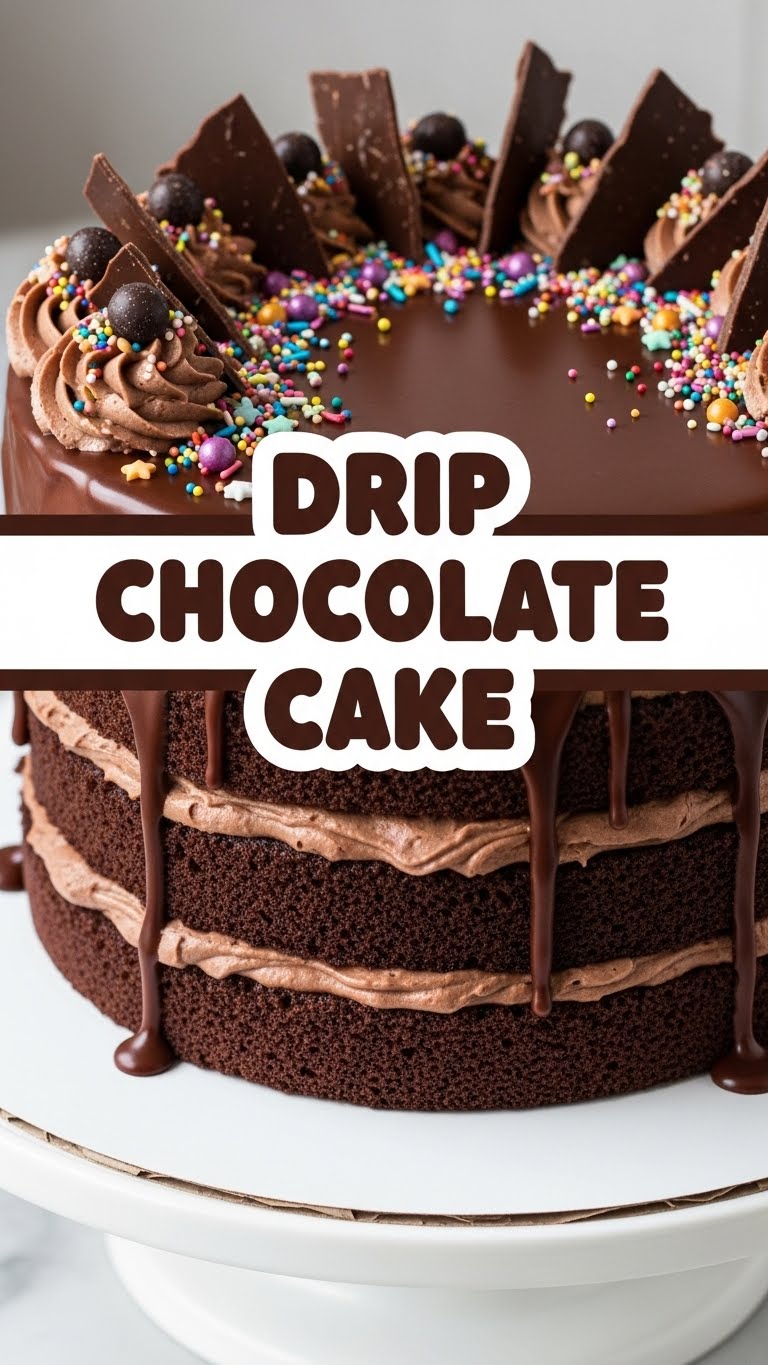
- Drip, Drip, Hooray! Let the ganache cool for about 10-15 minutes until it’s still pourable but slightly thickened. Slowly pour or spoon the ganache over the top center of the cake, letting it naturally drip down the sides. You can use a spoon to gently push some over the edge if you like a more dramatic drip.
- Chill Out: Pop the cake in the fridge for about 15-30 minutes to set that beautiful ganache drip.
- Devour: Slice, serve, and accept all the compliments!
Common Mistakes to Avoid
Nobody’s perfect, but we can avoid some common cake catastrophes, right? Learn from my past (chocolate-stained) mistakes:
- Impatience is the Enemy: Trying to frost or drip ganache on a warm cake is a recipe for a melty, sliding disaster. Seriously, let those cakes cool completely!
- Overmixing the Batter: When you’re combining the wet and dry ingredients, stop mixing as soon as everything is just combined. Overmixing develops the gluten too much, leading to a tough, dry cake. Nobody wants a sad, chewy cake.
- Ignoring Ganache Temperature: Pouring ganache when it’s too hot means it’ll be too thin and run straight off the cake. Too cold, and it’ll be chunky and hard to drip. A good sign it’s ready is when it’s still warm but thick enough to coat the back of a spoon.
- Using Subpar Chocolate for Ganache: This is where quality really shines. Cheap chocolate can seize up or just not taste as rich. Invest a little in good chocolate chips or a baking bar for that glorious drip. Your taste buds (and guests) will thank you, IMO.
- Opening the Oven Door Too Early: Resist the urge! Opening the oven door lets cold air in, which can cause your cake to sink in the middle. Wait until at least ¾ of the baking time has passed before peeking.
Alternatives & Substitutions
Feeling adventurous? Or just missing an ingredient? No worries, we’ve got options!
- Buttermilk Boost: Swap out regular milk for buttermilk in the cake batter for an even moister, more tender crumb. If you don’t have buttermilk, add 1 tablespoon of white vinegar or lemon juice to your regular milk and let it sit for 5 minutes before using.
- Oil vs. Butter in Cake: We’ve used oil for maximum moistness, but if you prefer the flavor of butter, you can substitute melted butter for the oil. Just be aware it might be slightly less moist over time.
- Dark Chocolate Drip: If you’re a true dark chocolate fanatic, use dark chocolate chips for the ganache. It’ll be less sweet and even more intense. Just remember, it might thicken faster!
- No Frosting? No Problem! If you’re really pressed for time or just prefer a simpler cake, you can skip the buttercream and just pour the ganache directly over the cooled cake. It’ll still be delicious!
- Extra Toppings: Want to jazz it up? Add some sprinkles, fresh berries (raspberries or strawberries are great!), chocolate shavings, or even a few chopped nuts on top of the ganache. Go wild!
FAQ (Frequently Asked Questions)
Got questions? I’ve got (casual) answers!
Can I use a different size cake pan?
Sure thing! Just remember that baking times will change. Smaller pans mean thicker cakes and longer baking; larger pans mean thinner cakes and shorter baking. Keep an eye on it!
My ganache is too thick/thin! What do I do?
Oh, the ganache drama! If it’s too thick, add a tiny bit more warm cream (1 tsp at a time) and whisk. If it’s too thin, let it cool longer, or pop it in the fridge for a few minutes (stirring every couple of minutes) until it thickens up. Patience, my friend!
Do I really need the hot water/coffee in the cake?
Well, technically you could use cold, but why would you? The hot liquid “blooms” the cocoa powder, making the chocolate flavor much richer and deeper. It also helps create that incredibly moist texture. So yeah, you really need it!
How long will this majestic cake last?
In an airtight container at room temperature, it should be good for 3-4 days. In the fridge, maybe a bit longer. But honestly, it usually doesn’t last that long, does it?
Can I make this cake gluten-free?
Absolutely! Just swap out the all-purpose flour for a good quality 1:1 gluten-free baking blend. Follow the rest of the recipe as written, and you should be golden.
Can I use margarine instead of butter for the frosting?
Well, technically yes, but why hurt your soul like that? Butter just gives a superior flavor and texture that margarine can’t quite replicate. If you’re going to treat yourself, go for the good stuff!
Final Thoughts
There you have it, superstar! Your very own Drip Chocolate Cake masterpiece. You’ve navigated the tricky waters of baking, conquered the ganache, and now stand victorious with a stunning, delicious creation. Go forth and conquer those cravings, share it (or don’t, I won’t judge), and bask in the glory of your chocolatey triumph. You’ve earned it! Now go impress someone—or yourself—with your new culinary skills. Happy baking!


