So you’re craving something warm, chocolatey, and utterly decadent, but the thought of spending hours in the kitchen sounds like a punishment, not a pleasure? Girl, I hear you. We’ve all been there, staring into the fridge hoping a magical cake will appear. Well, guess what? This isn’t *quite* magic, but it’s pretty darn close. Say hello to your new best friend: **Chocolate Cake with Condensed Milk.**
Why This Recipe is Awesome
Okay, let’s be real. In a world full of complicated recipes that require a culinary degree and the patience of a saint, this one is a breath of fresh air. Why is it awesome? Because it’s practically idiot-proof. Seriously, even I, the queen of “oops, did I just burn water?”, can pull this off. It’s ridiculously moist (thanks, condensed milk, you beautiful genius!), intensely chocolatey, and comes together faster than you can decide which Netflix show to binge next. Plus, it uses ingredients you probably already have lurking in your pantry. No obscure stuff here, folks. It’s a crowd-pleaser, a mood-booster, and a definite win for minimal effort, maximum deliciousness. You’re welcome.
Ingredients You’ll Need
Gather ’round, my fellow lazy gourmands! Here’s what you’ll need to make your chocolate dreams come true. Don’t worry, no fancy equipment required—just your trusty mixing bowl and a spoon (or a whisk, if you’re feeling fancy).
- **1 ½ cups all-purpose flour:** The backbone of our cake. Sift it, or don’t. I won’t tell.
- **¾ cup unsweetened cocoa powder:** This is where the magic happens. Go for good quality if you can, your taste buds will thank you.
- **1 ½ teaspoons baking soda:** Our leavening friend, making sure our cake isn’t a brick.
- **½ teaspoon salt:** Balances out all that sweetness and deepens the chocolate flavor. Don’t skip it!
- **1 cup granulated sugar:** Because sugar makes everything better. Period.
- **½ cup unsalted butter, melted:** Adds richness and moisture. If you only have salted, just reduce the added salt a tad.
- **1 large egg:** The binder, the glue, the reason our cake holds together.
- **1 teaspoon vanilla extract:** A flavor superstar. Don’t even think about skipping it.
- **1 cup milk (any kind!):** Whole, skim, almond, oat—whatever you have chilling in your fridge.
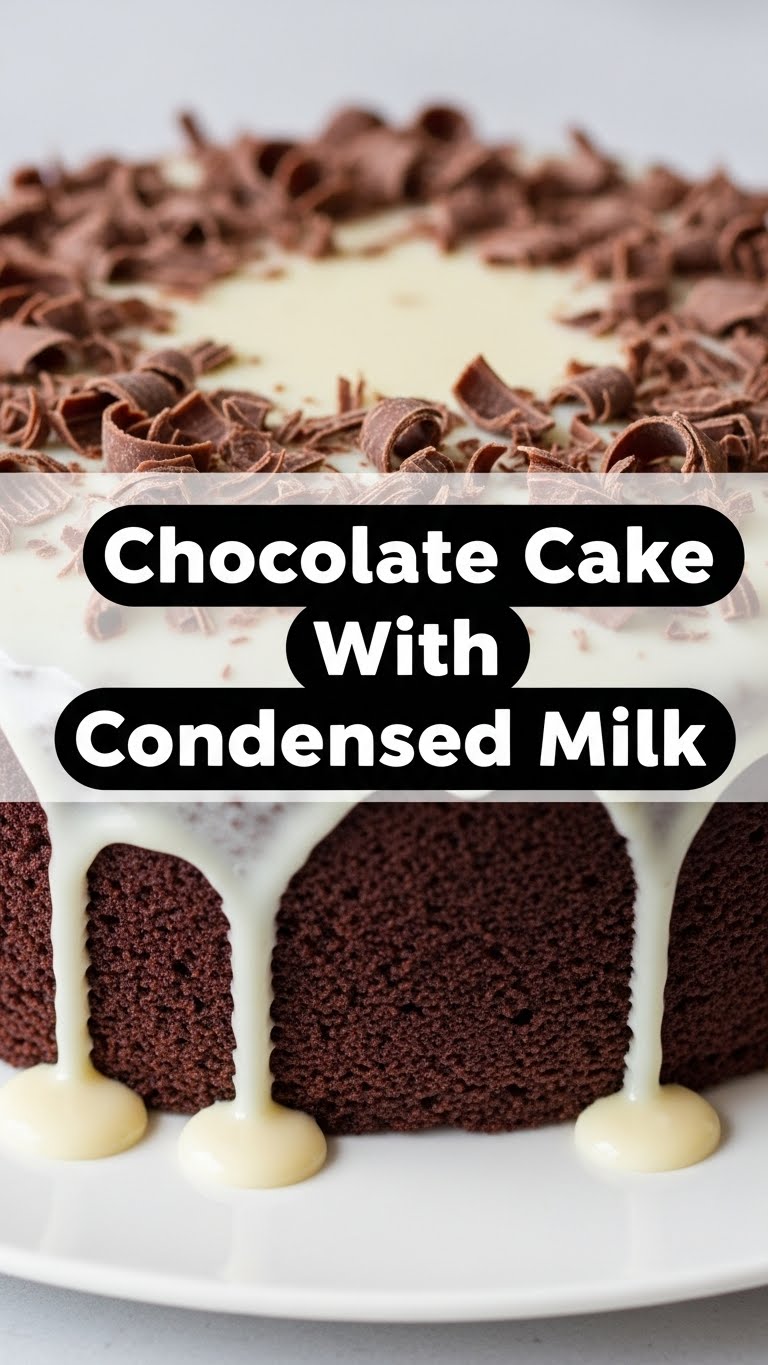
- **1 can (14 oz) sweetened condensed milk:** The star of the show! This is what gives us that incredible moistness and adds a creamy, sweet touch.
- **½ cup hot water or freshly brewed coffee:** This secret weapon intensifies the chocolate flavor like crazy. Trust me on this.
Step-by-Step Instructions
Alright, apron on (or not, no judgment here), let’s get baking! These steps are so easy, you could probably do them in your sleep.
- **Preheat Your Oven & Prep Your Pan:** First things first, turn your oven to 350°F (175°C). Then, grab an 8×8 or 9×9 inch baking pan. Grease it really well with butter or baking spray, then dust it lightly with a bit of cocoa powder (instead of flour, to keep that chocolate vibe strong).
- **Combine Dry Ingredients:** In a large bowl, whisk together the flour, cocoa powder, baking soda, salt, and granulated sugar. Give it a good whisk until everything is super combined and there are no lumpy bits.
- **Add Wet Ingredients:** Now, create a little well in the center of your dry ingredients. Pour in the melted butter, egg, vanilla extract, and milk. Mix gently until *just* combined. Don’t overmix! **Overmixing leads to tough cake, and nobody wants that.**
- **Stir in the Hot Stuff:** Slowly pour in the hot water or coffee. Keep stirring until the batter is smooth. It will be a bit thin, and that’s exactly what we want.
- **Bake It Up:** Pour your glorious chocolate batter into your prepared pan. Pop it into the preheated oven and bake for 30-35 minutes. How do you know it’s done? A toothpick inserted into the center should come out clean.
- **The Condensed Milk Drizzle:** As soon as you pull the cake out of the oven, while it’s still piping hot, grab that can of sweetened condensed milk. Pour it evenly over the entire surface of the hot cake. It will soak right in, creating pure magic!
- **Cool & Devour:** Let the cake cool in the pan completely. This is the hardest part, I know, but it’s crucial for the condensed milk to fully absorb and for the cake to set. Once cool, slice it up and prepare for chocolate heaven.
Common Mistakes to Avoid
Because even easy recipes have their pitfalls, and I’m here to save you from baking blunders. Learn from my past mistakes, dear friend!
- **Not Preheating the Oven:** Rookie mistake! If your oven isn’t at the right temperature from the start, your cake won’t rise properly. Think of it like jumping into a cold pool—it’s just not ideal.
- **Overmixing the Batter:** I can’t stress this enough. Once you add the wet to the dry, mix *just* until combined. Overmixing develops the gluten too much, leading to a dense, chewy cake instead of a light, fluffy one. **Stop mixing when you no longer see streaks of flour.**
- **Opening the Oven Door Too Early:** Curiosity killed the cake! Opening the oven door during the first 20-25 minutes can cause your cake to collapse. Resist the urge to peek!
- **Not Greasing Your Pan Properly:** There’s nothing sadder than a perfectly baked cake stuck to the bottom of the pan. Grease AND dust with cocoa powder. Your future self will thank you.
- **Skipping the Hot Water/Coffee:** You might think, “Eh, it’s just water.” But that hot liquid, especially coffee, blooms the cocoa powder, making the chocolate flavor much more intense and deep. Don’t skip this secret weapon!
Alternatives & Substitutions
Feeling adventurous? Or maybe you’re just out of one thing? No stress! Here are some ways to shake things up a bit.
- **Milk Alternatives:** Out of dairy milk? No biggie! Almond milk, oat milk, or soy milk all work perfectly. The texture might be slightly different, but the deliciousness remains.
- **Coffee vs. Hot Water:** If you’re not a coffee fan (gasp!), just use hot water. It still does the job of blooming the cocoa powder. But IMO, the coffee really takes the chocolate flavor to another level without making the cake taste like coffee.
- **Add-ins:** Feeling extra? Stir in ½ cup of chocolate chips or chopped nuts into the batter before baking for an extra textural surprise. Or, a dash of espresso powder (about 1-2 tsp) can deepen the chocolate even further.
- **Different Toppings:** While the condensed milk soak is divine on its own, you could also dust with powdered sugar, add a dollop of whipped cream, or even a simple chocolate ganache if you want to go all out (but then it wouldn’t be quite as “lazy” now, would it?).
FAQ (Frequently Asked Questions)
Got questions? I’ve got answers. Probably. Let’s tackle some common conundrums.
- **Can I make this in a different size pan?** You can, but you’ll need to adjust baking time. A bundt pan might need longer, while cupcakes will be much quicker. Keep an eye on it and use the toothpick test!
- **What if I don’t have baking soda? Can I use baking powder?** Unfortunately, no. Baking soda reacts with acidic ingredients (like cocoa powder) to create rise, and baking powder is a different leavener. For this recipe, stick with baking soda.
- **How long does this cake last?** Tightly covered at room temperature, it’s usually good for 3-4 days. But let’s be real, it’s chocolate cake. It probably won’t last that long.
- **Can I add frosting?** Absolutely! While the condensed milk makes it super moist and sweet, a simple chocolate buttercream or even a cream cheese frosting would be divine if you want a more traditional frosted cake.
- **My cake looks dry! What went wrong?** Usually, this is due to overbaking. Keep an eye on your oven and use the toothpick test. Or, perhaps your oven runs hot. An oven thermometer can be a great investment!
- **Can I use light condensed milk?** You can, but the texture might be slightly less rich and creamy. For the full, decadent experience, stick to the full-fat stuff. You’re making cake, not dieting, right?
Final Thoughts
There you have it, folks! An unbelievably delicious, super simple chocolate cake that’ll make you feel like a master baker without breaking a sweat. This cake is proof that good things don’t always require a ton of effort. So go ahead, whip this up, and bask in the glory of homemade deliciousness. Share it with friends (or don’t, I won’t judge!), pair it with a scoop of ice cream, or just eat it straight from the pan with a fork. You’ve earned it! Now go impress someone—or yourself—with your new culinary skills. Happy baking, my friend!

