So you’re scrolling through TikTok, saw some ridiculously fancy dessert, and now your sweet tooth is doing a mosh pit, but the idea of baking something complicated makes you want to curl up and cry? Same, friend, same. Good news: I’ve got your back with a recipe so easy, it’s practically a magic trick. We’re talking Chocolate Ice Cream Cake, and it’s about to become your new best friend for potlucks, birthdays, or just a Tuesday night when you deserve something spectacular (which, let’s be honest, is every Tuesday).
Why This Recipe is Awesome
Because it’s literally **idiot-proof**. No offense, but even if your culinary skills peak at microwaving popcorn, you got this. Seriously. There’s almost no actual *baking* involved, which means less stress and more time for important things like deciding what show to binge-watch while you wait for it to freeze. It’s rich, it’s creamy, it’s chocolatey, and it’s basically an edible hug, but colder and even more decadent. Plus, it looks like you put in way more effort than you actually did. Win-win, IMO.
Ingredients You’ll Need
Get ready for a shopping list that’s more “treat yo’ self” than “healthy greens.”
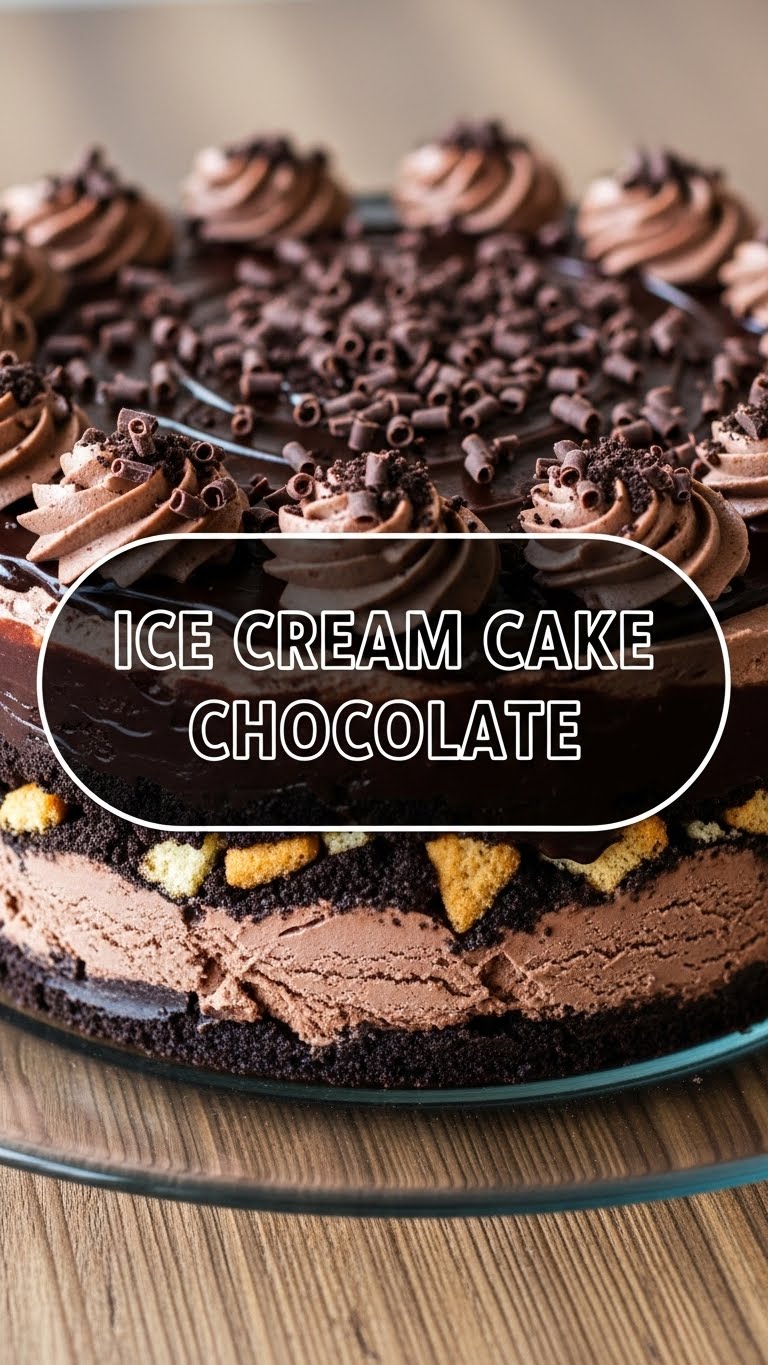
- Chocolate Cookie Sandwiches (like Oreos, fam): Grab a family pack. No, seriously. You’ll need about 35-40 cookies. You’ll thank me later. And maybe eat a few. For quality control, obvs.
- Melted Butter: About half a cup (1 stick). Unsalted, unless you’re feeling wild and want that salty-sweet vibe. Butter makes everything better, right?
- Chocolate Ice Cream: Two big tubs (about 1.5 quarts each, so 3 quarts total). Your favorite kind! Don’t skimp here. This is the undisputed star of the show.
- Hot Fudge Topping: One jar. Because why just have chocolate when you can have *more* chocolate?
- Whipped Topping (Cool Whip or homemade): One large tub (16 oz). The fluffy cloud that ties it all together and makes it feel extra fancy.
- Optional Garnish: Extra cookie crumbs, chocolate shavings, sprinkles, a drizzle of chocolate syrup – go wild! This is where you flex your artistic muscles (or just dump stuff on top, no judgment).
Step-by-Step Instructions
Alright, let’s get this party started. It’s so easy, you might just do a happy dance.
Crush Those Cookies: Empty almost all of your chocolate sandwich cookies into a food processor and pulse until they’re fine crumbs. Save about 5-7 for later garnish, or just eat them. If you don’t have a food processor, a large Ziploc bag and a rolling pin work wonders (and double as stress relief!).
Butter Up the Crumbles: Pour your melted butter over the cookie crumbs and mix until it all looks like wet sand. Press this glorious mixture firmly into the bottom of a 9-inch springform pan. Really get in there and compact it!
Freeze the Crust: Pop that pan into the freezer for at least 15-20 minutes. We want that crust to be nice and firm, ready to hold all the deliciousness we’re about to pile on.
Soften the Star: While your crust chills, take one tub of chocolate ice cream out of the freezer. Let it sit on the counter for about 10-15 minutes to soften just enough so it’s spreadable, but not totally melted. You want it scoopable, not soupy!
Layer One: Ice Cream Dreams: Once the crust is firm, spread about half of your softened ice cream evenly over the crust. Use an offset spatula or the back of a spoon to make it smooth. This is your first creamy layer of joy.
Fudge It Up: Microwave your hot fudge for a few seconds to make it pourable, then drizzle about half the jar generously over the ice cream layer. Don’t be shy; this is where the magic happens.
More Ice Cream, Please: Repeat step 4 with the second tub of ice cream, then spread it over the fudge layer. Yes, more chocolate! You’re welcome.
Whipped Perfection: Gently spread the entire tub of whipped topping over the top ice cream layer. Make it look pretty, or just get it on there. It’s going to be delicious either way.
Freeze for Glory: This is a crucial step! Cover the cake loosely with plastic wrap and freeze for at least 4 hours, or ideally, overnight. **Patience, my friend, patience.** It’s worth the wait.
Garnish and Serve: When you’re ready to serve, remove the sides of the springform pan. Drizzle with the remaining hot fudge, sprinkle those reserved cookie crumbs (or any other garnish you chose!), slice it up, and bask in the adoration of your friends and family. Or just eat it all yourself. No judgment here.
Common Mistakes to Avoid
Even though this recipe is super chill, there are a few rookie errors that can happen. Let’s make sure you skip ’em:
- Not Freezing Enough: Impatience is your enemy here. If you try to cut it too soon, it’ll be a delicious mess. A delicious, soupy mess. **Always freeze for at least 4 hours, preferably overnight.**
- Over-Softening the Ice Cream: You want spreadable, not melted soup. If it gets too soft, just pop it back in the freezer for a bit to firm up before layering.
- Forgetting the Springform Pan: Good luck getting that beautiful, layered masterpiece out of a regular cake pan! The springform makes removal a breeze.
- Eating All the Cookies Before the Crust: Self-control, my friend. I know they’re tempting, but the crust needs them.
Alternatives & Substitutions
Feeling adventurous? Or just working with what you’ve got? Here are some ideas:
- Cookie Crust: Instead of chocolate cookies, try graham cracker crumbs, vanilla wafers, or even crushed pretzels for a salty-sweet twist.
- Ice Cream Flavors: Go wild! Vanilla, coffee, mint chip, peanut butter cup, or even swirl different flavors for layers. Vanilla bean ice cream with the chocolate fudge is divine!
- Topping Drizzles: Caramel sauce, peanut butter sauce, white chocolate ganache – your imagination is the limit.
- Mix-ins: Add chopped nuts, mini chocolate chips, mini marshmallows, or chopped candy bars between layers for extra texture and flavor.
- Whipped Topping: If you’re feeling fancy, make your own fresh whipped cream. Just be sure to stabilize it a bit if you want it to hold up longer in the freezer.
FAQ (Frequently Asked Questions)
Got questions? I’ve got answers (and probably a joke or two).
- Can I make this ahead of time? Absolutely! It’s actually encouraged. The longer it freezes, the better it sets. It’s perfect for making a day or two before an event.
- How long does it last in the freezer? If it’s properly wrapped (tightly in plastic wrap then foil), it can last up to a week. But honestly, it’s usually gone in a day.
- Do I *have* to use a springform pan? Strongly, strongly recommended. It makes unmolding a dream. If you don’t have one, you *could* line a regular cake pan with foil with an overhang to lift it out, but it’s trickier.
- My ice cream is too hard to scoop and spread! What do I do? Just let it sit out on the counter a little longer. Give it 5-10 more minutes. Don’t try to force it, or you’ll get tired arms and a broken spoon.
- Can I add alcohol to this? Ooh, good question! A splash of Kahlua or Irish cream drizzled over the ice cream layers (before the fudge) could add a grown-up kick. Just don’t overdo it, or it might not freeze properly.
- What if I don’t have a food processor for the crumbs? A sturdy Ziploc bag and a rolling pin (or a heavy bottomed glass/mug) will do the trick! Just smash away until they’re fine crumbs. Great for working out some aggression, FYI.
Final Thoughts
So there you have it, your new go-to dessert for when you want to impress without the stress. This chocolate ice cream cake is a showstopper, a crowd-pleaser, and a testament to the fact that delicious doesn’t have to mean difficult. Now go forth and conquer, you magnificent kitchen wizard! Make that chocolate ice cream cake – your taste buds (and maybe your ego) will absolutely thank you. You totally earned this.


