So you’re craving something tasty but too lazy to spend forever in the kitchen, huh? Same. We’ve all been there, staring blankly into the fridge, wishing a magical chocolate cake would just *appear*. Well, guess what? We’re about to make that wish a reality, and no, you don’t need a wizard’s degree or a team of pastry chefs. Just you, me, and a quest for ultimate chocolatey goodness.
Why This Recipe is Awesome
Okay, let’s be real. There are a million chocolate cake recipes out there. So why this one? Because it’s practically idiot-proof. Seriously, even I, a person who once set off a smoke alarm making toast, manage to nail this every single time. It’s moist, it’s rich, it’s got that deep chocolate flavor that makes your soul sing, and the best part? It’s ridiculously easy. You’ll spend more time admiring your handiwork than actually, you know, working. Plus, it’s a one-bowl wonder for many steps, which means less dish duty. You’re welcome.
Ingredients You’ll Need
Gather ’round, my fellow kitchen adventurers! Here’s your treasure map of ingredients. Don’t stress too much; most of these are probably chilling in your pantry already.
- 1 ½ cups (190g) All-Purpose Flour: The foundation of our chocolate empire.
- 1 ½ cups (300g) Granulated Sugar: Because life’s too short for unsweetened cake.
- ½ cup (45g) Unsweetened Cocoa Powder: Not the hot chocolate mix, folks. We want the real deal.
- 1 ½ teaspoons Baking Soda: Our magical lift-off agent.
- 1 teaspoon Salt: Balances everything out. Don’t skip it, seriously.
- 1 cup (240ml) Milk: Whole milk is best for richness, but whatever you have will likely do.
- ½ cup (120ml) Vegetable Oil: Or canola, or any neutral oil. This keeps things super moist.
- 1 Large Egg: The binder that holds our dreams together.
- 1 teaspoon Vanilla Extract: The secret weapon that makes chocolate taste even more chocolatey.
- 1 cup (240ml) Boiling Water: This is the secret to an incredibly moist cake. Don’t be scared!
Step-by-Step Instructions
Alright, apron up! Let’s get this party started.
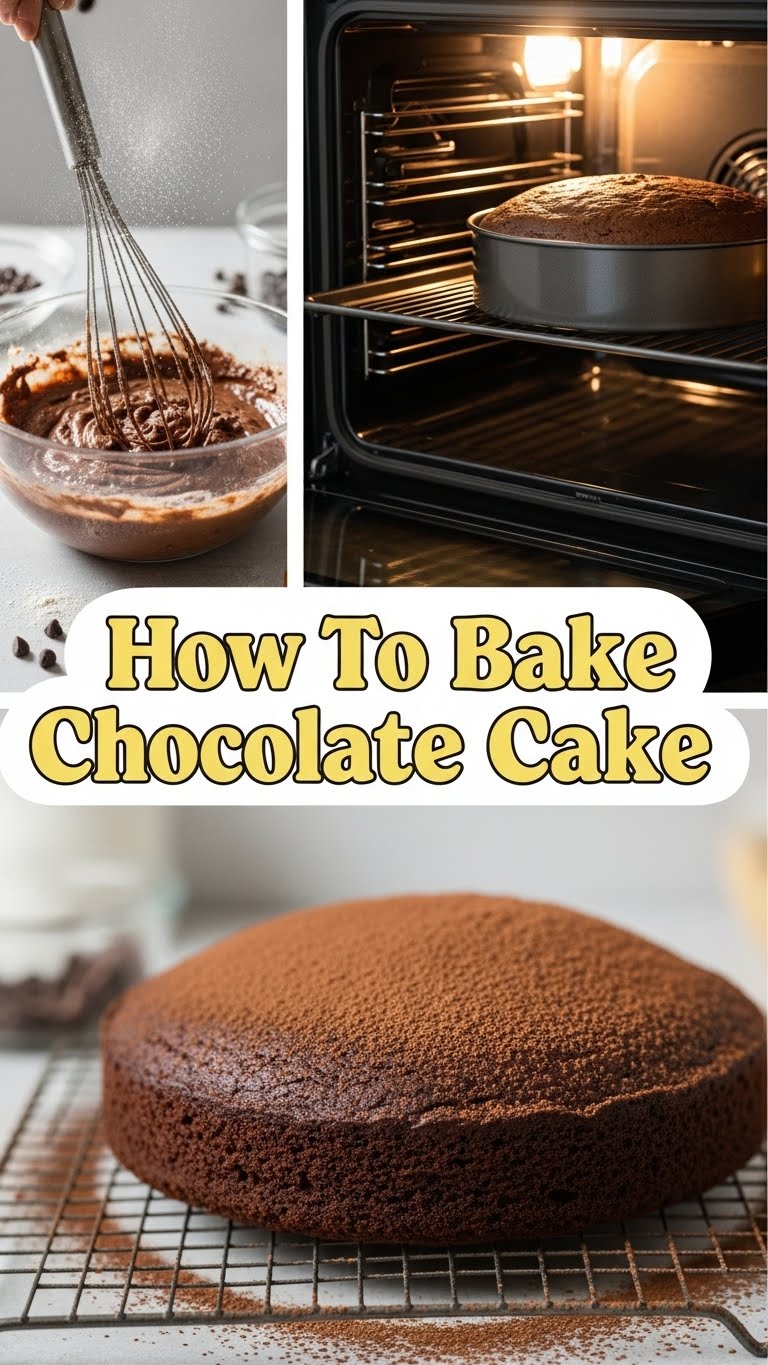
- Preheat & Prep: First things first, fire up that oven to 350°F (175°C). Then, grab a 9×13 inch baking pan (or two 8-inch round pans) and grease it well with butter or oil, then dust lightly with flour or cocoa powder. This prevents sticking, which is a real mood killer.
- Combine Dry Ingredients: In a large mixing bowl, whisk together the flour, sugar, cocoa powder, baking soda, and salt. Make sure there are no lumps—we’re aiming for smooth sailing here.
- Add Wet Ingredients (Mostly): Pour in the milk, oil, egg, and vanilla extract. Beat everything on medium speed with an electric mixer (or with serious arm power) until just combined. Don’t overmix!
- Introduce the Hot Water: Carefully pour in the boiling water. The batter will be thin, almost like soup, and you might think you’ve messed up. You haven’t! Whisk it gently until smooth. This is the magic potion for moistness.
- Bake It Up: Pour the super-liquid batter into your prepared pan(s). Pop it into the preheated oven. Bake for 30-35 minutes for a 9×13 pan, or 25-30 minutes for round pans. You’ll know it’s done when a toothpick inserted into the center comes out clean.
- Cool Down: Let your masterpiece cool in the pan for about 10-15 minutes before attempting to invert it onto a wire rack to cool completely. Patience, young padawan! Frosting a warm cake is a one-way ticket to a melted mess.
Common Mistakes to Avoid
Listen up, buttercup. We’ve all made blunders in the kitchen. Learn from my past culinary catastrophes!
- Thinking you don’t need to preheat the oven: Rookie mistake. A cold oven equals unevenly baked cake. Don’t do it.
- Overmixing the batter: This develops the gluten too much, leading to a tough, dense cake. We want light and fluffy, not a brick. Mix until just combined, then stop.
- Not greasing AND flouring the pan: Just greasing isn’t always enough, especially for chocolate cakes. The cocoa dust provides an extra layer of non-stick magic.
- Opening the oven door constantly: Resist the urge! Every time you open it, the temperature drops, messing with your cake’s rise and texture. Wait until the final few minutes of baking.
- Ignoring the boiling water instruction: Yes, it feels weird. No, it’s not a typo. This is crucial for that signature moistness. Trust the process!
Alternatives & Substitutions
Feel free to get creative! Baking is about having fun, after all.
- Flour Power: While all-purpose is classic, you can try a gluten-free all-purpose blend (make sure it has xanthan gum) if you’re avoiding gluten. I’ve had good luck with cup-for-cup alternatives!
- Dairy-Free Delight: Swap regular milk for almond, soy, or oat milk. They work beautifully.
- Oil Options: Not a fan of vegetable oil? Melted coconut oil (liquid form) or even applesauce (use a 1:1 ratio, might make it slightly denser) can be alternatives, though I personally love the consistent results of vegetable oil for this particular recipe.
- Chocolate Boost: For an extra rich cake, stir in ½ cup of chocolate chips (dark or semi-sweet) into the batter before baking. Because more chocolate is always a good idea, IMO.
- Coffee Kick: Replace the boiling water with hot brewed coffee for an even deeper chocolate flavor. Coffee really amplifies chocolate without making the cake taste like coffee itself. Genius!
FAQ (Frequently Asked Questions)
- Can I use margarine instead of butter for greasing the pan? Well, technically yes, but why hurt your soul like that? Butter just works better and adds a tiny bit of flavor, plus it’s easier to spread.
- How long will this chocolate cake last? If you manage to not devour it all in one sitting, it’ll be great for 3-4 days at room temperature, covered. In the fridge, maybe up to a week. Good luck making it last that long, though!
- Can I make this into cupcakes? Absolutely! Line a cupcake tin with liners and fill them about two-thirds full. Bake for about 18-22 minutes. You’ll get roughly 24 cupcakes.
- What kind of frosting should I use? A classic chocolate buttercream is divine. Or, for something quicker, a simple ganache or cream cheese frosting works wonders too. Don’t overthink it, just make it delicious.
- My cake sank in the middle! What happened? Oh, the dreaded crater! This often happens if the oven door was opened too early, the oven temperature was too low, or the cake was underbaked. Make sure your oven is properly calibrated, and resist peeking!
- Do I need to sift the dry ingredients? While I don’t always do it (shhh!), sifting can help ensure a lighter, airier cake by breaking up any lumps and incorporating air. If you have the time, go for it. If not, a good whisk will usually suffice for this recipe.
Final Thoughts
And there you have it, my friend! A perfect, utterly delicious chocolate cake that makes you look like a culinary genius without breaking a sweat. This recipe is your new secret weapon for potlucks, birthdays, or just a Tuesday night when you desperately need chocolate. So, what are you waiting for? Now go impress someone—or yourself—with your new culinary skills. You’ve earned it!

