So you’re craving something tasty but too lazy to spend forever in the kitchen, huh? Same, friend, same. Especially when that craving hits for something utterly divine, like a cloud-like cake that whispers sweet nothings of white chocolate and zesty raspberries. Fear not, my fellow culinary enthusiast (or, let’s be real, enthusiastic eater), because I’ve got the lowdown on a recipe that’s about to become your new favorite obsession: The White Chocolate Raspberry Dream Cake.
Why This Recipe is Awesome
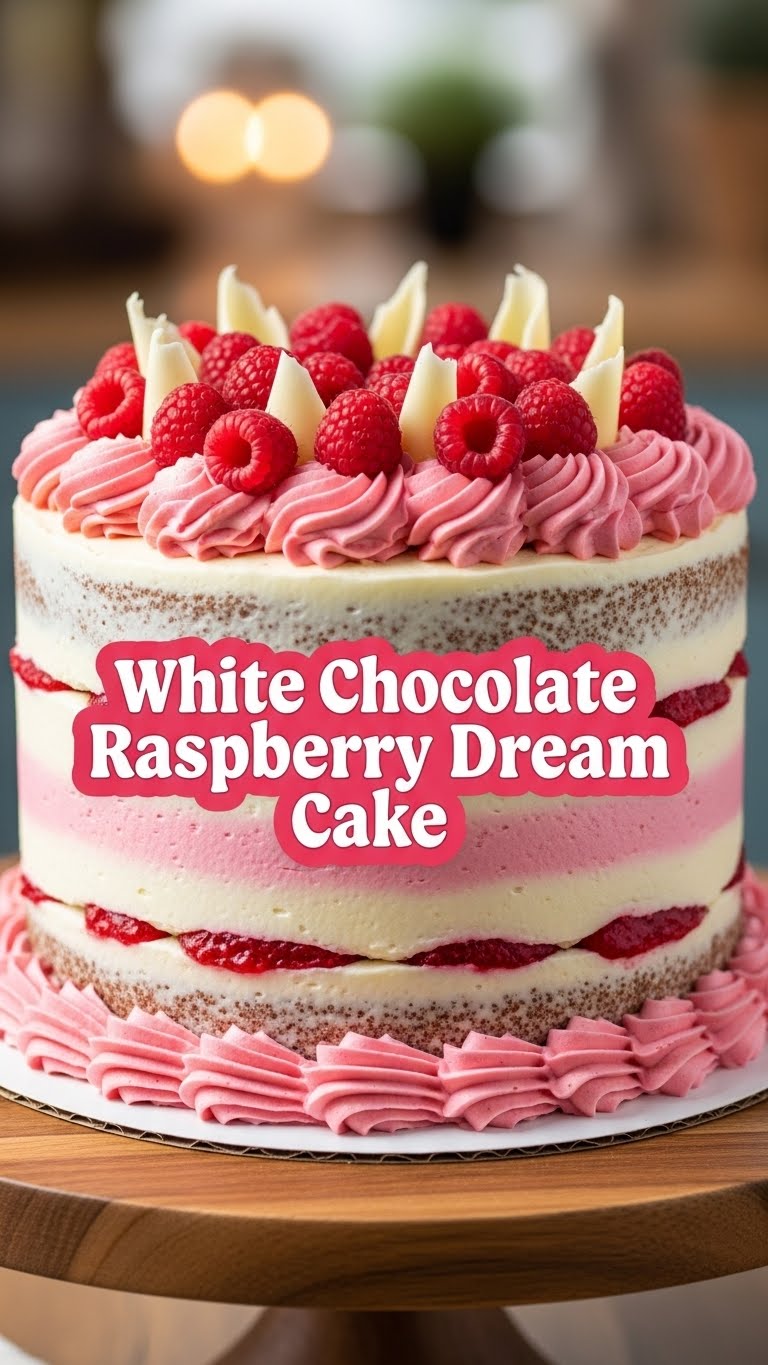
Okay, let’s be brutally honest. Most fancy cakes look like they require a culinary degree and a full day off work. This one? Not so much. It’s basically **idiot-proof**, and coming from someone who once burnt water (don’t ask), that’s high praise. We’re talking about a super moist, fluffy white chocolate cake studded with bright, juicy raspberries, all smothered in a rich, tangy cream cheese frosting that also has white chocolate in it. (Because why have one good thing when you can have two?).
It looks impressive, tastes even better, and yet, it won’t have you pulling your hair out. You’ll make it, you’ll serve it, and everyone will think you’re some kind of baking wizard. And we both know the only magic involved is butter and sugar… but shhh, that’s our secret. 😉
Ingredients You’ll Need
Time to gather your edible treasures! Don’t skimp on the good stuff – your taste buds will thank you.
- For the Cake:
- 1 ½ cups all-purpose flour (the basic kind, no fancy stuff needed)
- 1 ½ teaspoons baking powder (your cake’s hype-man, lifting it up)
- ¼ teaspoon salt (to make everything else taste even better, obvi)
- ½ cup unsalted butter, softened (the good stuff, not that “spread” impostor)
- 1 cup granulated sugar (the sweet soul of our operation)
- 2 large eggs (room temp, for a happier blend)
- 1 teaspoon vanilla extract (because everything is better with vanilla)
- ½ cup milk (whole milk if you’re feeling extra indulgent)
- 1 cup white chocolate chips (good quality, please! They’re the star!)
- 1 cup fresh or frozen raspberries (the little bursts of joy that cut through the sweet)
- For the White Chocolate Cream Cheese Frosting:
- 8 oz cream cheese, softened (full-fat, because we’re not messing around)
- ½ cup unsalted butter, softened (again, the good stuff)
- 2 cups powdered sugar (sifted, unless you like lumpy frosting… you don’t)
- 1 teaspoon vanilla extract (more vanilla, yes please!)
- 4 oz white chocolate, melted and slightly cooled (this makes it next-level)
Step-by-Step Instructions
- Get Prepped: Preheat your oven to 350°F (175°C). Grease and flour two 8-inch round cake pans. Or line them with parchment paper if you’re fancy.
- Dry Mix: In a medium bowl, whisk together the flour, baking powder, and salt. Set it aside for a moment.
- Wet Mix Magic: In a larger bowl, using an electric mixer, cream the softened butter and granulated sugar together until they’re light and fluffy. This takes about 2-3 minutes.
- Egg-cellent Addition: Beat in the eggs one at a time, making sure each is fully incorporated before adding the next. Stir in the vanilla extract.
- Alternate & Combine: Gradually add the dry ingredients to the wet ingredients, alternating with the milk. Start and end with the dry ingredients. Mix until just combined – **do not overmix!** Lumps are okay, gluey cake is not.
- Choc & Berry Time: Gently fold in the white chocolate chips and raspberries. Be gentle so you don’t smash all the berries.
- Bake It Up: Divide the batter evenly between your prepared cake pans. Bake for 25-30 minutes, or until a wooden skewer inserted into the center comes out clean.
- Cool Down: Let the cakes cool in the pans for about 10 minutes, then invert them onto a wire rack to cool completely. **This is crucial!** Frosting a warm cake is a one-way ticket to a melted mess.
- Frosting Fun: While the cakes are cooling, beat the softened cream cheese and butter together in a bowl until smooth. Add the sifted powdered sugar and vanilla extract, mixing until fluffy.
- White Chocolate Swirl: Slowly beat in the slightly cooled melted white chocolate into the frosting until well combined and smooth.
- Assemble Your Masterpiece: Once the cakes are completely cool, place one layer on your serving plate. Spread about a third of the frosting evenly over the top. Place the second cake layer on top and cover the whole cake (top and sides) with the remaining frosting. You can decorate with extra raspberries or white chocolate shavings if you’re feeling extra!
- Chill Out (Optional but Recommended): Pop it in the fridge for about 30 minutes to let the frosting set. Then, slice and devour!
Common Mistakes to Avoid
- Thinking you don’t need to preheat the oven: Rookie mistake! Your cake needs a hot, consistent temperature to rise properly.
- Overmixing the batter: This is a big no-no. It develops the gluten too much, making your cake tough and dense instead of light and fluffy. Mix until just combined, no more.
- Opening the oven door too soon: Patience, young padawan! Opening the door before the cake is set can cause it to sink. Resist the urge for at least the first 20 minutes.
- Not letting cakes cool completely: Seriously, I warned you! Frosting a warm cake will lead to a gloopy, sad situation. **Be patient!**
- Eyeballing ingredients: Baking is science, folks. Follow the measurements. Your ‘pinch’ of flour might be my ‘cup’ of flour.
Alternatives & Substitutions
Life’s too short for rigid recipes, right? Here are some tweaks if you’re feeling adventurous or just missing an ingredient:
- Raspberries: Fresh or frozen works! If using frozen, don’t thaw them first – just toss ’em in. You could also swap them for other berries like blueberries or chopped strawberries. IMO, raspberries are still king here for that tart kick!
- White Chocolate: If you absolutely can’t do white chocolate in the cake (gasp!), you could use milk chocolate chips, but it’ll change the vibe. For the frosting, try a different flavored extract if you’re feeling wild, like almond or orange, but the melted white chocolate is pretty foundational to the “Dream Cake” part.
- Flour: You can try a 1:1 gluten-free flour blend if you need to, but results may vary slightly in texture.
- Dairy-Free: You can typically substitute dairy milk with plant-based milk (almond, soy, oat). For butter, a good quality dairy-free stick butter can work. For cream cheese, look for dairy-free cream cheese alternatives.
FAQ (Frequently Asked Questions)
Got questions? I’ve got (casual) answers!
- Can I use margarine instead of butter? Well, technically yes, but why hurt your soul like that? Butter just tastes better and gives a superior texture. For this cake, I really recommend sticking to butter for the best “dreamy” results.
- Can I use frozen raspberries? Do I need to thaw them? Yep, totally! And nope, don’t thaw them. Just fold them in frozen. They’ll release their juices as they bake, adding moisture and color without making the batter too runny.
- How long does this cake last? Covered and refrigerated, it’ll last a good 3-4 days. But let’s be real, it usually disappears within 24 hours. 😉
- Can I make this cake ahead of time? Absolutely! You can bake the cake layers a day in advance, wrap them tightly in plastic wrap, and store them at room temp. Frost the day you plan to serve. The frosting can also be made a day ahead and stored in the fridge, then re-whipped briefly before frosting.
- My cake looks dry. What did I do wrong? Likely culprit? Overmixing the batter or overbaking. Keep an eye on the baking time and test with a skewer!
- Can I turn this into cupcakes? You betcha! Reduce the baking time to about 18-22 minutes. You’ll get about 18-24 cupcakes from this recipe. FYI, they’re equally delicious!
Final Thoughts
So there you have it! Your new go-to recipe for when you want to impress without the stress. This White Chocolate Raspberry Dream Cake isn’t just a dessert; it’s an experience. A fluffy, fruity, chocolatey hug in cake form. Now go forth, bake this beauty, and prepare for the oohs and aahs. You’ve earned it!


