So, you’ve got that chocolate craving gnawing at your soul, but the thought of spending hours in the kitchen makes you want to just order takeout? Been there, my friend. Many times. But what if I told you there’s a cake that looks super fancy, tastes divine, and won’t make you want to throw your spatula across the room? Enter the Chocolate Drip Cake: your new best friend for impressing everyone (including yourself) with minimal effort. Let’s get baking!
Why This Recipe is Awesome
Okay, let’s be real. We all want to look like we spent all day perfecting a culinary masterpiece, right? This chocolate drip cake lets you do just that, but it’s secretly idiot-proof. Seriously, even if your previous baking attempts ended up looking like abstract art, you can nail this. It’s moist, ridiculously chocolatey, and that drip? Chef’s kiss! Plus, the ingredients are probably already lurking in your pantry, waiting for their moment to shine. No obscure, expensive stuff needed here, which, IMO, is a major win.
Ingredients You’ll Need
Time to gather your troops! (Or, you know, just your ingredients.)
- All-Purpose Flour: The foundation of all deliciousness. About 1 ½ cups.
- Granulated Sugar: Sweet, sweet sugar. 1 ½ cups.
- Unsweetened Cocoa Powder: Go for good quality here; it makes a difference! ½ cup.
- Baking Soda: Our trusty leavening agent. 1 teaspoon.
- Baking Powder: Its partner in crime. ½ teaspoon.
- Salt: Just a pinch to enhance all those lovely flavors. ½ teaspoon.
- Eggs: 2 large ones, at room temperature. Happy eggs bake better, trust me.
- Milk: Any kind works, but whole milk gives it that extra richness. 1 cup.
- Vegetable Oil: Or any neutral oil. ½ cup.
- Vanilla Extract: Don’t skimp on this! 1 teaspoon.
- Hot Water: ½ cup. This is key for unlocking cocoa’s full potential!
- For the Chocolate Drip:
- Heavy Cream: ½ cup.
- Semi-Sweet Chocolate Chips: ½ cup. Or finely chopped chocolate.
- For the Frosting:
- Unsalted Butter: 1 cup (2 sticks), softened.
- Powdered Sugar: 3-4 cups, sifted. No one likes lumpy frosting!
- Unsweetened Cocoa Powder: ½ cup.
- Milk/Cream: 2-4 tablespoons.
- Vanilla Extract: 1 teaspoon.
Step-by-Step Instructions
- Preheat & Prep: Get that oven fired up to 350°F (175°C). Grease and flour two 8-inch round cake pans. Don’t skip this, unless you enjoy fighting with your cake later.
- Dry Mix Magic: In a large bowl, whisk together the flour, sugar, cocoa powder, baking soda, baking powder, and salt. Make sure there are no lumps—we’re aiming for smooth sailing.
- Wet Mix Wonder: In a separate medium bowl, whisk the eggs, milk, oil, and vanilla extract. This is where the liquid love happens.
- Combine Forces: Pour the wet ingredients into the dry ingredients. Mix on low speed (or by hand) until just combined. Don’t overmix; we want a tender cake, not a tough one!
- Hot Water Boost: Slowly pour in the hot water. The batter will be thin, and that’s totally okay! It’s what makes this cake so incredibly moist.
- Bake Time: Divide the batter evenly between your two prepared pans. Bake for 30-35 minutes, or until a wooden skewer inserted into the center comes out clean.
- Cool Down: Let the cakes cool in the pans for about 10 minutes, then invert them onto a wire rack to cool completely. Patience, young padawan!
- Frosting Frenzy: While the cakes cool, beat the softened butter until creamy. Gradually add the sifted powdered sugar and cocoa powder, alternating with milk/cream and vanilla, until smooth and fluffy. Add more liquid if too thick, more sugar if too thin.
- Assemble Your Masterpiece: Once the cakes are completely cool, level them if needed. Spread a generous layer of frosting on the first cake, place the second cake on top, and then frost the top and sides of the entire cake.
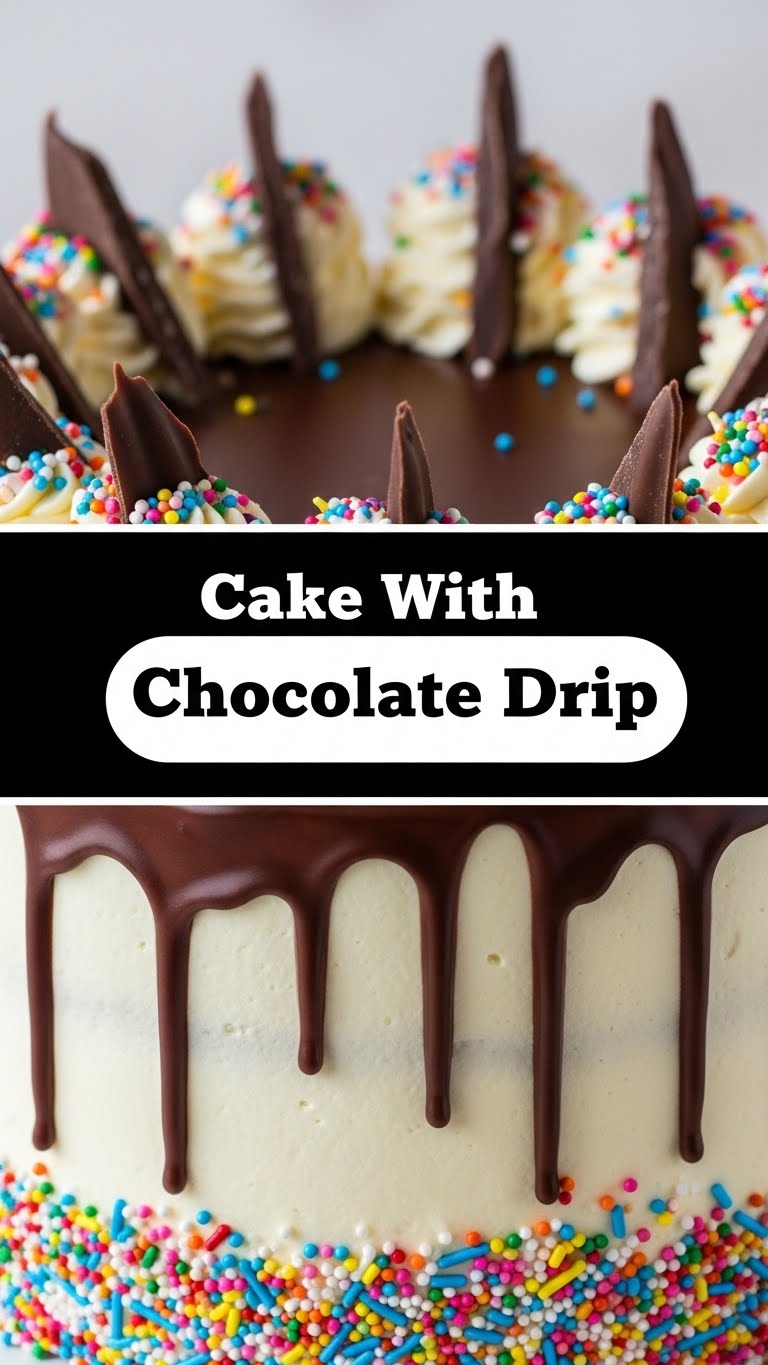
- Drip, Baby, Drip: For the chocolate drip, heat the heavy cream in a small saucepan until just simmering. Remove from heat, add chocolate chips, and let sit for 5 minutes. Stir until smooth and glossy. Let it cool slightly (about 10-15 minutes) so it’s thick enough to drip but still pourable.
- The Big Moment: Using a spoon or a squeeze bottle, carefully pour the ganache around the edge of the cake, letting it drip down the sides. Then, fill in the top of the cake with the remaining ganache.
- Chill Out: Pop it in the fridge for 15-30 minutes to set the drip. Then, go ahead and admire your handiwork!
Common Mistakes to Avoid
- Eyeballing Measurements: This isn’t a “guesstimate” contest, folks. Baking is a science! Use proper measuring cups and spoons for best results.
- Overmixing the Batter: The moment you combine wet and dry ingredients, stop mixing once just combined. Overmixing develops gluten, leading to a tough, dense cake. No one wants that.
- Baking a Hot Cake: Seriously, ensure your cakes are COMPLETELY cool before frosting. Frosting a warm cake is a recipe for disaster (and a melting mess).
- Not Greasing/Flouring Your Pans Properly: Unless you enjoy chiseling cake out of the pan, take the extra minute to grease and flour thoroughly. Pro tip: parchment paper circles on the bottom are a lifesaver!
- Impatient Dripping: Pouring the ganache when it’s too hot will result in a runny, messy drip that just pools at the bottom. Let it cool a bit until it’s thick enough to cling but still flows.
Alternatives & Substitutions
Life’s all about options, right? This cake is pretty flexible!
- No Buttermilk? No Problem: If you don’t have buttermilk on hand (the original recipe often calls for it, though we used milk and hot water here), just add 1 tablespoon of white vinegar or lemon juice to your regular milk and let it sit for 5 minutes before adding to the wet ingredients. Instant buttermilk hack!
- Oil vs. Butter: While oil makes for a super moist cake, you can totally substitute melted butter for the oil if you prefer that buttery flavor. Just make sure it’s cooled slightly before adding.
- Different Drip: Feel free to experiment with different types of chocolate for your drip—dark chocolate for a more intense flavor, or milk chocolate for something sweeter. Just adjust the cream ratio slightly as darker chocolate is thicker.
- Frosting Flavors: Not feeling chocolate buttercream? Go for a vanilla buttercream or even a cream cheese frosting. It’s your cake; make it sing!
FAQ (Frequently Asked Questions)
Got questions? I’ve got (casual) answers!
- Can I make this cake ahead of time? Absolutely! The unfrosted cake layers can be wrapped tightly and frozen for up to a month. The frosted cake keeps well in an airtight container at room temp for 2-3 days, or in the fridge for up to a week.
- My cake layers domed in the oven. What gives? Too high oven temp or overmixing can cause this. You can always level them off with a serrated knife for a flat top (and then snack on the scraps!).
- What kind of cocoa powder should I use? Natural unsweetened cocoa powder is usually best for this recipe as it reacts with the baking soda. Dutch-processed works too, but might change the texture slightly.
- Can I skip the chocolate drip? I mean, you *can*, but then it’s just a chocolate cake. And who wants *just* a cake when you can have a *drip* cake? It adds that extra “wow” factor!
- My ganache drip is too thin/thick. Help! If it’s too thin, let it cool longer, or stir in a few more chocolate chips. If it’s too thick, gently warm it over a double boiler or in the microwave in 10-second bursts until it reaches the right consistency.
- Can I bake this in a different size pan? Yes, but baking times will vary. For a 9×13 inch pan, it’ll likely take 35-45 minutes. Keep an eye on it!
Final Thoughts
So there you have it, folks! A show-stopping chocolate drip cake that’s ridiculously easy and unbelievably delicious. Go ahead, whip this up, and prepare for the compliments to roll in. You’ve earned those bragging rights! Now go impress someone—or yourself—with your new culinary skills. You’ve totally got this!


