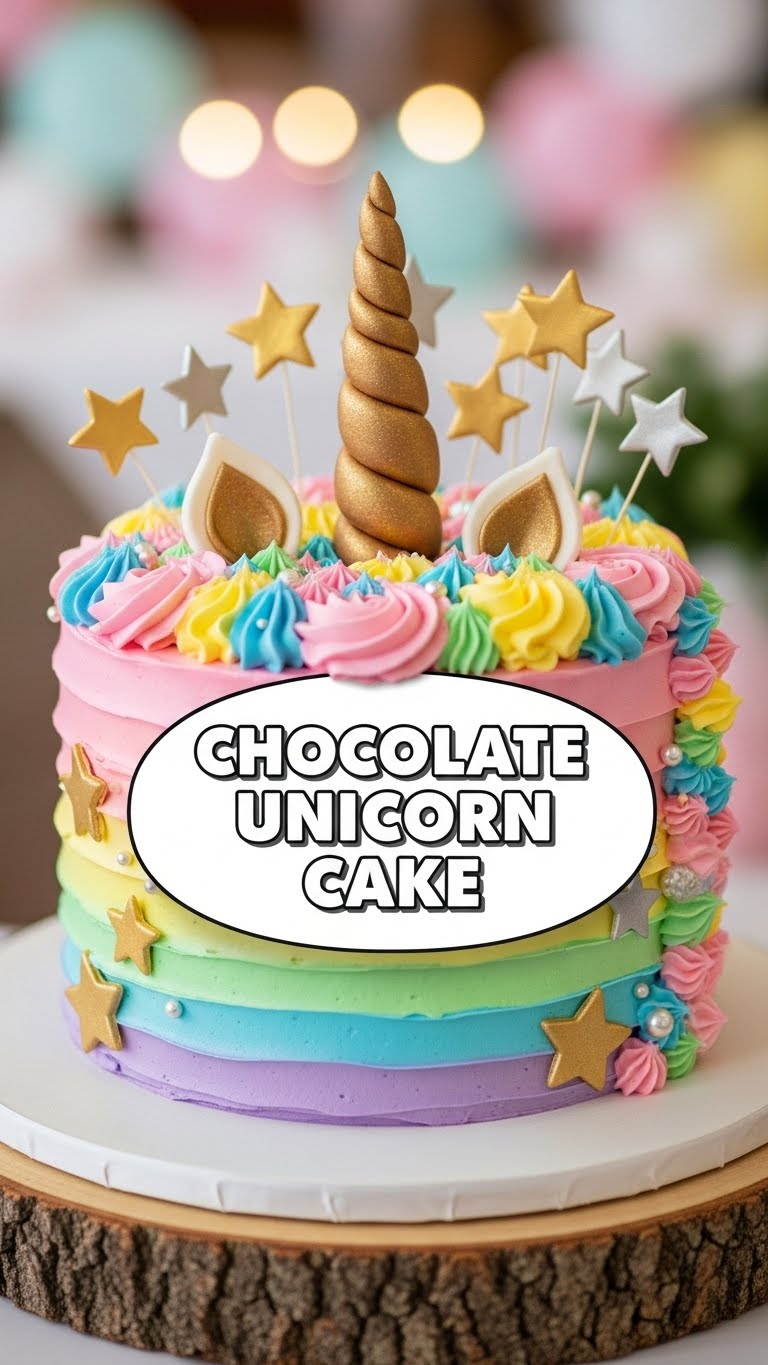
Ever wake up and think, “You know what my life needs? More glitter. And chocolate. Preferably together, in cake form.” No? Just me? Cool. Well, buckle up, buttercup, because we’re about to dive headfirst into the most magical, most delicious, and surprisingly doable creation: The Chocolate Unicorn Cake!
Why This Recipe is Awesome
Because who needs adulting when you can bake a mythical creature into a dessert? This isn’t just cake; it’s a statement. A delicious, sparkly, chocolatey statement that screams, “I may be a grown-up, but my inner child still believes in magic!”
Plus, it’s surprisingly straightforward. No need for a culinary degree, just a healthy dose of enthusiasm, a willingness to get a little messy, and maybe some emergency sprinkles. We’re talking showstopper vibes without the professional baker stress. It’s practically idiot-proof. Even I didn’t mess it up!
Ingredients You’ll Need
Let’s gather our magical components! Seriously, grab a whisk, a mixing bowl, and your best unicorn-themed apron (optional, but highly encouraged).
For the Seriously Good Chocolate Cake:
- 2 cups (250g) All-Purpose Flour: The backbone of our chocolatey dreams.
- 2 cups (400g) Granulated Sugar: Sweetness overload, just how we like it.
- ¾ cup (65g) Unsweetened Cocoa Powder: Good quality, please! None of that dusty stuff from the back of the pantry.
- 2 teaspoons Baking Soda: For that fluffy rise.
- 1 teaspoon Baking Powder: Double agent for extra lift!
- 1 teaspoon Salt: Balances everything out. Trust me.
- 1 cup (240ml) Milk: Whole milk works best, IMO.
- ½ cup (120ml) Vegetable Oil: Keeps things moist and tender.
- 2 Large Eggs: Room temp, please!
- 2 teaspoons Vanilla Extract: The soul of any good cake.
- 1 cup (240ml) Hot Water or Hot Coffee: Yes, coffee! It deepens the chocolate flavor without making it taste like coffee. Magic!
For the Dreamy Unicorn Buttercream:
- 1 cup (226g) Unsalted Butter: Softened, but not melted. It’s a fine line.
- 4-5 cups (480-600g) Powdered Sugar (Icing Sugar): Sifted, to avoid lumpy sadness.
- 2 teaspoons Vanilla Extract: Because more vanilla is always better.
- 3-5 tablespoons Heavy Cream or Milk: Add slowly until you hit that perfect consistency.
- Gel Food Coloring: Pink, purple, blue, green – get vibrant! Liquid food coloring won’t give you that punch.
- A boatload of Sprinkles: Unicorn-themed, rainbow, glitter – go wild!
For the Fabulous Unicorn Decor:
- Edible Gold Dust: With a splash of vodka or clear extract to paint.
- Unicorn Horn & Ears: You can buy these online, at party stores, or make your own from fondant/modeling chocolate if you’re feeling ambitious (and a little crazy).
Step-by-Step Instructions
Let’s get this party started! Follow these steps, and you’ll be a cake boss in no time.
- Get Your Bake On: Preheat that oven to 350°F (175°C). Grease and flour two 8-inch round cake pans. Or, line them with parchment paper. Don’t skip this, or your cake might stage a rebellion and stick to the pan.
- Dry Mix Magic: In a large bowl, whisk together the flour, sugar, cocoa powder, baking soda, baking powder, and salt. Make sure there are no lumps—we want smooth sailing!
- Wet Mix Whisking: In another bowl, whisk together the milk, oil, eggs, and vanilla extract.
- Combine & Conquer: Pour the wet ingredients into the dry ingredients. Mix on low speed (or by hand) until just combined. Don’t overmix! Overmixing leads to tough cakes, and we’re not about that life.
- The Secret Weapon: Carefully stir in the hot water or coffee. The batter will be thin, but that’s exactly what we want.
- Bake It Up: Divide the batter evenly between your prepared cake pans. Bake for 30-35 minutes, or until a wooden skewer inserted into the center comes out clean.
- Cool Down: Let the cakes cool in the pans for about 10-15 minutes before inverting them onto a wire rack to cool completely. Seriously, don’t try to frost warm cakes. It’s a melted disaster waiting to happen.
- Buttercream Bliss: While the cakes cool, make your buttercream. Beat the softened butter on medium speed until creamy (about 2 minutes). Gradually add the powdered sugar, one cup at a time, beating well after each addition.
- Fluffy Time: Add the vanilla and 3 tablespoons of cream/milk. Beat on high speed for 3-5 minutes until the buttercream is light, fluffy, and looks like a cloud a unicorn would nap on. Add more cream/milk if it’s too thick, or more powdered sugar if it’s too thin.
- Color Pop: Divide the buttercream into small bowls and color them with your gel food coloring. Go for pastel unicorn hues!
- Stack ‘Em Up: Once the cakes are completely cool, level them if needed. Place one cake layer on your serving plate or cake stand. Spread a generous layer of white buttercream on top. Repeat with the second cake layer.
- Crumb Coat Crew: Apply a thin layer of white buttercream all over the cake – this is your “crumb coat.” It traps any loose crumbs. Pop the cake in the fridge for 15-20 minutes to chill and set. This step is your best friend. Don’t skip it unless you *like* sprinkles of cake in your final frosting.
- Unicorn Magic: Now for the fun part! Using a small offset spatula or butter knife, apply patches of your colored buttercreams all over the chilled cake. Then, using a clean bench scraper or long spatula, smooth out the sides and top, swirling the colors together for that magical unicorn effect.
- Horn & Ears: Gently place your unicorn horn and ears on top of the cake.
- Gold Touch: Mix a tiny bit of gold dust with a few drops of vodka/clear extract to create an edible paint. Carefully paint details on the horn, ears, or any other areas you want to make extra fancy.
- Sprinkle Shower: Shower your masterpiece with all the sprinkles you can possibly imagine!
Common Mistakes to Avoid
Baking is science, but it’s also a little art. Avoid these common pitfalls to ensure your unicorn cake doesn’t turn into a sad, deflated pony.
- Thinking you don’t need to preheat the oven: Rookie mistake! A properly preheated oven ensures even baking.
- Overmixing the batter: You’ll develop the gluten too much, leading to a tough, dense cake. Mix until *just* combined, then stop.
- Using warm cakes for frosting: We covered this, but it bears repeating. **Seriously, chill those cakes!**
- Not sifting powdered sugar for buttercream: Lumps in frosting? No thank you. Sift it, always.
- Using liquid food coloring for vibrant colors: You’ll need so much liquid food coloring to get bright hues that it will mess up your buttercream consistency. **Gel food coloring is your superhero here.**
Alternatives & Substitutions
Life happens, ingredients run out, or maybe you just want to shake things up. Here are some ideas!
- Boxed Cake Mix: No time for scratch cake? No judgment here! Grab your favorite boxed chocolate cake mix and follow the package directions (mostly). Just make sure it yields enough for two 8-inch layers.
- Different Frosting Flavors: Not a vanilla buttercream fan? Try a cream cheese frosting or even a chocolate ganache for layering, then use the colored buttercream just for the exterior swirls.
- Vegan Unicorn: Swap out the dairy and eggs for plant-based alternatives. There are tons of great recipes for vegan chocolate cakes and buttercreams out there, so your unicorn can be cruelty-free!
- DIY Horn & Ears: If you’re feeling crafty, mold your horn and ears from white fondant or modeling chocolate. Dust with edible gold dust for that magical sheen.
- No Food Coloring? No Problem!: Make a dark chocolate cake with white frosting and top with *loads* of colorful sprinkles. It’ll still scream “party!”
FAQ (Frequently Asked Questions)
Got questions? I’ve got (casual and hopefully helpful) answers!
- Can I make this cake ahead of time? Absolutely! The unfrosted cake layers can be wrapped tightly in plastic wrap and stored at room temperature for up to 2 days, or frozen for up to a month. The buttercream can be made a few days ahead and stored in the fridge, then re-whipped before use.
- My frosting is too thin/thick! Help! Too thin? Add more sifted powdered sugar, a tablespoon at a time. Too thick? Add more cream/milk, a teaspoon at a time, until you hit that dreamy consistency.
- Can I use margarine instead of butter in the buttercream? Well, technically yes, but why hurt your soul like that? Butter tastes infinitely better and gives a much better texture. For the best results, stick with real butter.
- Where do I get those fancy unicorn horn and ears? Amazon, Etsy, party supply stores, or even some craft stores often carry them. If you’re feeling super ambitious, you can make them from fondant or modeling chocolate!
- Is it really that hard to get the swirly frosting effect? It looks intimidating, but it’s easier than you think! The key is applying blobs of color and then gently smoothing it with a bench scraper. Don’t aim for perfection; aim for whimsical!
- My cake dome came out flat! What did I do wrong? Likely culprit: old baking soda/powder. Or perhaps you opened the oven door too early. Make sure your leavening agents are fresh, and avoid peeking during the first 2/3 of baking time.
Final Thoughts
You did it! You just made a chocolate unicorn cake, and it’s probably looking fabulous. Seriously, take a moment to admire your handiwork. This isn’t just dessert; it’s a piece of edible art, born from chocolate, glitter, and pure imagination. You’ve conquered the kitchen, summoned a mythical creature, and probably made your kitchen a little bit shinier in the process.
Now, go impress someone—or yourself—with your new culinary skills. Take a gazillion photos, savor every glittery, chocolatey bite, and remember: life’s too short for boring cake. You’ve earned it!

