So, you’ve baked a chocolate cake. Congrats! You managed not to burn down the kitchen, and the aroma alone is probably worth a Nobel Prize. But let’s be real, a plain chocolate cake, while delicious, is like showing up to a party in your PJs. Comfy, but not exactly “wow.” It’s time to unleash your inner artist (or at least your inner enthusiastic amateur) and make that chocolate masterpiece look as good as it tastes. No fancy culinary school required, just a willingness to play with frosting and sprinkles. Let’s get pretty!
Why Your Cake Needs a Glow-Up (aka Why This “Recipe” is Awesome)
Because life’s too short for boring cakes, that’s why! This isn’t about precise measurements or tricky techniques; it’s about fun. We’re talking about making your chocolate cake go from “meh” to “OMG, you made that?!” with minimal effort and maximum visual impact. It’s idiot-proof, honestly. Even I, who once mistook baking soda for baking powder (don’t ask), can make these look good. Plus, the more beautiful your cake, the less people question if you licked the spoon during prep. Win-win!
Ingredients You’ll Need (For the Glow-Up, Not the Cake Itself!)
- **Your Beautifully Baked & Cooled Chocolate Cake:** The star of the show! Make sure it’s completely cold, or things will get melty and sad.
- **Chocolate Ganache or Frosting:** Whether it’s homemade, store-bought, or that emergency tub you hide from your significant other. Chocolate on chocolate? Yes, please.
- **Sprinkles, Sprinkles, & More Sprinkles:** The more colorful, the better. Jimmie-type, nonpareils, confetti – go wild!
- **Fresh Berries:** Strawberries, raspberries, blueberries. They add a pop of color and a touch of “fancy.” Plus, they count as fruit, so it’s practically healthy, right?
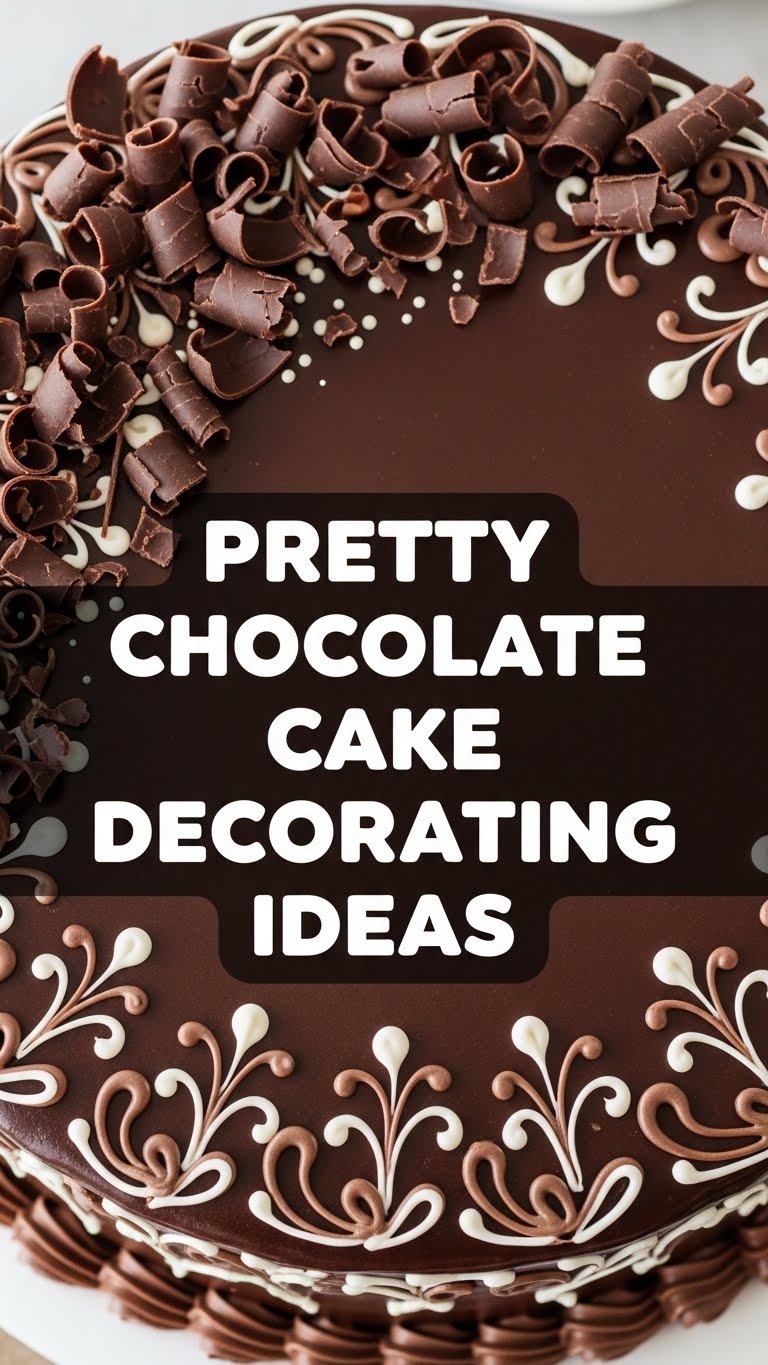
- **Chocolate Shavings or Curls:** Because you can never have too much chocolate. You can make your own by scraping a chocolate bar with a veggie peeler – so satisfying!
- **Dusting of Cocoa Powder or Edible Glitter:** For that extra touch of elegance or sparkle.
- **Optional Fun Extras:** Mini chocolate chips, crushed nuts, edible flowers (if you’re feeling extra bougie), cookie crumbles.
Step-by-Step Instructions: Let’s Get Pretty!
- **First Layer of Frosting:** Slather your cooled cake with a thin layer of your chosen frosting. This is your crumb coat – it traps all those rogue crumbs so your final coat looks smooth. Chill it in the fridge for 15-20 minutes. Don’t skip this; it’s a game-changer!
- **Smooth Operator (or Not!):** Apply a thicker, final layer of frosting. Use an offset spatula or knife to smooth the top and sides. **Pro tip:** For a rustic look, just swirl it around with the back of a spoon. Perfection is overrated!
- **The Drip Effect (Optional but Awesome):** If using ganache, let it cool slightly until it’s thick but still pourable. Carefully pour a small amount over the top edge of your cake, letting it drip artfully down the sides. For an even drip, use a spoon to guide it around the edge.
- **Sprinkle Party!** While the ganache/frosting is still a bit wet, gently press sprinkles onto the sides of the cake. Or, go crazy and cover the whole thing! You can also just sprinkle them on top. There are no rules in sprinkle-land.
- **Top It Off with Treasures:** Arrange your fresh berries, chocolate shavings, or other fun extras on the top of the cake. Think about balance and color. A pile in the center, a ring around the edge – whatever your heart desires.
- **The Finishing Flourish:** Lightly dust with cocoa powder for a sophisticated touch, or a sprinkle of edible glitter for some sparkle. Voila! You’ve officially upgraded your cake from “yum” to “YUM-BELIEVABLE.”
Common Mistakes to Avoid (So You Don’t Cry Over Your Cake)
- **Decorating a Warm Cake:** This is a big no-no. Your frosting will melt, slide, and become a soupy mess. **Always ensure your cake is completely cool!** We’re talking room temp, then maybe even a quick chill.
- **Too Much Frosting at Once:** Trying to get a super thick layer in one go can pull up crumbs. That’s why we do the crumb coat first. Patience, padawan!
- **Not Having Fun:** Seriously, it’s just cake. If a drip goes rogue or a berry rolls off, who cares? It’s still chocolate cake, and it’s still delicious. Embrace the imperfections – they add character!
- **Overthinking It:** Your cake doesn’t need to look like it came from a professional bakery. The beauty is in the effort and the joy of creating something tasty and pretty.
Alternatives & Substitutions (Get Creative!)
Feeling adventurous? Good! Here are some ways to switch things up:
- **Instead of Chocolate Frosting:** Try a luscious cream cheese frosting, a vibrant raspberry buttercream, or even a simple vanilla glaze. Contrast is cool!
- **Berry Swaps:** Not a fan of berries? How about chopped candied nuts, toasted coconut flakes, mini marshmallows, or even crushed Oreos?
- **DIY Chocolate Curls:** Don’t want to buy them? Take a block of chocolate and use a vegetable peeler to shave off thin curls. It’s surprisingly easy and looks super professional.
- **Stencils:** Got a stencil from an old craft project? Dust cocoa powder or powdered sugar over it for a cool pattern on top of your frosted cake. Instant artistry!
- **Edible Flowers:** If you want to be extra, extra fancy, a few food-safe edible flowers can really elevate your cake. Check your local organic market.
FAQ (Frequently Asked Questions)
Got questions? I probably have sarcastic-ish answers!
- **”Can I decorate my cake the day before?”** Absolutely! Most cakes actually taste better the next day as the flavors meld. Just store it in an airtight container in the fridge, and let it come to room temp for about 30 minutes before serving.
- **”My ganache isn’t dripping right, what gives?”** It’s probably too hot or too cold. If it’s too runny, let it cool a bit more. If it’s too thick, gently warm it for a few seconds. It’s all about finding that perfect viscosity – think thick syrup, not water.
- **”What if I mess up the frosting?”** Who cares?! It’s chocolate cake! Scrape it off, add more, or just embrace the “rustic” look. Nobody will know unless you tell them.
- **”Can I use *only* sprinkles?”** My friend, it’s your cake! If you want a sprinkle explosion, you go right ahead. **FYI**, a sprinkle-covered cake is always a crowd-pleaser.
- **”Are edible glitters safe?”** Yep, as long as they’re specifically marked “edible.” Don’t go using craft glitter from your kids’ art supplies – that’s a one-way ticket to a sparkly stomach ache.
- **”I don’t have an offset spatula. What then?”** A butter knife, the back of a spoon, or even a credit card (a clean one, please!) can work in a pinch. We improvise, darling!
Final Thoughts: Go Forth and Decorate!
There you have it! Proof that making your chocolate cake look utterly fabulous doesn’t require a culinary degree or an hour-long YouTube tutorial. It just takes a little creativity, some fun toppings, and a healthy dose of “who cares if it’s not perfect?” attitude. Now go impress someone – or, more importantly, yourself – with your new cake-decorating prowess. You’ve earned that extra slice. And hey, if it doesn’t look exactly like the pictures, remember: it’s still chocolate cake. And that’s always a win!


