So you’re craving something chocolaty, magical, and ridiculously easy, but your energy levels are currently residing somewhere between ‘meh’ and ‘nah’? Friend, I got you. This isn’t just any cake; this is the Chocolate Magic Cake. It’s the kind of dessert that makes people think you’re some sort of kitchen wizard, when in reality, you just followed a few super simple steps and let your oven do the actual sorcery. Ready to impress without breaking a sweat? Let’s do this!
Why This Recipe is Awesome
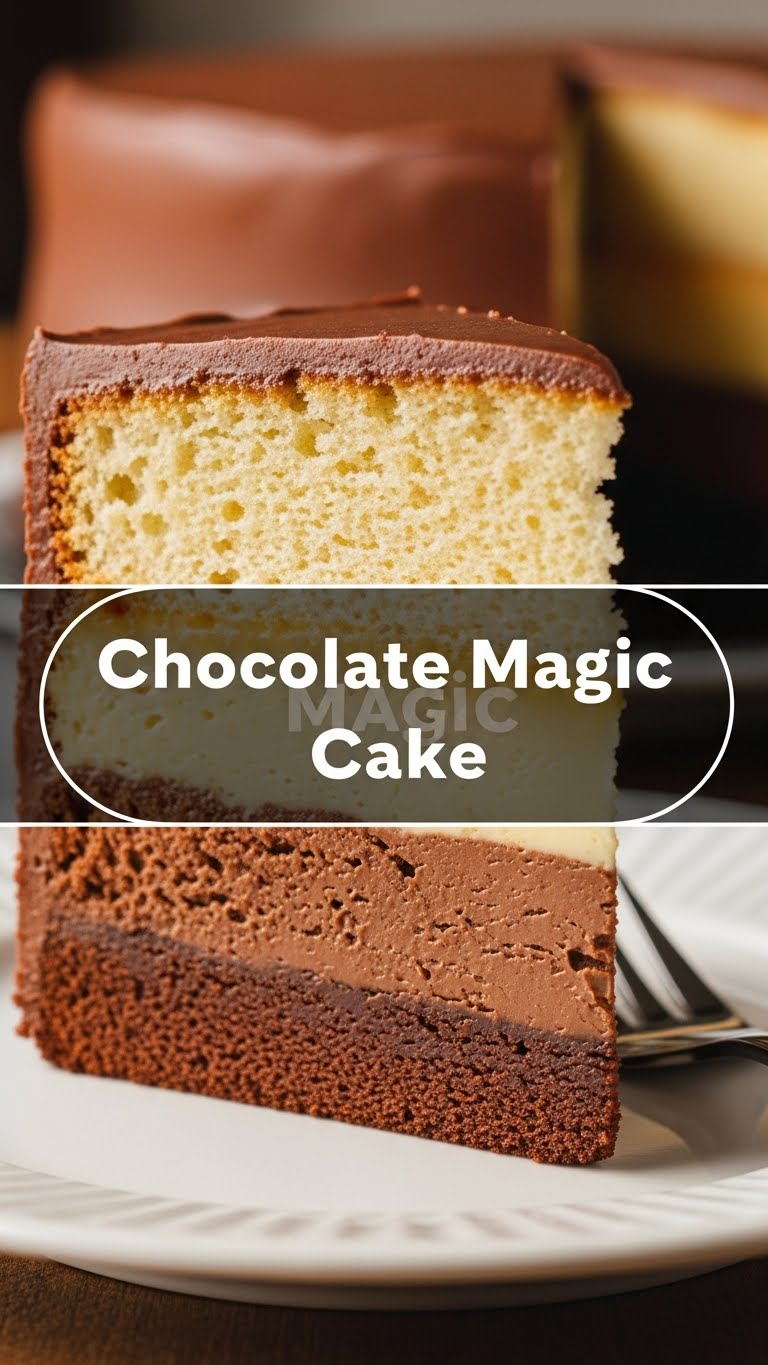
Okay, buckle up, because this cake is literally called “Magic Cake” for a reason. You pour one batter into a pan, pop it in the oven, and BAM! It separates itself into three distinct layers while baking: a dense, fudge-like bottom, a creamy custard middle, and a light, spongy top. All from one batter! No fancy layering, no multiple bowls of different mixes. It’s like a dessert party in a single pan. Plus, it’s pretty much **idiot-proof** – even I didn’t mess it up, and my track record with complex baking is… let’s just say “adventurous.”
Ingredients You’ll Need
- 1/2 cup (113g) unsalted butter: The good stuff. Melted, obviously. Don’t burn it, unless you’re going for a ‘charred’ aesthetic, which… no.
- 1 1/2 cups (300g) granulated sugar: Sweetness! No, you can’t reduce it by half and expect the same magic. Sugar plays a role in structure here, not just taste, FYI.
- 4 large eggs: Separated. Yes, you have to separate them. It’s the most “difficult” part, promise. Yolks for richness, whites for fluff.
- 1 tsp vanilla extract: A must! Or, if you’re feeling fancy, a vanilla bean paste. Don’t skimp on the vanilla; it brings out the chocolatey goodness.
- 1/4 cup (25g) unsweetened cocoa powder: The chocolate kick! Use good quality stuff. No, hot chocolate mix is not a substitute.
- 1 cup (125g) all-purpose flour: Just plain old flour. Sifted, if you’re feeling particularly Martha Stewart-y.
- 2 cups (480ml) warm milk: The key to the magic! Make sure it’s warm, like bathwater warm, not scorching hot. Room temperature works too, but warm helps things along.
- Pinch of salt: Balances everything out. Trust me on this.
- Powdered sugar for dusting: Optional, but makes it look fancy and professional.
Step-by-Step Instructions
- Preheat your oven to 325°F (160°C). Grease and lightly flour an 8×8 or 9×9 inch square baking pan. You can also line it with parchment paper for easy removal. Don’t skip this; nobody wants a stuck cake.
- Melt the butter. Let it cool slightly while you get on with the next steps.
- In a large bowl, whisk together the egg yolks, granulated sugar, and vanilla extract until light and creamy. This should take a few minutes.
- Stir in the melted (and slightly cooled) butter until combined.
- Gradually add the cocoa powder and flour, alternating between the two, mixing until just incorporated. Don’t overmix, or your cake might get tough.
- Slowly pour in the warm milk, whisking continuously until the batter is smooth and quite thin. Yes, it’s supposed to be thin, don’t panic.
- In a separate, super clean bowl (seriously, no grease!), whip the egg whites with the pinch of salt until they form stiff peaks. This is crucial for the cake’s structure.
- Gently fold the whipped egg whites into the chocolate batter. Don’t overmix; you want to see some small clumps of egg white floating around. This is where the “magic” starts for the airy top layer.
- Pour the thin batter into your prepared pan. Place the pan on a baking sheet (just in case of any drips, you know).
- Bake for 40-60 minutes. The baking time can vary, so keep an eye on it. The cake is done when the top is set and slightly golden, but it will still be jiggly in the middle like a firm custard. **A toothpick inserted into the center should come out clean from the bottom, but might have some moist crumbs from the middle layer.**
- Let the cake cool completely in the pan on a wire rack. Seriously, COMPLETELY. This is where the layers fully set. This can take a few hours.
- Once cooled, chill the cake in the refrigerator for at least 2 hours, or even overnight. This makes it super easy to cut and enhances the texture.
- Dust with powdered sugar before serving. Slice into squares and prepare for applause.
Common Mistakes to Avoid
- Not preheating the oven: Rookie mistake! Your cake needs consistent heat from the start.
- Using cold milk: That’s a one-way ticket to lumpy batter town, my friend. Warm milk is key for a smooth, homogenous batter.
- Overmixing the batter: Especially after adding flour and egg whites. Light hands, folks! Overmixing develops gluten and can make your cake tough.
- Not fully cooling or chilling: The layers solidify as it cools. If you cut it warm, it’ll be a delicious mess, but not the pretty layered cake you’re aiming for. Patience, grasshopper!
- Thinking you can skip separating the eggs: Nope. The yolks and whites play very different roles in creating those magical layers.
Alternatives & Substitutions
Feeling a bit experimental? I like your style!
- No cocoa powder? You could technically make a vanilla magic cake by omitting the cocoa, but then it wouldn’t be *chocolate* magic cake, would it? Let’s not stray too far from perfection.
- Dairy-free? You can try using a plant-based milk (almond, soy, oat) and dairy-free butter. The texture might be slightly different, but it usually works!
- Want more chocolate? Add a handful of mini chocolate chips to the batter before baking, or drizzle with a chocolate ganache after cooling for an extra dose of cocoa goodness.
- Different pan size? A round 9-inch pan works too, or even a loaf pan for a taller, narrower slice. Just adjust baking time; thinner cakes bake faster, thicker ones take longer.
FAQ (Frequently Asked Questions)
- My cake didn’t form three layers! What went wrong? Usually, this happens if the milk wasn’t warm enough, the egg whites weren’t stiff enough, or the batter was overmixed after adding the egg whites. Did you let it cool completely before cutting? That’s also crucial!
- Can I use margarine instead of butter? Well, technically yes, but why hurt your soul like that? Butter is king for a reason – it provides the best flavor and texture. Margarine might work, but the “magic” might be a little less potent, IMO.
- Can I add other flavorings? Absolutely! A touch of coffee powder (espresso powder) enhances chocolate flavor beautifully. A hint of orange zest or mint extract could be fun, too, if you’re feeling adventurous.
- How long does it last? Stored in an airtight container in the fridge, it’s usually good for 3-4 days. But let’s be real, it rarely lasts that long!
- Is it supposed to be jiggly when it comes out of the oven? Yes, yes, a thousand times yes! That jiggle means the middle custard layer is still doing its thing. It will firm up as it cools.
Final Thoughts
So there you have it, your very own Chocolate Magic Cake guide! It’s proof that sometimes, the most impressive things in life are actually the easiest. This cake is rich, creamy, and utterly delightful – perfect for a dinner party, a cozy night in, or just because it’s Tuesday and you deserve something amazing. Now go impress someone—or just yourself, because let’s be real, you deserve it—with your newfound Chocolate Magic Cake prowess. You’ve earned those bragging rights!

