Okay, so let’s be real: you’ve scrolled through enough aesthetically pleasing food pics to know what you want, and right now, your soul is screaming for chocolate cake. But you also don’t want to spend your entire Sunday feeling like a contestant on a baking show. Right? Good, because I’m with you. And I’ve got just the thing!
Why This Recipe is Awesome
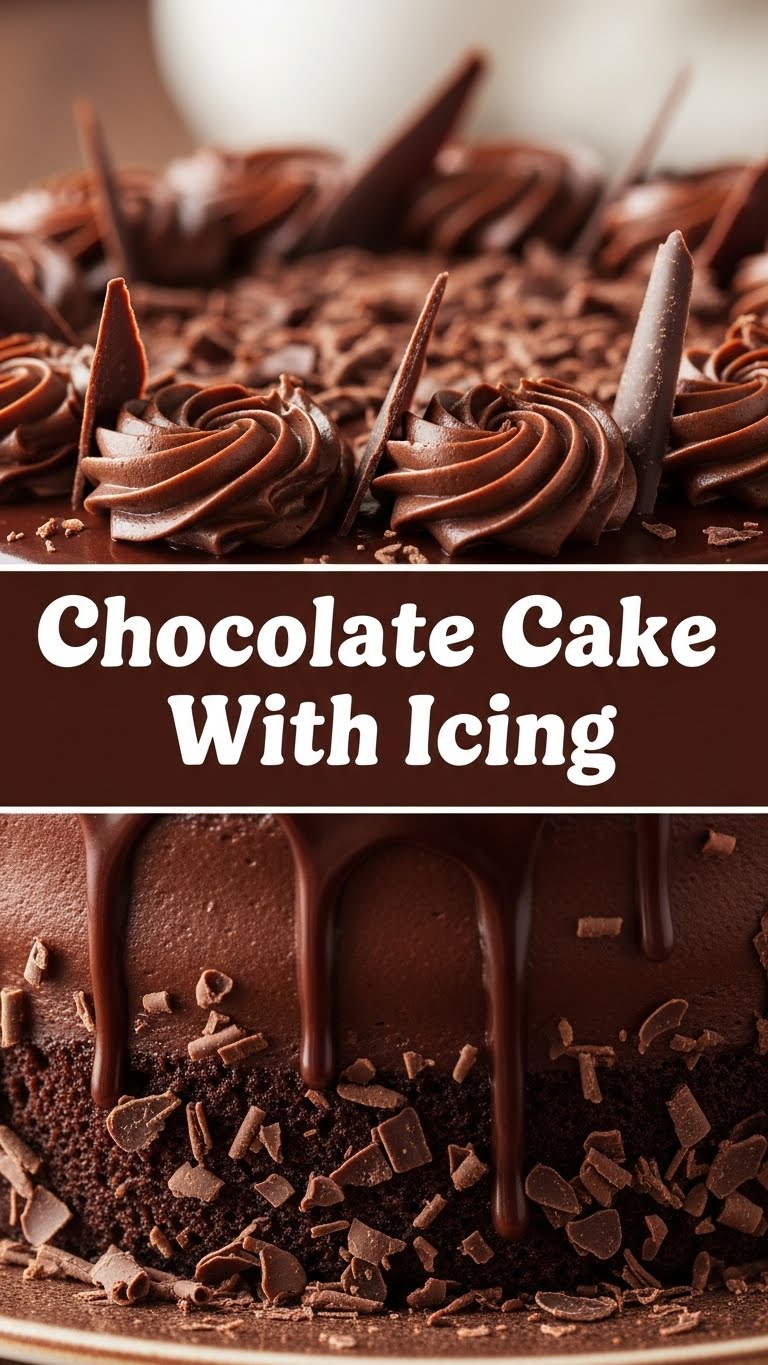
Look, I’m not going to lie, this isn’t some super fancy, five-tier, Michelin-star dessert. It’s better. Why? Because it’s the kind of chocolate cake that says, “I love you, but also, I made this in about an hour because I have a life.” It’s incredibly moist, ridiculously chocolatey, and seriously, it’s almost impossible to mess up. Even I managed it without summoning any kitchen demons. Plus, the icing? Oh, the icing is a dream. You’ll be licking the bowl, FYI.
Ingredients You’ll Need
Alright, gather your troops! Most of these are probably chilling in your pantry already. If not, a quick trip to the store won’t break the bank.
- All-Purpose Flour: The backbone of our cake. No fancy stuff needed.
- Granulated Sugar: Sweetness! Because life’s too short for unsweetened cake.
- Unsweetened Cocoa Powder: The star of our show. Don’t skimp here; quality matters for that deep chocolate flavor.
- Baking Soda & Baking Powder: Our dynamic duo for lift and fluffiness. Don’t mix ’em up!
- Salt: Just a pinch to wake up all those beautiful flavors. Trust me on this.
- Milk: Any kind works, but whole milk gives it that extra richness.
- Vegetable Oil (or melted butter): Keeps it super moist. This is our secret weapon against dry cake.
- Eggs: Bring it all together. Room temp is best, but if you forgot, don’t stress *too* much.
- Vanilla Extract: A splash for warmth and depth. Don’t skip it, even if you think you won’t taste it.
- Hot Water (or coffee): Sounds weird, makes it intensely chocolatey. Magic, basically.
- Unsalted Butter: Softened, please! Crucial for creamy icing. IMO, don’t skimp on quality here.
- Powdered Sugar (Confectioners’ Sugar): Sifted, unless you like lumpy icing. You don’t.
- Unsweetened Cocoa Powder: More chocolate!
- Milk (or heavy cream): Just a tiny bit to get that perfect spreadable consistency.
- Vanilla Extract: Another dash of deliciousness.
For the Chocolate Buttercream Icing:
Step-by-Step Instructions
Okay, apron on, game face ready! Let’s get this deliciousness going.
- Preheat & Prep: First things first, get your oven to 350°F (175°C). Grease and flour (or line with parchment) two 8-inch round cake pans. Don’t skip this, unless you enjoy wrestling with stuck cake.
- Dry Mix Magic: In a large bowl, whisk together the flour, sugar, cocoa powder, baking soda, baking powder, and salt. Make sure there are no lumps—we want smooth sailing here.
- Wet Mix Wonders: In a separate medium bowl, whisk together the milk, oil (or melted butter), eggs, and vanilla extract until well combined.
- Combine & Conquer: Pour the wet ingredients into the dry ingredients. Mix on low speed (or by hand) until just combined. Don’t overmix! A few small lumps are totally fine. Overmixing leads to tough cake, and nobody wants that.
- The Hot Liquid Boost: Carefully stir in the hot water (or coffee). The batter will be thin, don’t panic! This is what makes it so incredibly moist and luscious.
- Bake It Up: Divide the batter evenly between your two prepared cake pans. Pop them into the preheated oven and bake for 30-35 minutes, or until a wooden skewer inserted into the center comes out clean.
- Cool Down Time: Let the cakes cool in their pans on a wire rack for about 10-15 minutes before inverting them onto the rack to cool completely. Patience is a virtue here; trying to ice a warm cake is a messy, regrettable decision.
- Icing on the Cake (Literally): While the cakes cool, grab a large bowl. Beat the softened butter until creamy. Gradually add the sifted powdered sugar and cocoa powder, alternating with splashes of milk and vanilla. Beat until light, fluffy, and spreadable. If it’s too thick, add more milk; too thin, add more powdered sugar.
- Assemble Your Masterpiece: Once the cakes are *completely* cool, spread a generous layer of icing on top of one cake layer. Place the second layer on top, then frost the top and sides of the entire cake. Get creative, make it messy, or aim for perfection—it’s your cake!
Common Mistakes to Avoid
Let’s save you some heartache (and wasted ingredients). Here are a few traps even the best of us fall into:
- Opening the Oven Door Too Soon: Seriously, resist the urge! Your cake needs consistent heat to rise properly. Wait until at least 25 minutes have passed before peeking, or better yet, just trust the timer.
- Overmixing the Batter: This is a biggie. Once the wet and dry ingredients meet, mix just until combined. Overmixing develops the gluten too much, leading to a dense, chewy cake instead of a light, fluffy one.
- Not Sifting Powdered Sugar: Unless you enjoy discovering delightful little lumps of sugar in your otherwise silky-smooth icing, please sift. It takes 30 seconds.
- Icing a Warm Cake: I know, the temptation is real. But warm cake + cold icing = a melted, slidy, frustrating mess. Cool your cakes completely! You’ve been warned.
- Forgetting to Grease/Flour Pans: Remember that wrestling with stuck cake I mentioned? Yeah, this is why. Don’t be that person.
Alternatives & Substitutions
Feeling adventurous, or just missing an ingredient? No stress, we can totally improv!
- Dairy-Free Version: Swap out regular milk for almond, soy, or oat milk. For the icing, use a dairy-free butter alternative and a plant-based milk. Still delish!
- Coffee Power-Up: Instead of hot water, use hot brewed coffee for an even deeper, more complex chocolate flavor. It won’t make your cake taste like coffee, just more intensely chocolate. Trust.
- Different Fats: If you prefer, unsalted butter (melted and cooled slightly) can replace the vegetable oil in the cake. It adds a lovely buttery note, but oil generally keeps cakes moister longer. Your call, chef!
- Flavor Boosts: A pinch of espresso powder in the cake batter or icing will intensify the chocolate. Or for a hint of something different, try a splash of peppermint extract in the icing for a mint-chocolate vibe. Yum!
- Icing Switch-Up: Not a fan of buttercream? A simple ganache (equal parts hot cream and chopped chocolate, stirred until smooth) makes a super elegant topping.
FAQ (Frequently Asked Questions)
- Q: Can I bake this as a sheet cake?
- A: Absolutely! Pour the batter into a greased and floured 9×13 inch pan. The baking time might be a bit shorter, usually around 25-30 minutes. Just keep an eye on it and test with a skewer!
- Q: My cake turned out dry. What went wrong?
- A: Oh no! This usually happens if you overbaked it, or sometimes if you overmixed the batter. Make sure you’re not baking it too long—the toothpick test is your friend! Also, ensure your measuring cups are accurate; too much flour can also lead to a dry cake.
- Q: Can I make this ahead of time?
- A: You betcha! The unfrosted cake layers can be wrapped tightly in plastic wrap and stored at room temperature for up to 2 days, or frozen for up to a month. Just thaw them before icing. The finished cake is best eaten within 2-3 days.
- Q: What if I don’t have buttermilk?
- A: Good question! If the recipe (which this one doesn’t explicitly call for, but sometimes they do!) asks for buttermilk and you don’t have it, just add one tablespoon of white vinegar or lemon juice to regular milk and let it sit for 5 minutes. Voila, instant buttermilk substitute!
- Q: Can I use margarine instead of butter for the icing?
- A: Well, technically yes, but why hurt your soul like that? Butter provides a richer flavor and a superior texture. Margarine can work in a pinch, but the result won’t be quite as luxurious. It’s your cake, your rules, though!
Final Thoughts
There you have it, future dessert wizard! You’ve just conquered a seriously delicious chocolate cake, and probably didn’t even break a sweat. Or maybe you did, but it was worth it, right? Now go impress someone—or just yourself—with your new culinary superpowers. You’ve earned every single glorious bite. Enjoy!

