So, you’ve scrolled past enough food porn to make your stomach rumble like a beast, but the thought of a complicated recipe makes you want to crawl back into bed? Been there, done that, got the t-shirt. But what if I told you there’s a chocolate cake so ridiculously easy, so decadently chocolatey, and so packed with crunchy Oreos that it practically bakes itself? Oh yeah, we’re talking about a Chocolate Oreo Cake that’s here to solve all your dessert dilemmas (and maybe some existential ones too, who knows?).
Why This Recipe is Awesome
Let’s be real, life is too short for bland cake and complicated instructions. This recipe? It’s the MVP of easy desserts. It’s rich, it’s moist, it’s got those crunchy Oreo bits literally everywhere, and **it’s practically idiot-proof**. Seriously, if *I* can make this without setting off the smoke detector, you, my friend, are practically a pastry chef already. It’s the kind of cake that makes people go, “Wow, you made this?” while you casually shrug and say, “Oh, this old thing?” Yeah, that kind of awesome.
Ingredients You’ll Need
Time to gather your troops! Don’t worry, nothing too fancy here. Just good ol’ pantry staples and, well, Oreos. Lots of Oreos. 😉
- All-Purpose Flour: The backbone of our cake. No need for the fancy stuff, unless you’re feeling extra bougie.
- Granulated Sugar: Because life is sweet, and so should your cake be.
- Unsweetened Cocoa Powder: The darker, the better for that intense chocolatey goodness. Dutch process is fab, but regular works too!
- Baking Soda & Baking Powder: Our leavening tag team, making sure your cake isn’t a brick.
- Salt: A pinch makes all the difference, enhancing those chocolate flavors. Don’t skip it!
- Eggs: The binders! Room temp is ideal, but let’s be honest, who plans that far ahead?
- Milk: Any kind works, but whole milk gives it that extra lusciousness.
- Vegetable Oil: For ultimate moisture! Say goodbye to dry cakes.
- Vanilla Extract: A splash of magic to deepen the flavors.
- Hot Water or Coffee: This is our secret weapon for super intense chocolate flavor. Trust me.
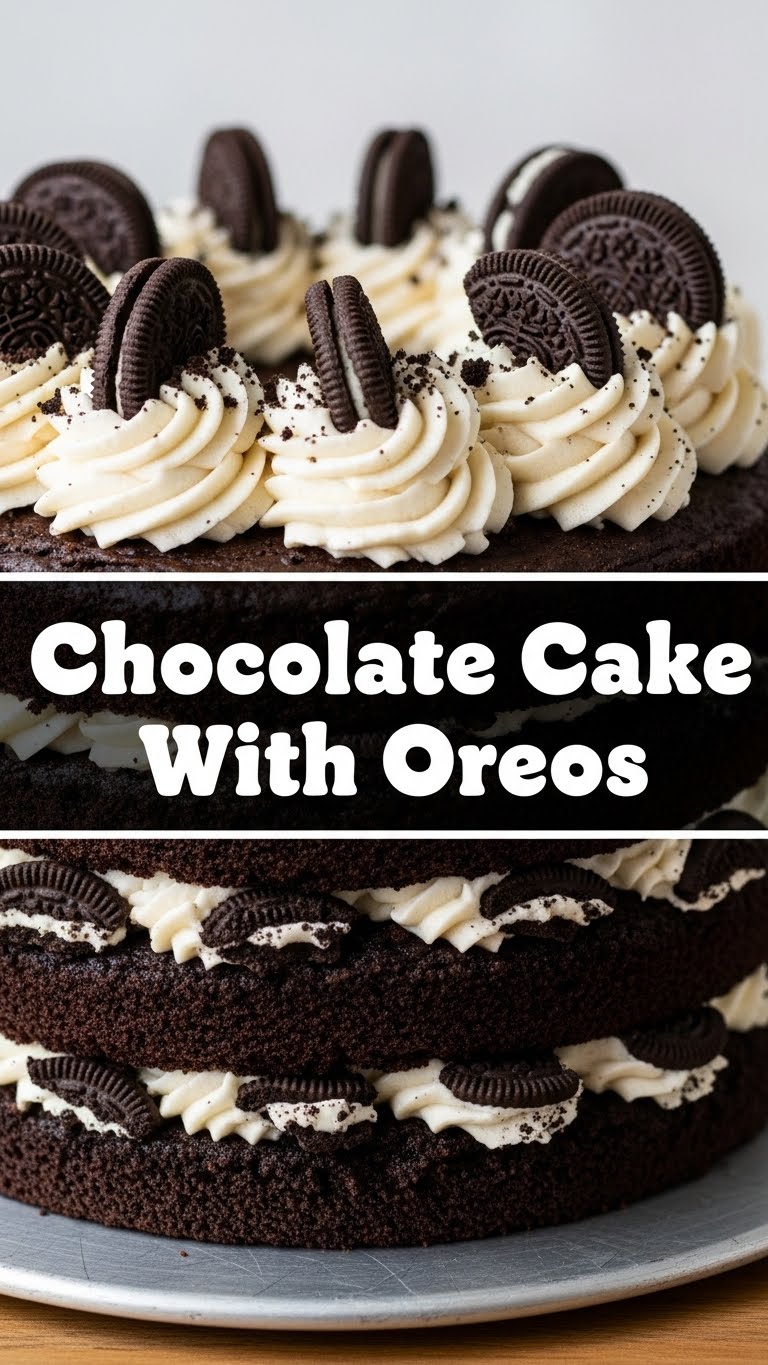
- Oreos: The star, the legend, the reason we’re all here. **Crushed Oreos for the batter and frosting, extra for garnish!**
- Butter (softened): For the frosting. Because butter makes everything better.
- Powdered Sugar: For that dreamy, creamy frosting.
Step-by-Step Instructions
Alright, apron on (or not, I won’t tell), let’s bake some magic!
- Preheat & Prep: First things first, crank that oven to 350°F (175°C). Grease and flour a 9×13 inch baking pan (or two 8-inch round pans if you’re feeling ambitious for layers). This is **super important** unless you want cake stuck to your pan forever.
- Dry Mix Party: In a large bowl, whisk together your flour, sugar, cocoa powder, baking soda, baking powder, and salt. Give it a good whisk until everything looks well acquainted.
- Wet Mix Wonders: In a separate, medium bowl, whisk your eggs, milk, vegetable oil, and vanilla extract until they’re all blended into a beautiful, eggy concoction.
- Combine Forces: Pour the wet ingredients into the dry ingredients. Mix on low speed (or by hand with a spatula) until just combined. **Do not overmix!** Lumps are okay; tough cake is not.
- The Hot Stuff: Carefully pour in the hot water (or coffee). Mix again until just smooth. The batter will be thin, but that’s exactly what we want. Now, gently fold in about 1 cup of roughly crushed Oreos.
- Bake It Off: Pour the batter into your prepared pan. Pop it into the preheated oven for 30-35 minutes for a 9×13, or 25-30 minutes for round pans. A toothpick inserted into the center should come out with moist crumbs, not wet batter.
- Cool Down: Let the cake cool in the pan for about 10-15 minutes before flipping it out onto a wire rack to cool completely. **Patience, young grasshopper!** Don’t try to frost a warm cake unless you want a melted, crumbly mess.
- Frosting Time: While the cake chills, make your Oreo buttercream! Beat softened butter until creamy, then gradually add powdered sugar, milk, and vanilla. Beat until light and fluffy. Stir in another cup of crushed Oreos.
- Decorate & Devour: Once the cake is completely cool, slather on that glorious Oreo buttercream. Garnish with more crushed Oreos or even whole ones for dramatic effect. Slice, serve, and accept all the compliments!
Common Mistakes to Avoid
Nobody’s perfect, but we can avoid these rookie blunders together:
- Thinking you don’t need to preheat the oven: Rookie mistake! Your cake won’t rise properly, and it’ll bake unevenly. Always preheat!
- Overmixing the batter: This is a cardinal sin. Overmixing develops the gluten, making your cake tough and chewy instead of light and fluffy. Mix until *just* combined.
- Not greasing AND flouring the pan: Oh, the horror! Unless you want to chisel your cake out of the pan, do this. Every. Single. Time.
- Frosting a warm cake: Unless you’re going for a deconstructed, gooey look (which, let’s be honest, you’re not), **wait for the cake to cool completely.** Period.
- Not getting enough Oreos: Seriously? This is an Oreo cake! Don’t skimp. Get extra. For the cake, for the frosting, for your face.
Alternatives & Substitutions
Feeling a little rebellious? Here are some ways to switch things up:
- Milk: Don’t have whole milk? Skim, 2%, almond, oat milk – they all generally work fine. The cake might be a *tad* less rich, but still delicious.
- Oil: Vegetable oil is great, but canola or even a light olive oil (if you’re feeling adventurous) can step in. I wouldn’t recommend coconut oil unless you want a subtle coconut flavor.
- Flour: While all-purpose is our go-to, you could try a gluten-free all-purpose blend (look for one that’s designed for baking) if you or your friends have dietary restrictions.
- Frosting: Not an Oreo buttercream fan? (Gasp! Who are you?!) You could totally use a simple chocolate ganache, a cream cheese frosting, or even a store-bought chocolate frosting and just stir in the crushed Oreos. **No judgment here, only cake love.**
- Different Oreos: Feeling wild? Use mint Oreos, golden Oreos, or even the double-stuffed ones!
FAQ (Frequently Asked Questions)
Got questions? I’ve got (casual) answers!
- Can I use margarine instead of butter for the frosting? Well, technically yes, but why hurt your soul like that? Butter just tastes better and gives a superior texture. Treat yo’ self!
- My cake sank in the middle! What happened? Oh no! Could be a few things: oven door opened too early (it’s tempting, I know!), too much leavening, or underbaking. Make sure your oven is properly calibrated!
- How long does this cake last? If stored in an airtight container at room temperature, it’s usually good for 3-4 days. In the fridge, maybe a bit longer, but who are we kidding, it won’t last that long.
- Can I make this dairy-free or vegan? **Totally!** Use plant-based milk (oat or almond are great), a flax egg or other egg substitute, and ensure your Oreos are vegan (most are, but check the label!). For the frosting, use a good quality vegan butter alternative.
- Do I really need the hot water/coffee? Yes! It blooms the cocoa powder, bringing out a much deeper, richer chocolate flavor. If you use coffee, you won’t taste coffee, just super intense chocolate. It’s a game-changer, trust me.
- Can I freeze this cake? Yep! You can freeze slices or the whole cake (unfrosted is best, but frosted works too if well-wrapped) for up to 2-3 months. Thaw in the fridge overnight before serving.
Final Thoughts
So there you have it, folks! Your new go-to recipe for a ridiculously delicious, shockingly easy Chocolate Oreo Cake. It’s perfect for birthdays, potlucks, Tuesday evenings, or any time you need a serious chocolate fix. Now go impress someone—or yourself—with your new culinary skills. You’ve earned it!


