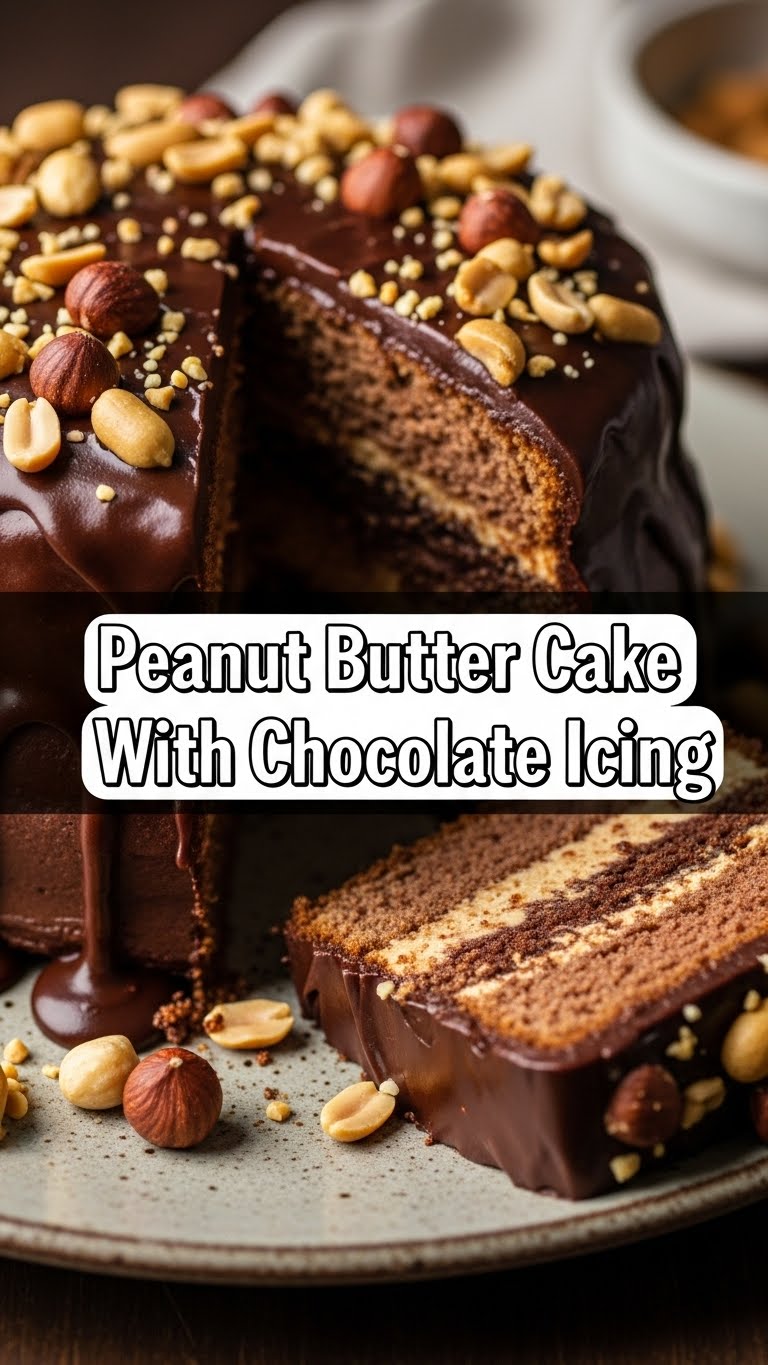
So you’re craving something tasty but too lazy to spend forever in the kitchen, huh? Same, friend, same. We’re talking about that irresistible combo that makes your taste buds sing, but without the drama of a Michelin-star recipe. Get ready for a **Peanut Butter Cake with Chocolate Icing** that’s so good, you’ll wonder why you ever bothered with anything else.
Why This Recipe is Awesome
Look, life’s too short for complicated baking. This recipe is your new best friend because it’s genuinely **idiot-proof** (and trust me, even I didn’t mess it up!). It’s quick, it’s comforting, and it basically requires minimal effort for maximum payoff. Plus, it’s peanut butter and chocolate – a duo so iconic, it should have its own walk of fame star. This isn’t just a cake; it’s a warm hug in dessert form, perfect for impressing guests or, more realistically, for devouring solo while binging your favorite show. **No judgment here!**
Ingredients You’ll Need
Gather your troops! Here’s what you’ll need to make this masterpiece. For the love of all that is delicious, try to use good quality ingredients – it really does make a difference!
For the Peanut Butter Cake:
- 1 ½ cups All-Purpose Flour: The basic foundation of our deliciousness. Nothing fancy.
- 1 teaspoon Baking Soda: The magic dust that makes it all fluffy.
- ½ teaspoon Salt: Just a pinch to balance out all that sweet, sweet goodness.
- ½ cup (1 stick) Unsalted Butter: Softened, because cold butter is just rude when you’re trying to cream it.
- 1 cup Granulated Sugar: For that sweet, sweet bliss.
- ½ cup Packed Light Brown Sugar: Adds a lovely depth and chewiness.
- ½ cup Creamy Peanut Butter: The star of our show! Make sure it’s creamy, not crunchy (unless you’re feeling rebellious, then go for it!).
- 2 Large Eggs: Room temperature, please. They mix better, trust me.
- 1 teaspoon Vanilla Extract: Don’t skimp on this! It’s the secret weapon.
- 1 cup Whole Milk: Again, room temperature is best. For ultimate richness.
For the Chocolate Fudge Icing:
- ½ cup (1 stick) Unsalted Butter: Melted. You’re doing great.
- ½ cup Unsweetened Cocoa Powder: The darker, the dreamier, IMO.
- 4 cups Powdered Sugar: Sifted, if you want truly smooth icing.
- ½ teaspoon Vanilla Extract: More vanilla, because why not?
- ¼ cup Milk: Or a little more/less, depending on your desired consistency.
Step-by-Step Instructions
Alright, apron on! Let’s get baking. These steps are short and sweet, just like our cake will be.
Making the Peanut Butter Cake:
- Get Preheated & Prepped: Preheat your oven to **350°F (175°C)**. Grease and flour a 9×13 inch baking pan. This step is non-negotiable, unless you like your cake stuck to the pan.
- Dry Mix It Up: In a medium bowl, whisk together the flour, baking soda, and salt. Set aside.
- Cream the Good Stuff: In a large bowl, using an electric mixer, cream together the softened butter, granulated sugar, and brown sugar until light and fluffy. This usually takes about 2-3 minutes.
- Add the Peanut Power: Beat in the creamy peanut butter until well combined. Then, add the eggs one at a time, beating well after each addition. Stir in the vanilla extract.
- Combine & Conquer: Gradually add the dry ingredients to the wet ingredients, alternating with the milk, beginning and ending with the dry ingredients. **Don’t overmix!** Mix just until combined.
- Bake It Off: Pour the batter into your prepared pan and spread evenly. Bake for **30-35 minutes**, or until a wooden skewer inserted into the center comes out clean.
- Cool Down: Let the cake cool completely in the pan on a wire rack before even *thinking* about icing it. Patience, young grasshopper.
Whipping Up the Chocolate Fudge Icing:
- Melt & Mix: In a medium bowl, melt the butter (you can do this in the microwave or on the stovetop). Whisk in the cocoa powder until smooth.
- Sweeten the Deal: Gradually add the powdered sugar, mixing until well combined. It’ll be thick.
- Smooth It Out: Stir in the vanilla extract and then slowly add the milk, a tablespoon at a time, until you reach your desired consistency. You want it smooth and spreadable, but not runny.
- Frost Away: Once the cake is completely cool, spread that glorious chocolate icing all over it. Try not to eat it all with a spoon first!
Common Mistakes to Avoid
Even the best of us make mistakes, but let’s try to avoid these rookie errors, shall we?
- Ignoring Preheat: Thinking you don’t need to preheat the oven—rookie mistake. Your cake will thank you for the consistent temperature.
- Cold Ingredients: Using cold butter, eggs, or milk. Room temperature ingredients emulsify better, leading to a smoother, more even batter and a better final texture.
- Overmixing: Once you add the flour, mix just until combined. Overmixing develops the gluten too much, resulting in a tough, dense cake. Nobody wants that.
- Hot Cake, Cold Icing: Icing a warm cake. This is a one-way ticket to a chocolate puddle disaster. Let it cool completely. Seriously.
- Forgetting to Scrape the Bowl: Those unmixed bits at the bottom or sides? They will haunt your cake. **Scrape that bowl down!**
Alternatives & Substitutions
Feeling a little adventurous, or just working with what you’ve got? Here are some ideas!
- Dairy-Free Delight: You can absolutely swap out the butter for a good quality vegan butter alternative and use your favorite plant-based milk (almond, oat, soy).
- Gluten-Free Goodness: A 1:1 gluten-free flour blend works great in this recipe. Just make sure it contains xanthan gum!
- Nutty Variations: While peanut butter is king here, you could try almond butter or cashew butter for a different flavor profile. The texture might vary slightly, but it’ll still be delicious.
- Chocolate Chips: Stir in a half-cup of mini chocolate chips into the cake batter for an extra chocolatey surprise.
- Icing Adventures: Don’t have cocoa powder? A simple vanilla buttercream is also fantastic with peanut butter cake. Or for extra decadence, sprinkle some chopped peanuts on top of the chocolate icing!
FAQ (Frequently Asked Questions)
- Can I use margarine instead of butter? Well, technically yes, but why hurt your soul like that? Butter provides a richer flavor and better texture. If you must, use a high-quality margarine.
- How do I know when the cake is done? A wooden skewer or toothpick inserted into the center should come out clean, with no wet batter clinging to it.
- Can I make this as cupcakes? Absolutely! Divide the batter into cupcake liners and bake for about 18-22 minutes. Keep an eye on them!
- How long does this cake last? Stored in an airtight container at room temperature, it’s best for 2-3 days. In the fridge, it can last up to 5 days, but let it come to room temp before serving for the best flavor.
- My icing is too thick/thin! Help! Too thick? Add milk a teaspoon at a time until it’s perfect. Too thin? Add more sifted powdered sugar a tablespoon at a time. It’s all about feel!
- Can I use crunchy peanut butter? You rebel, you! Yes, but it will give your cake a different, slightly chunkier texture. For classic smooth deliciousness, creamy is the way to go.
Final Thoughts
And there you have it! A ridiculously easy, incredibly delicious Peanut Butter Cake with Chocolate Icing that’s bound to be a crowd-pleaser (or a “me-pleaser,” which is equally important). So, dust off your apron, crank up some tunes, and get baking. Now go impress someone—or yourself—with your new culinary skills. You’ve earned it! Enjoy every single, glorious bite!

