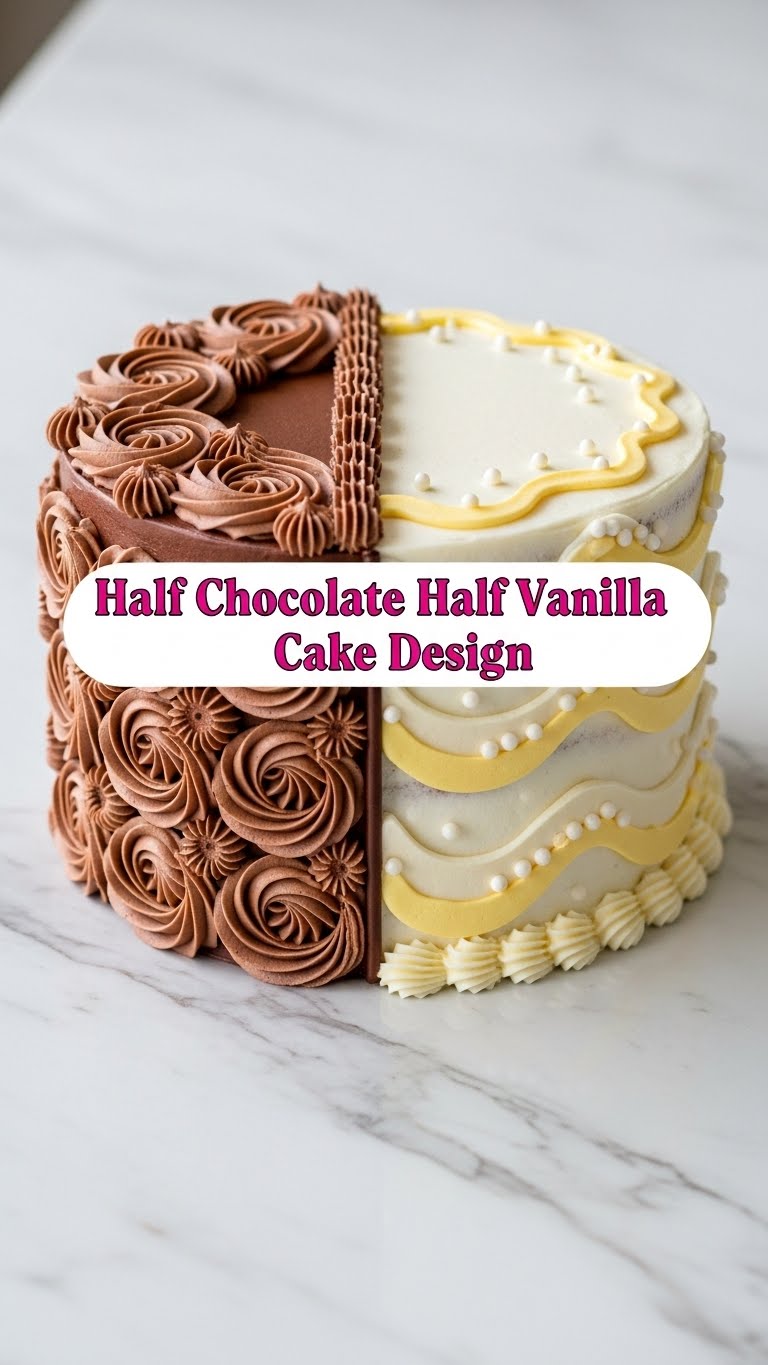
Ever stared into the fridge, wanting cake, but then had an existential crisis trying to pick between chocolate and vanilla? Yeah, me too. The struggle is real, my friend. What if I told you there’s a way to silence those warring dessert desires? No, you don’t need to bake two separate cakes (who has that kind of energy?!). You, my friend, need the Half Chocolate Half Vanilla Cake. It’s like a culinary truce, and everyone wins!
Why This Recipe is Awesome
This isn’t just a cake; it’s a diplomatic solution to your dessert indecision. This glorious creation lets you have your cake and eat it too – literally! It’s also **surprisingly easy**, even for those of us who occasionally burn water (no judgment, we’ve all been there). Plus, it looks super fancy, so you can totally brag about your mad baking skills without actually breaking a sweat. It’s an instant crowd-pleaser and a personal sanity-saver. Win-win!
Ingredients You’ll Need
Time to gather your baking squad! Most of these are probably chilling in your pantry already. No obscure, hard-to-find ingredients here, because life’s complicated enough, right?
- All-Purpose Flour: 2 cups. The foundational magic dust.
- Granulated Sugar: 1 ¾ cups. Sweet, sweet joy.
- Unsalted Butter: 1 cup (2 sticks), softened. The good stuff. Don’t skimp; your taste buds will thank you.
- Large Eggs: 3. Our binding heroes.
- Whole Milk: 1 cup. Liquid love, helps keep things moist.
- Baking Powder: 2 teaspoons. For that lift, baby!
- Salt: ½ teaspoon. Just a pinch, to make everything pop.
- Pure Vanilla Extract: 2 teaspoons. Pure vanilla bliss. No fake stuff, please.
- Unsweetened Cocoa Powder: ½ cup. For the dark side, obviously.
- Your Favorite Frosting: Enough for one cake. Homemade or store-bought, because sometimes life is too short for homemade frosting. We’re here for fun, not stress!
Step-by-Step Instructions
Alright, let’s get this party started! Follow these simple steps, and you’ll be a dual-flavor maestro in no time.
Prep Time! Preheat your oven to 350°F (175°C). Grab a 9-inch round cake pan (or an 8-inch if you want a taller cake), grease it up, and lightly flour it. Or line with parchment paper for zero stick anxiety. Your call, champ.
Cream it Up: In a large bowl, or your stand mixer if you’re feeling fancy, cream together the softened butter and granulated sugar until it’s light and fluffy. This usually takes about 2-3 minutes. Don’t rush this step!
Egg-cellent Addition: Add the eggs, one at a time, beating well after each addition. Scrape down the sides of the bowl to make sure everything gets cozy.
Dry Meets Wet: In a separate bowl, whisk together the flour, baking powder, and salt. Now, add half of this dry mixture to your wet ingredients, mixing until just combined. Pour in the milk, mix briefly, then add the remaining dry ingredients. **Don’t overmix!** Mix until just combined, a few lumps are okay. Seriously, stop it. You’re developing gluten, not building biceps.
Split Personality: Divide your beautiful batter evenly into two separate bowls. Eyeball it, or use a scale if you’re feeling precise. We’re not judging.
Vanilla Vibe: To one bowl, add 2 teaspoons of vanilla extract and mix it in gently. This is your pure, angelic vanilla batter.
Chocolate Charmer: To the second bowl, add the ½ cup of unsweetened cocoa powder. Mix until it’s all one gorgeous, dark chocolatey color. You might need to add a tablespoon or two of extra milk if it seems too thick. FYI, this is where the magic happens!
Pan Party: Now for the fun part! Spoon alternating dollops of vanilla and chocolate batter into your prepared cake pan. You can do big blobs, little blobs, or even try to make a defined half-and-half line if you’re feeling ambitious. Use a knife or skewer to gently swirl the batters together once or twice for a marbled effect, but don’t overdo it!
Bake Away: Pop that pan into your preheated oven. Bake for 30-35 minutes, or until a wooden skewer inserted into the center comes out clean. **Patience, grasshopper.** Your cake needs its space, so resist opening the oven door too early.
Cool Down: Let the cake cool in the pan for about 10-15 minutes before flipping it out onto a wire rack to cool completely. This is the hardest part, I know, but trust the process.
Frosting Fun: Once it’s completely cool (and I mean completely, otherwise you’ll have a frosting meltdown), frost your cake with your chosen frosting. Decorate as wildly or as simply as you like! Go wild!
Common Mistakes to Avoid
Listen, we’ve all been there. Baking isn’t always sunshine and rainbows, but knowing these common blunders can save you a cake-tastrophe.
- Overmixing the Batter: I already mentioned it, but it’s worth repeating. Mixing too much develops the gluten, making your cake tough instead of tender. Mix until *just* combined.
- Not Preheating Your Oven: Rookie mistake! Your oven needs to be at the correct temperature from the moment the cake goes in for even baking and proper rising. It’s not a suggestion, it’s a command from the baking gods.
- Opening the Oven Door Early: Every time you peek, you let out heat, causing your cake to potentially sink in the middle. Resist the urge until at least two-thirds of the baking time has passed.
- Frosting a Warm Cake: Unless you’re going for a deconstructed, melted-mess look, wait until your cake is completely cool. Like, truly, fully cool.
- Eyeballing Ingredients (Sometimes): While I encourage some creative liberty, baking is a science. For core ingredients, try to be somewhat precise. This isn’t a cocktail party, precision matters… mostly.
Alternatives & Substitutions
Baking should be adaptable! Here are a few ways to tweak this recipe to your liking or what you have on hand:
- Oil instead of Butter: You can absolutely use a neutral oil (like vegetable or canola) for a slightly lighter, moister crumb. Sure, for a lighter texture, but IMO, butter wins on flavor every single time.
- Dairy-Free Milk: Got a dairy sensitivity? Totally doable! Almond, oat, soy – take your pick. Just make sure it’s unsweetened if you’re using flavored milk.
- Gluten-Free Flour: Yep, this recipe works great with a 1:1 gluten-free baking blend. Just follow the instructions as written.
- Different Frostings: Cream cheese frosting? Ganache? A simple glaze? Whipped cream? Go wild! This cake is a blank canvas for your frosting fantasies. Or just buy it, no judgment here, remember?
FAQ (Frequently Asked Questions)
Got questions? I’ve got answers. Mostly. Don’t worry, these aren’t pop quizzes.
- Can I use less sugar? Technically, yes, but your cake might secretly judge you. Sugar helps with moisture and tenderness, so cutting too much can affect the texture. Maybe reduce by a quarter cup, but no more if you want a happy cake.
- How do I get a clean split between vanilla and chocolate? Ah, the quest for perfection! **A little bit of magic, a lot of careful spooning.** If you want a really defined line, try using a piping bag for each batter and piping them side-by-side. Or just embrace the swirl; it’s art!
- My cake is dry! What went wrong? Usually, a dry cake means over-baking or over-mixing the batter. Check your oven temperature with a thermometer and remember that “just combined” batter rule.
- Can I make this as cupcakes? Um, absolutely! This batter is perfect for cupcakes. Just line your muffin tin, fill ’em up about two-thirds full, and adjust your baking time. They’ll probably need around 18-22 minutes.
- What if I don’t have buttermilk? No buttermilk, no problem! Just add a tiny bit of vinegar or lemon juice (about 1 tablespoon per cup) to regular milk, let it sit for 5 minutes, and voila – DIY buttermilk, who knew?!
- How long does it keep? If stored in an airtight container at room temperature, it’ll be good for 2-3 days. In the fridge, maybe up to 5 days. But honestly, if it lasts more than 2 days, you’re doing something wrong. Or you have incredible self-control, which I admire.
Final Thoughts
See? You just tamed two flavor beasts in one glorious cake. You’re basically a dessert superhero, a culinary diplomat, a… well, you get the idea. This half-and-half masterpiece is going to bring so much joy to your taste buds (and anyone lucky enough to get a slice). Now go impress someone—or yourself—with your new culinary skills. You’ve earned it, **you baking legend!** Don’t forget to share a slice (or ten), because sharing cake is caring.
