So, you’ve got a perfectly baked cake. It’s looking good, smelling divine, but… it’s a little… *naked*, isn’t it? You know that feeling when you want to take things up a notch, make it look like it just sashayed off a Pinterest board, but you’re also eyeing that comfy couch? Yeah, me too. This isn’t about baking a cake (you’ve already nailed that, champ!). This is about transforming it into a dazzling, decadent masterpiece with a chocolate glaze so shiny, you might just see your own impressed face in it. And guess what? It’s ridiculously easy. Let’s get you from “meh” to “OMG, you *made* that?!”
Why This Recipe is Awesome
Okay, let’s be real. We all want to look like a culinary genius without actually, you know, doing *genius-level* work. And this chocolate glaze? It’s your secret weapon. It’s so simple, even your most kitchen-averse friend could whip it up (and probably high-five themselves afterward). It’s quick, uses ingredients you probably already have lurking in your pantry, and transforms any humble cake into a show-stopper. Plus, the shine? Oh honey, the shine! It’s like magic, but edible. Seriously, this recipe is **idiot-proof**, I swear, I’ve tested it on myself multiple times and haven’t messed it up yet!
Ingredients You’ll Need
Gather ’round, buttercup, these are your cake-transforming tools. No fancy obscure stuff here, just good ol’ deliciousness.
- Unsalted Butter (¼ cup / 56g): The unsung hero, adding richness and a glorious sheen. Don’t even *think* about margarine. We’re classy here.
- Milk (¼ cup / 60ml): Any kind works, but whole milk makes it extra luscious. Dairy-free? Almond or oat milk can pinch-hit.
- Unsweetened Cocoa Powder (¼ cup / 20g): Go for good quality! This is where your chocolatey punch comes from. Sift it if you’re feeling fancy (and want to avoid lumps, which, trust me, you do).
- Powdered Sugar (1 ½ cups / 180g): Also known as confectioners’ sugar. It’s super fine, making for a super smooth glaze. Sift this too, unless you *like* fighting lumps.
- Vanilla Extract (½ teaspoon): A tiny splash for depth and warmth. It’s like the little black dress of baking ingredients – always a good idea.
- A tiny pinch of salt: Seriously, just a pinch. It makes all the chocolatey flavors sing!
Step-by-Step Instructions
Alright, let’s get this glaze party started! Remember, we’re going for chill vibes here, not rocket science.
Grab a small saucepan and toss in your butter and milk. Heat it gently over medium-low heat. Stir occasionally until the butter is completely melted and the mixture is warm, but **don’t let it boil**! We’re not making hot chocolate here, just getting things cozy.
Remove the pan from the heat. Now, carefully whisk in your sifted cocoa powder and powdered sugar. Stir, stir, stir until it’s all combined and beautifully smooth. No lumpy bits allowed, so if you see any, keep whisking like your life depends on it! Or, you know, like your cake’s beauty depends on it.
Once smooth, stir in the vanilla extract and that tiny pinch of salt. Give it another good whisk. Now, let it cool down a bit. You want it warm enough to pour easily, but not so hot it melts your cake or runs off like a scared puppy. Aim for a consistency where it coats the back of a spoon.
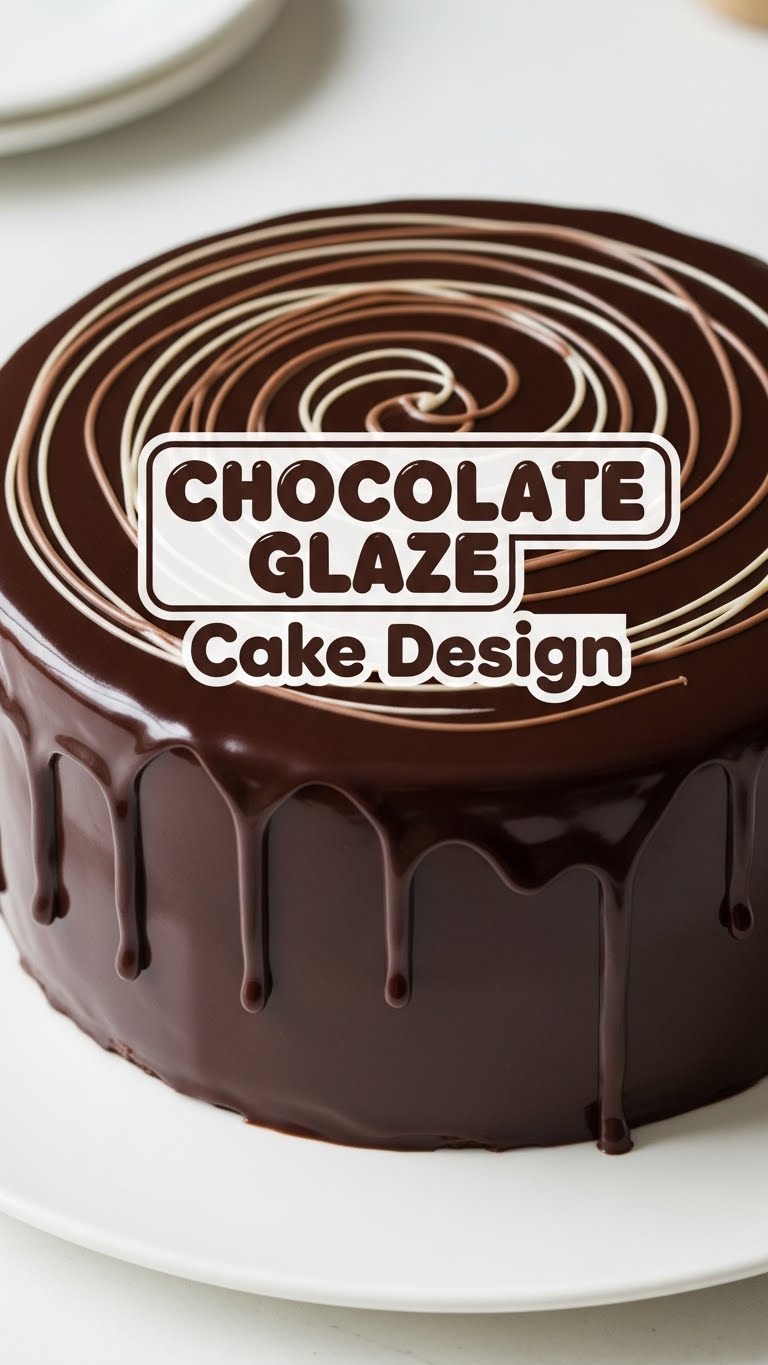
Place your cooled cake on a wire rack with a baking sheet underneath (to catch the drips, FYI). Slowly pour the glaze over the center of your cake, letting it naturally cascade down the sides. For those perfect drips, use a spoon to guide some glaze over the edges. Want more drama? Pour a thicker layer!
Let the glaze set! Depending on how thick it is and your kitchen’s temperature, this might take anywhere from 15 minutes to an hour. You can pop it in the fridge for a quick set if you’re impatient (who isn’t?). Once set, go admire your glorious handiwork!
Common Mistakes to Avoid
Look, we all make ’em. But I’m here to save you from these glaze-related blunders. Consider me your culinary guardian angel.
- Not Sifting Your Dry Ingredients: Rookie mistake! Seriously, sift that cocoa and powdered sugar unless you fancy fighting tiny, defiant lumps for eternity. Your whisk will thank you.
- Overheating the Glaze: If it’s too hot, it’ll be too thin and just slide right off your cake, leaving a sad, barely-coated mess. Patience, young padawan, let it cool a bit.
- Glazing a Warm Cake: This is a big NO-NO. Your cake needs to be completely cool. Like, stone-cold cool. Otherwise, the glaze will melt right into it, and you’ll end up with a soggy, uneven mess.
- Not Using a Cooling Rack: Thinking you can just glaze it on a plate? Sure, if you want a pool of glaze under your cake and messy sides. The rack catches the drips, making cleanup (and your life) easier.
- Forgetting the Pinch of Salt: It seems tiny, but it’s mighty! Without it, your chocolate might taste a little flat. **Don’t skip the salt!**
Alternatives & Substitutions
Feeling adventurous? Or just realized you’re out of something crucial? No worries, we’ve got options!
- Milk Alternatives: Out of dairy milk? **Almond milk, oat milk, or even water** can work in a pinch, but know that using water will result in a less rich, slightly less creamy glaze. Still good, just different, IMO.
- Espresso Powder: Want to deepen that chocolate flavor and make it sing? Add **½ teaspoon of instant espresso powder** with your cocoa. It won’t make it taste like coffee, just *more chocolatey*. Trust me on this one!
- Different Extracts: Swap vanilla for **peppermint extract** for a festive twist, or a tiny bit of **almond extract** for something sophisticated. Just go easy, extracts are potent!
- Darker Chocolate Vibe: Use a **Dutch-processed cocoa powder** for a darker, less acidic chocolate flavor. It’s like switching from a nice dark roast coffee to a super rich, intense espresso – both good, just different moods.
FAQ (Frequently Asked Questions)
Got questions? I’ve got (casual) answers!
Can I use margarine instead of butter? Well, technically yes, but why hurt your soul like that? Butter just tastes better and gives a richer, smoother glaze. Do yourself a favor and stick to butter.
My glaze is too thick! What do I do? Easy peasy! Whisk in a tiny bit more milk (half a teaspoon at a time) until it reaches your desired pourable consistency. Don’t add too much at once, you can always add more, but you can’t take it away!
My glaze is too thin! Help! Pop it back on very low heat and whisk continuously for a minute or two to evaporate some liquid, or whisk in a tiny bit more sifted powdered sugar until it thickens up. Remember, it will thicken slightly as it cools.
How do I get those perfect drip edges? The trick is consistency and temperature. The glaze shouldn’t be too hot or too cold. Once poured, use the back of a spoon to gently push small amounts over the edge in specific spots. Practice makes perfect!
How long does this glaze last? Once set on the cake, it’s pretty stable at room temperature for a couple of days. If you have leftover glaze (unlikely, but hey!), store it in an airtight container in the fridge for up to a week. You might need to gently reheat and whisk it to get it back to pourable consistency.
Can I use this glaze on cupcakes? Absolutely! Just let it cool a bit more so it’s thicker and less prone to dripping everywhere. Dip the tops of your cooled cupcakes for a gorgeous, shiny finish!
Final Thoughts
See? I told you it was easy! Now you’re equipped with the ultimate secret weapon for turning any ordinary cake into an extraordinary masterpiece. Go ahead, bask in the glory, accept all the compliments (you earned ’em!), and maybe even drop a casual, “Oh, this old thing? Just a little something I whipped up.” Because you totally did! Now go impress someone—or yourself—with your new culinary skills. You’ve earned it!


