So, you’ve got that classic craving, right? The one where your brain screams ‘CAKE!’ but your heart whispers ‘…and also chocolate. Lots of chocolate. Hidden chocolate, preferably.’ Don’t worry, my friend, I hear you. And I’ve got the perfect solution that won’t make you wanna throw your apron at the wall.
Why This Recipe is Awesome
Why this recipe, you ask? Because it’s basically the culinary equivalent of a hug from a unicorn – magical, comforting, and surprisingly easy to achieve. Seriously, if I, a person who once set off a smoke detector making toast, can nail this, so can you. It’s **super forgiving**, looks fancy without the fancy effort, and best of all, it delivers a chocolate explosion right when you least expect it (or most, let’s be real). Plus, who doesn’t love a secret?
Ingredients You’ll Need
Gather your troops, fellow dessert warrior! Here’s what you’ll need for this delicious adventure:
For the Cake:
- All-purpose flour: The unsung hero. Don’t substitute with almond flour unless you want a… different experience.
- Granulated sugar: Sweetness incarnate. Don’t skimp, unless you’re into ‘health cake’ – which, let’s be honest, is an oxymoron here.
- Unsweetened cocoa powder: The darker, the better for that deep chocolatey goodness. Think evil villain, but delicious.
- Baking soda & baking powder: The dynamic duo for lift. Don’t confuse them, unless you enjoy dense hockey pucks.
- Salt: Just a pinch! Makes everything taste more *itself*.
- Large eggs: Room temp is best, they play nicer. Like humans, really.
- Milk: Any kind works, but whole milk adds a little extra love.
- Vegetable oil: Or any neutral oil. Keeps it moist, like a secret.
- Vanilla extract: The Beyoncé of flavorings. Just a splash!
- Hot water or coffee: Sounds weird, but trust me, it unlocks the cocoa magic.
For the Chocolate Filling:
- Good quality chocolate (chips or chopped bar): Your preferred poison. Dark, semi-sweet… whatever makes your heart sing.
- Heavy cream: The dream maker. Nothing less, please!
Step-by-Step Instructions
Alright, apron on, game face ready! Let’s get baking:
- Get Ready, Get Set: Preheat your oven to 350°F (175°C). Grease and flour an 8 or 9-inch round cake pan. If you’re feeling fancy, line the bottom with parchment paper.
- Mix the Dry Stuff: In a large bowl, whisk together the flour, sugar, cocoa powder, baking soda, baking powder, and salt. Make sure there are no lumpy surprises.
- Combine the Wet Stuff: In a separate medium bowl, whisk the eggs, milk, oil, and vanilla extract until well combined.
- Marry Them Up: Pour the wet ingredients into the dry ingredients. Mix on low speed (or by hand) until just combined. Don’t overmix! Now, *carefully* stir in the hot water or coffee. The batter will be thin, don’t panic! This is its secret.
- Bake It Off: Pour the batter into your prepared pan. Bake for 30-35 minutes, or until a toothpick inserted into the center comes out with moist crumbs, not wet batter.
- Cool Down: Let the cake cool in the pan for 10-15 minutes before inverting it onto a wire rack to cool completely. **Patience is a virtue here!** Don’t try to fill a warm cake, or you’ll have a chocolate soup situation.
- Whip Up the Filling: While the cake cools, make your ganache. Heat the heavy cream in a small saucepan over medium heat until it just begins to simmer. Remove from heat.
- Chocolate Magic: Pour the hot cream over your chocolate chips/chopped chocolate in a heatproof bowl. Let it sit for 5 minutes, then whisk until smooth and glossy. If it’s too thin, pop it in the fridge for 10-15 minutes to thicken slightly.
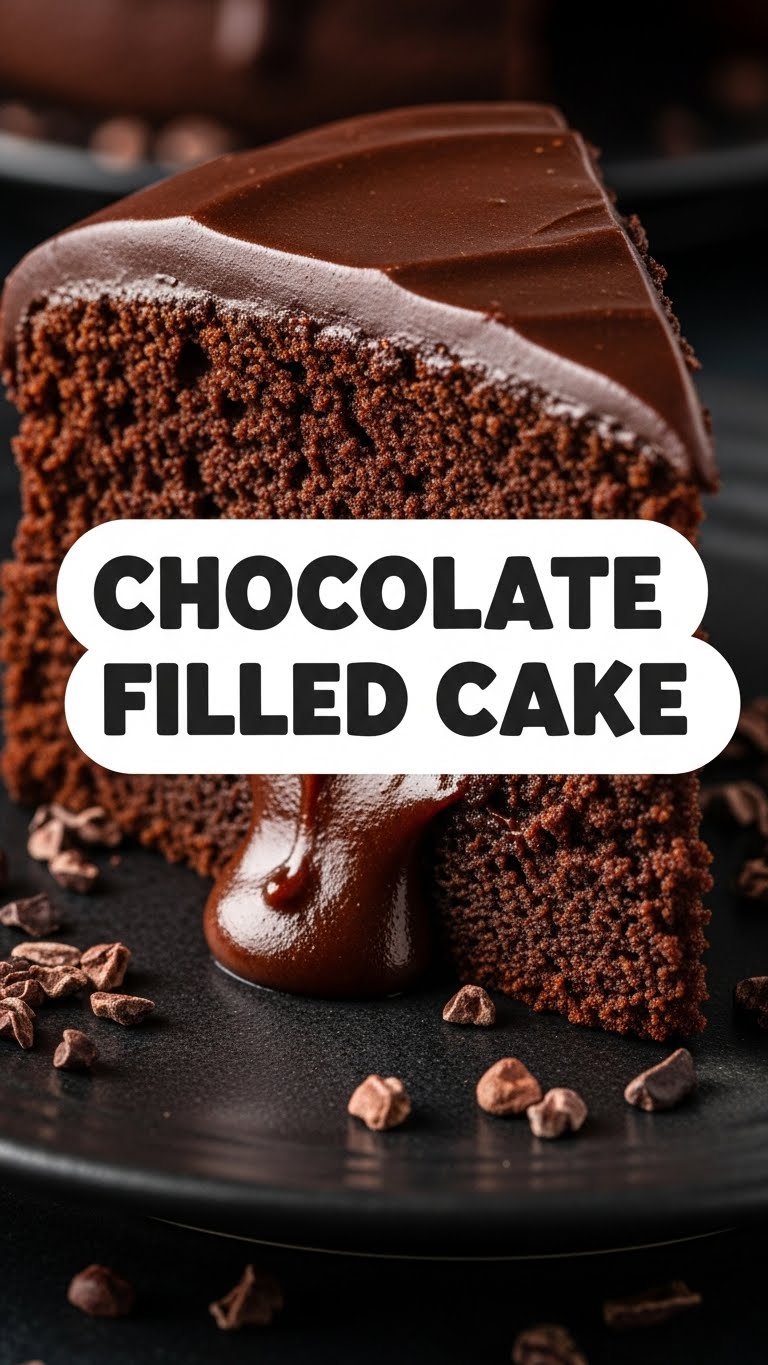
- Assemble the Dream: Once the cake is completely cool, use a sharp knife or a cake leveler to carefully slice it horizontally into two even layers. Spread your luscious chocolate ganache evenly over the bottom layer, leaving a small border. Place the top layer gently over the filling.
- Admire and Devour: Slice into your masterpiece and watch the chocolate filling ooze out. Prepare for immediate adoration (and maybe a second slice).
Common Mistakes to Avoid
Even the pros make mistakes (allegedly), so here are some pitfalls to dodge:
- Not preheating the oven: Seriously, it’s not a suggestion, it’s a command. Rookie mistake that leads to uneven baking.
- Overmixing the batter: You want a tender cake, not a rubber ball. Mix until *just* combined, then stop. Walk away from the mixer!
- Not cooling the cake completely: **This is crucial!** Filling a warm cake means your beautiful ganache will melt faster than an ice cream cone in July. Instant regret.
- Opening the oven door constantly: Resist the urge! Every time you peek, you let out heat and risk your cake sinking. Trust the process, future baker.
- Using low-quality chocolate for the ganache: You’ve gone this far, don’t cheap out on the star! Good chocolate makes a difference, IMO.
Alternatives & Substitutions
Feeling a little rebellious? Here are some tweaks you can make:
- Dairy-free? Swap out the milk for your favorite plant-based milk (almond, oat, soy all work great!), and use a good quality dairy-free chocolate and cream alternative for the ganache. Just make sure the cream alternative is ‘heavy cream’ style, not coffee creamer, unless you’re into soup.
- Coffee hater? No problem! Just use hot water instead of coffee for the batter. The coffee just enhances the chocolate flavor, it doesn’t make it taste like a mocha. But if you’re truly anti-coffee, water is fine.
- Want extra flair? You can add a teaspoon of instant espresso powder to the dry ingredients for an even deeper chocolate punch. Or a dash of your favorite liqueur (like Kahlúa or Baileys) to the ganache for a grown-up twist. Treat yo’ self!
- Different filling? Okay, okay, if you *must* deviate from pure chocolate (gasp!), you could use a salted caramel sauce, or a raspberry jam for a fruity kick. But for this recipe, the ganache is king.
FAQ (Frequently Asked Questions)
- “Can I make this cake ahead of time?” Absolutely! The cake itself can be baked a day in advance and stored covered at room temperature. The ganache can also be made a day ahead and stored in the fridge – just re-warm gently or let it come to room temp before spreading.
- “My ganache is too thin/thick, help!” If it’s too thin, pop it in the fridge for 10-15 minute intervals, stirring occasionally, until it reaches a spreadable consistency. Too thick? Gently re-warm it over a double boiler or in short bursts in the microwave, stirring until it loosens up. You’ve got this!
- “What if I don’t have two cake pans?” No worries! You can bake the whole batter in one pan, then slice it in half horizontally once completely cooled. Or, you could halve the recipe and bake it twice if you’re *really* dedicated. Or just make cupcakes! (But then it’s not a cake, is it?)
- “Can I use a different size cake pan?” Technically yes, but adjust your baking time! A smaller pan will need longer; a wider, shallower pan will need less. Keep an eye on it and do the toothpick test. **When in doubt, go with the recommended size for best results.**
- “My cake sank in the middle! What happened?” Ah, the dreaded crater! Usually, this means you opened the oven door too early, or your baking soda/powder wasn’t fresh (FYI, they do expire!). Sometimes it’s overmixing, or not enough leavening. Don’t fret, just fill the crater with *more* ganache. No one will ever know.
- “How long does this cake last?” Assuming it doesn’t vanish within an hour (which is highly likely), it’ll be good for 3-4 days at room temperature, covered. In the fridge, it’ll last a bit longer, but bring it to room temp before serving for the best texture.
Final Thoughts
See? That wasn’t so scary, was it? You just made a chocolate cake with a secret chocolate heart – basically a superhero of desserts. Now go impress someone—or yourself—with your new culinary skills. You’ve earned it! Grab a slice (or three), brew some coffee, and pat yourself on the back. You’re a rockstar, and your taste buds are gonna thank you.


