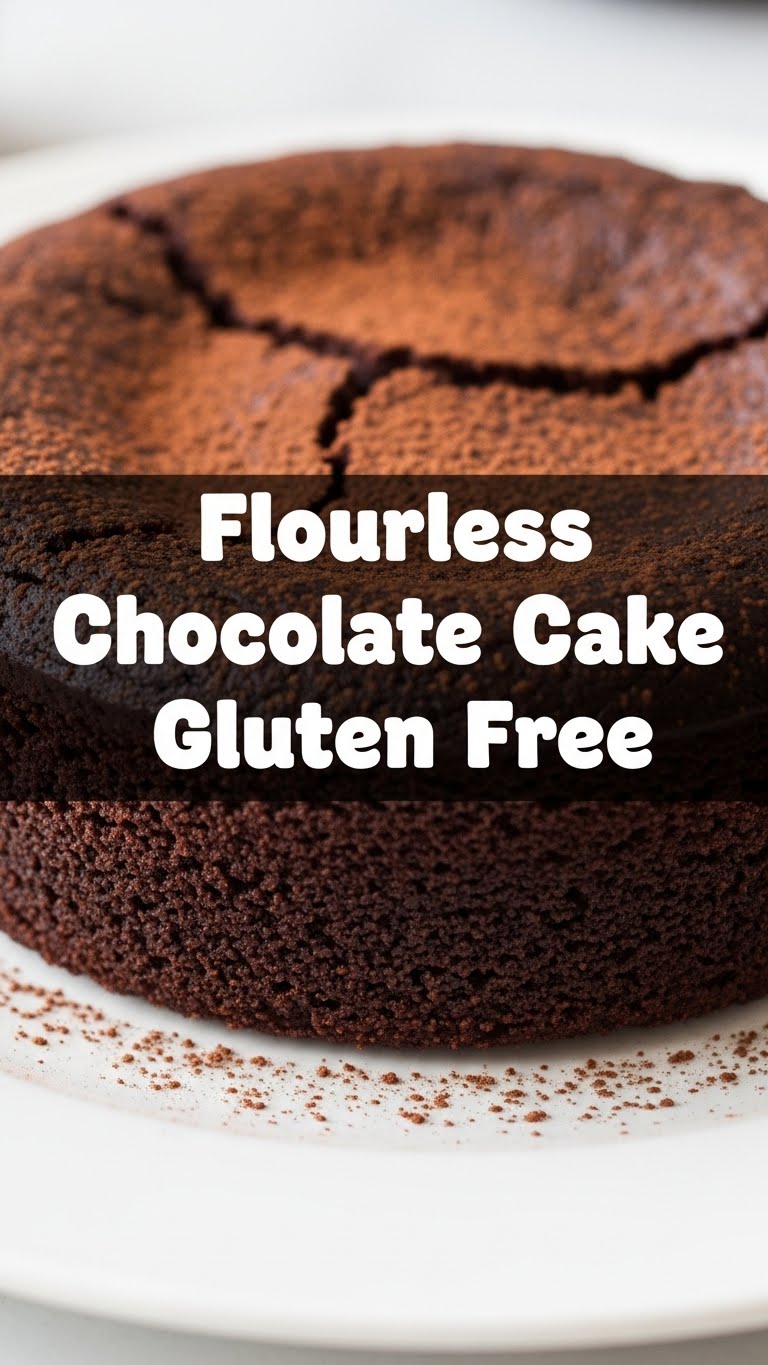
So you’re craving something rich, chocolatey, and so ridiculously good it feels a little illegal, but the thought of actual *flour* in your cake just feels… complicated? Or maybe you’re just avoiding gluten because your gut gives you the side-eye. Whatever your vibe, I’ve got your back. We’re making Flourless Chocolate Cake today, and it’s basically magic. It’s like the little black dress of desserts: sophisticated, classic, and always a hit. Plus, it’s so easy, you’ll wonder why you ever bothered with flour in the first place.
Why This Recipe is Awesome
First off, it’s chocolate. Need I say more? Secondly, it’s flourless, which means less fuss, fewer ingredients, and more *oomph* where it counts. It’s naturally gluten-free without even trying, making you look like a genius host/dessert whisperer without breaking a sweat. Think of it as your secret weapon for impressing literally anyone, from your picky aunt to that super-cool friend who “doesn’t really do dessert.”
Seriously, it only takes like, five ingredients and minimal brainpower. It’s practically idiot-proof. If I, a person who once set off a smoke alarm trying to boil water, can nail this, you can probably do it blindfolded while juggling flaming torches. (Disclaimer: Don’t actually try that. Use your eyes, please.) The texture is like a brownie’s fancier, more elegant cousin – dense, fudgy, and meltingly tender. It’s pure chocolate bliss in every bite!
Ingredients You’ll Need
Gather ’round, my sweet-toothed companions! Here’s the short and sweet list of what you’ll need. No weird stuff, just good old deliciousness.
- 1 pound (about 450g) good quality dark chocolate: This is the star of the show, so don’t skimp! Aim for 60-70% cocoa solids. Not the stuff you find under the couch, please.
- 1 cup (2 sticks / 226g) unsalted butter: The real deal, not that sad, watery spread. It’s what makes it so incredibly fudgy.
- 1 cup (200g) granulated sugar: Because life needs sweetness, and so does this cake.
- 6 large eggs: The binding agents of deliciousness. Make sure they’re at room temperature for the best results.
- 1 teaspoon vanilla extract: A little perfume for your cake. Adds that extra layer of warmth.
- 1/2 teaspoon salt: Don’t skip this! It enhances all the chocolatey goodness and keeps it from being *too* sweet.
Step-by-Step Instructions
Alright, let’s get this party started! Follow these ridiculously easy steps, and you’ll be a chocolate cake wizard in no time.
- Preheat & Prep: First things first, preheat your oven to 325°F (160°C). Then, grab a 9-inch round springform pan. Line the bottom with parchment paper and grease the sides. This is a crucial step unless you enjoy wrestling cake later.
- Melt the Magic: In a heatproof bowl set over a saucepan of simmering water (or a microwave, if you’re feeling brave), combine your chopped chocolate and butter. Stir occasionally until it’s completely smooth and glossy. Remove it from the heat and let it cool a bit. You don’t want to scramble your eggs later, trust me.
- Whisk the Wonders: In a separate large bowl, whisk together the sugar, eggs, and vanilla extract until they’re light and frothy. This should take about 2-3 minutes. You’re basically whipping up some airy dreams here.
- Combine Forces: Slowly pour the slightly cooled chocolate mixture into the egg mixture, whisking constantly until everything is beautifully combined. Then, stir in the salt. You’ll have a gorgeous, thick batter that smells divine.
- Bake it Up: Pour the batter into your prepared springform pan. Gently tap the pan on the counter a couple of times to release any air bubbles. Bake for 35-40 minutes. The edges should be set, but the center will still be a bit jiggly. This is good! It means fudgy perfection.
- Cool & Chill: Remove the cake from the oven and let it cool completely on a wire rack. As it cools, the center will sink slightly – totally normal! Once cool, cover it and pop it in the fridge for at least 4 hours, or even better, overnight. Chilling is key for that perfect dense texture.
- Serve it Up: When ready to serve, run a thin knife around the edge before releasing the springform. Dust with cocoa powder, powdered sugar, or add some fresh berries. Slice with a warm, dry knife for clean cuts. Devour!
Common Mistakes to Avoid
Even though this cake is pretty straightforward, there are a few banana peels you can trip over. Let’s make sure you don’t!
- Overbaking: The biggest sin! If you bake it too long, it’ll turn dry and crumbly, and we want fudgy and moist. Remember, the center should still be a little jiggly when you pull it out. Trust the jiggle!
- Not lining the pan (or greasing well): This cake is dense and loves to stick. If you don’t line the bottom with parchment and grease the sides, you’ll be prying chocolate chunks out of the pan and questioning your life choices.
- Trying to cut it warm: Oh, you impatient soul! While tempting, cutting this cake warm will result in a glorious, delicious mess. It needs that chill time to firm up and achieve its signature dense, sliceable texture.
- Using low-quality chocolate: As mentioned, chocolate is the star. If you use waxy, cheap chocolate, your cake will taste… well, waxy and cheap. Your efforts deserve better!
Alternatives & Substitutions
Feeling adventurous? Or just realized you’re missing an ingredient? No worries, we’ve got options!
- Chocolate Varieties: You can play around with different types of dark chocolate. For an extra intense flavor, go 72% or higher. For something slightly less bitter, a 60% will do beautifully. Some folks even swirl in a bit of milk chocolate for a sweeter profile, but IMO, the dark is where it’s at for this specific cake.
- A Boozy Kick: Want to adult it up? Add 1-2 tablespoons of espresso powder (to enhance chocolate flavor without tasting like coffee), Grand Marnier, Kahlua, or dark rum to the melted chocolate mixture. Ooh la la!
- Spice it Up: A pinch of cayenne pepper or chili powder in the chocolate can add a really intriguing, subtle warmth. Don’t go crazy, a little goes a long way.
- Dairy-Free Delight: Swap out the butter for your favorite high-quality dairy-free butter substitute (like Miyoko’s Kitchen or Earth Balance sticks). It usually works wonderfully!
- Toppings Galore: While perfect on its own, this cake loves company. Fresh berries (raspberries, strawberries!), a dollop of whipped cream, a dusting of powdered sugar, or even a simple chocolate ganache elevate it instantly.
FAQ (Frequently Asked Questions)
Got questions? I’ve got answers. Mostly. Let’s tackle some common thoughts you might have while whipping this up.
- “My cake cracked on top! Did I mess up?”
Nope, not at all! Cracking is super common with flourless chocolate cakes, especially when they cool and the center sinks. It just adds to its rustic charm, I say! Once you dust it with powdered sugar, no one will even notice. It’s character!
- “Can I use semi-sweet chocolate instead of dark?”
You *can*, but be warned, it will be significantly sweeter and might lose some of that intense chocolate depth that makes this cake so special. If you have a serious sweet tooth, go for it. But for a balanced flavor, stick to dark.
- “Why does it need to chill for so long?”
Ah, patience, my friend! The chilling time is crucial because it allows the cake to fully set and become dense and fudgy. Cutting it warm is like trying to slice a very rich pudding – delicious, but messy. Plus, the flavor actually develops more when it’s cold. Trust the process!
- “How long does this cake last?”
Stored in an airtight container in the fridge, it’ll last beautifully for 5-7 days. Good luck making it last that long, though! It’s usually gone within 24 hours in my house, FYI.
- “Can I freeze it?”
Absolutely! This cake freezes like a dream. Wrap individual slices or the whole cake (cooled and chilled first!) tightly in plastic wrap, then foil. It’ll keep in the freezer for up to 2 months. Thaw in the fridge overnight before serving.
- “Can I bake it in a different size pan?”
Technically yes, but you’ll need to adjust the baking time. A smaller, thicker cake will take longer, a wider, thinner cake less time. Keep an eye on that jiggle! If you go too small, it might also just be too dense.
Final Thoughts
And there you have it, folks! Your very own, show-stopping (yet ridiculously easy) Flourless Chocolate Cake. You’ve just created a masterpiece that’s elegant, rich, and naturally gluten-free without even breaking a sweat. So go forth and conquer your chocolate cravings. Slice yourself a generous piece, maybe add a little something extra on top, and savor every fudgy bite.
Now go impress someone – or yourself – with your new culinary skills. You’ve earned it! And remember, life’s too short for boring desserts. Enjoy!

