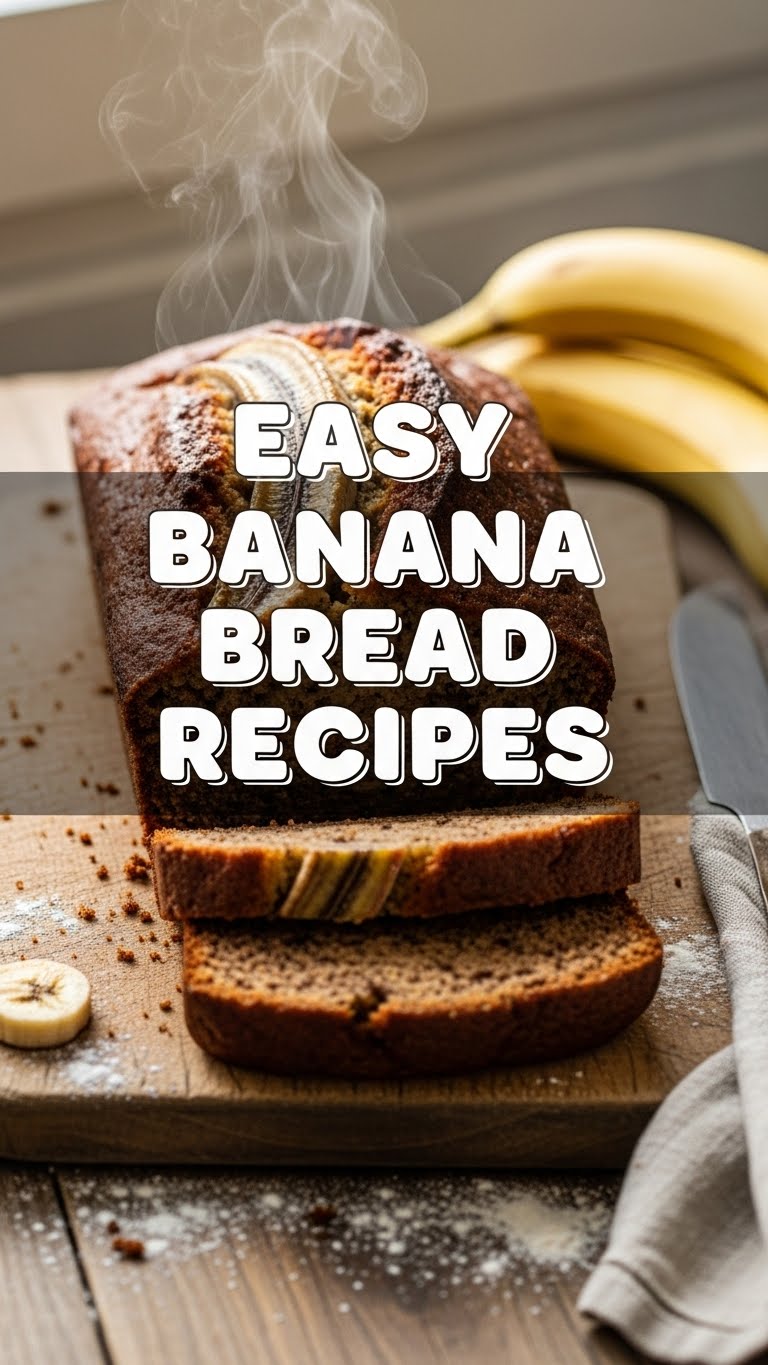
So you’ve got some suspiciously spotty bananas staring back at you from the counter, practically begging for a second chance at life, right? And you’re also craving something warm, sweet, and comforting, but, let’s be real, you’re not trying to win any Michelin stars today. My friend, you’ve come to the right place. We’re about to turn those sad, bruised beauties into the most ridiculously easy and delicious banana bread you’ve ever, well, easily made!
Why This Recipe is Awesome
Forget complicated techniques and fancy equipment. This recipe is so straightforward, your pet goldfish could probably follow it. Okay, maybe not, but you get the idea! It’s one-bowl friendly (less washing up, hooray!), uses super common ingredients you probably already have, and honestly, it’s pretty much fail-proof. I mean, if I can make it without setting off the smoke detector, you’re golden. Plus, your kitchen will smell like a dream, which is a definite bonus.
Ingredients You’ll Need
- Ripe Bananas (3-4 medium): We’re talking brown, spotty, almost-ready-for-the-bin bananas. The browner, the sweeter! Don’t even think about using yellow ones; they’re just not ready for their destiny.
- All-Purpose Flour (1 ½ cups): The trusty backbone of any good bake. No need for fancy types, just the regular stuff.
- Granulated Sugar (½ to ¾ cup): Depends on how sweet you like things and how ripe your bananas are. I usually go for ¾ because, well, sugar.
- Baking Soda (1 teaspoon): Our leavening MVP, making it light and fluffy. Don’t skip it!
- Salt (½ teaspoon): Just a pinch to balance all that sweetness and make everything taste more. Science!
- Egg (1 large): A binder, a unifier, a necessary evil for some. Room temp is best, but if you forget, it’s not the end of the world.
- Melted Butter (¼ cup or ½ stick): Unsalted, please! Or salted if you’re feeling rebellious and skip the extra salt. Make sure it’s melted and slightly cooled.
- Vanilla Extract (1 teaspoon): Because everything is better with vanilla, IMO.
- Optional add-ins: Chocolate chips (duh!), chopped walnuts or pecans, cinnamon (½ tsp).
Step-by-Step Instructions
- Preheat & Prep: First things first, get your oven ready. Preheat it to 350°F (175°C). Grease a 9×5-inch loaf pan with a bit of butter or non-stick spray. You can even line it with parchment paper for easy removal if you’re feeling fancy.
- Mash ‘Em Up: In a large bowl, take your gloriously overripe bananas and mash them up with a fork. You want some chunks left? Go for it! Smooth as baby food? Also fine! This is your banana bread adventure.
- Wet Ingredients Unite! To your mashed bananas, add the melted butter, the egg, and the vanilla extract. Give it a good stir until everything is nicely combined.
- Dry Mix Time: In a separate (or the same, if you’re truly going one-bowl-ninja) bowl, whisk together the flour, sugar, baking soda, and salt. Make sure there are no lumpy bits.
- Combine & Conquer: Pour the dry ingredients into the wet ingredients. Mix gently with a spatula or spoon just until combined. A few lumps are totally okay! Do not overmix, seriously, that’s how you get tough banana bread. If you’re adding chocolate chips or nuts, fold them in now.
- Into the Pan: Scrape your batter into the prepared loaf pan. Give it a gentle tap on the counter to settle.
- Bake Away! Pop it into your preheated oven and bake for 50-65 minutes. It’s done when a wooden skewer or toothpick inserted into the center comes out clean (or with a few moist crumbs, but no wet batter).
- Cool Down: Let your masterpiece cool in the pan for about 10-15 minutes before transferring it to a wire rack to cool completely. Patience, young padawan!
Common Mistakes to Avoid
- Using under-ripe bananas: Rookie mistake! Green or yellow bananas won’t give you that intense banana flavor or the right sweetness. Wait for the spots!
- Overmixing the batter: I know it’s tempting to get it super smooth, but overmixing develops the gluten in the flour, leading to a dense, tough loaf. Mix just until the dry ingredients disappear.
- Not preheating your oven: This isn’t just a suggestion; it’s essential for even baking and a good rise. Your oven needs to be at temp from the start.
- Opening the oven door constantly: Resist the urge! Every time you open the door, the temperature drops, which can cause your bread to sink.
- Cutting it hot: I know, the smell is intoxicating. But cutting it while it’s still piping hot can make it crumble and dry out faster. Give it time to set up!
Alternatives & Substitutions
- Butter alternative: No butter? You can totally use vegetable oil or melted coconut oil instead. It might give a slightly different texture, but still delicious. For a lighter touch, unsweetened applesauce can work for half the butter, but results vary.
- Sugar swap: If you want to use brown sugar, go for it! It adds a lovely molasses note. You might need to adjust the amount slightly. Honey or maple syrup can also be used, but again, texture and sweetness might change.
- Flour power: Feeling whole-grainy? You can substitute up to half of the all-purpose flour with whole wheat flour for a heartier loaf. Don’t go 100% unless you’re ready for a denser texture.
- Mix-ins galore: The world is your oyster! Besides chocolate chips and nuts, try shredded coconut, dried cranberries, a sprinkle of cinnamon or nutmeg, or even a swirl of cream cheese. Just don’t go too wild; you still want it to be banana bread.
FAQ (Frequently Asked Questions)
- “My bananas aren’t ripe enough! What do I do?” Panic not! You can roast them! Pop them on a baking sheet (skin on) at 300°F (150°C) for 15-20 minutes until the skins are black and shiny. Let them cool, then scoop out the sweet, gooey insides. Game changer!
- “Can I make muffins instead?” Absolutely! This recipe works perfectly for muffins. Just divide the batter into a greased muffin tin (fills about 12), and bake for 20-25 minutes. Check with a toothpick.
- “What if I don’t have baking soda?” Uh oh, that’s a key ingredient for the lift. You could try baking powder (use about 2-3 times the amount of baking soda), but the leavening reaction might be different because baking soda reacts with the acid in bananas. FYI, baking soda is better here.
- “How do I store banana bread?” Once completely cooled, wrap it tightly in plastic wrap or foil, or store in an airtight container at room temperature for up to 3-4 days. For longer storage, slice it, wrap individual slices, and freeze for up to 3 months. Just thaw and enjoy!
- “Can I add more bananas for extra banana-y goodness?” You can, but be careful! Too many bananas can make your bread overly dense or wet. Stick to the recommended 3-4 for the best texture and flavor balance. Trust me on this one.
- “Is this healthy?” Pfft. It has fruit, right? And calcium if you add nuts? Let’s just say it’s “comfort food” healthy. It’s not not healthy, if you know what I mean. Enjoy it, don’t overthink it!
Final Thoughts
So there you have it, folks! Your very own guide to whipping up a batch of ridiculously easy and utterly delightful banana bread. No stress, minimal mess, and maximum deliciousness. It’s the perfect treat for breakfast, a snack, or even a sneaky late-night indulgence (no judgment here!). Go forth, conquer those spotty bananas, and bask in the glory of your baking prowess. Now go impress someone—or yourself—with your new culinary skills. You’ve earned it!

