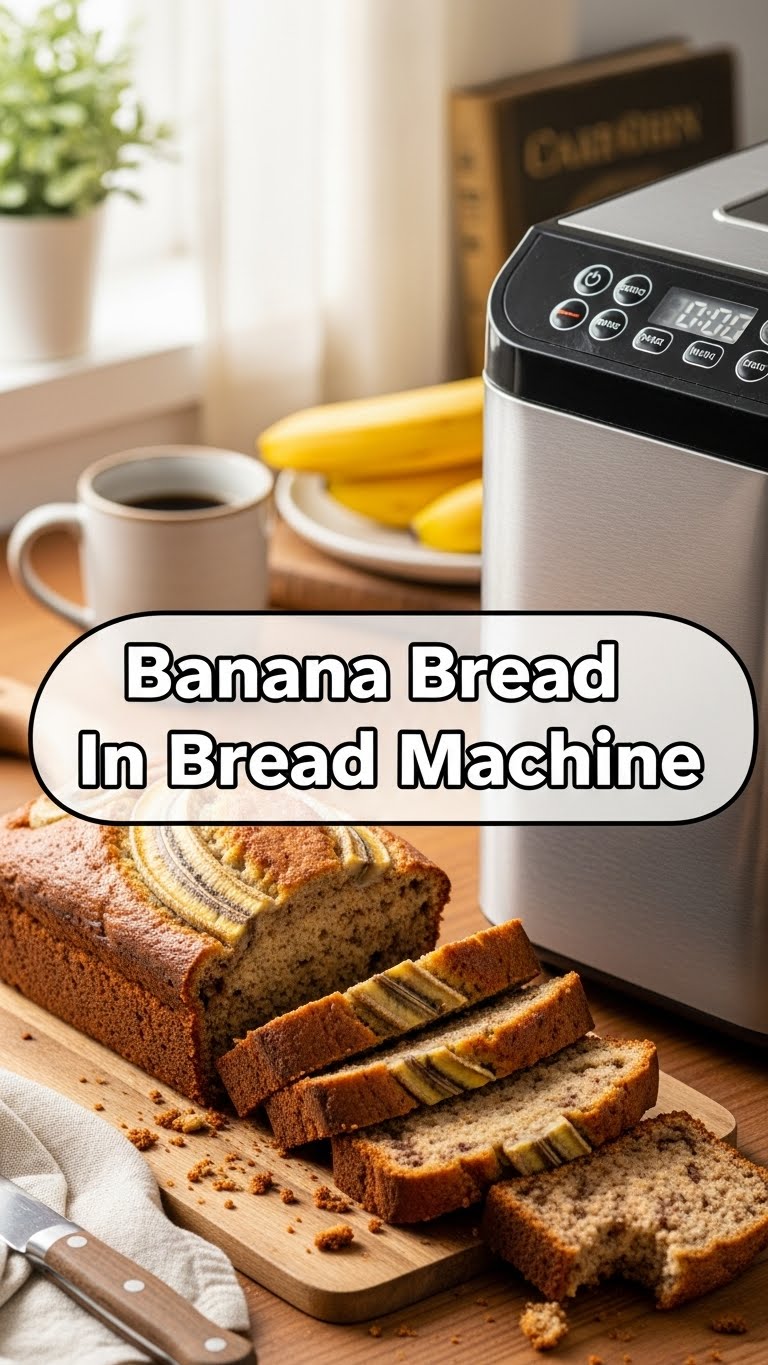
So you’re craving something tasty but too lazy to spend forever in the kitchen, huh? Same. And let’s be real, sometimes even the *thought* of preheating an oven and getting a dozen bowls dirty is enough to send us straight back to the snack cabinet. But what if I told you there’s a magical appliance that practically bakes banana bread for you while you… well, do anything else? Like rewatch that questionable reality show? You’re welcome. We’re diving into the ridiculously easy world of banana bread in a bread machine!
Why This Recipe is Awesome
Okay, buckle up, because this isn’t just “awesome,” it’s revolutionary for the culinarily challenged (like me, pre-bread machine enlightenment). Forget sticky dough, constant checking, or the anxiety of whether it’s cooked through. This recipe is so **idiot-proof**, even I didn’t mess it up, and my kitchen adventures often resemble a small, flour-dusted disaster zone. Seriously, your bread machine does *all* the heavy lifting: mixing, kneading (well, for quick bread, it just mixes), and baking. You basically just dump stuff in, press a button, and wait for your house to smell like a cozy bakery. Minimal dishes, maximum deliciousness. It’s a win-win, IMO.
Ingredients You’ll Need
Gather ’round, fellow non-chefs! Here’s what you’ll need for this low-effort, high-reward banana bread. No exotic spices or obscure flours, just the good ol’ basics.
- Ripe Bananas (3 medium): The blacker, the better, my friend. We’re talking mottled, bruised, “are-they-still-good?” bananas. They’re the secret to ultimate sweetness and moisture. Don’t be shy!
- All-Purpose Flour (1 ½ cups): Because we’re not fancy bakers here, just looking for deliciousness.
- Granulated Sugar (½ cup): For that sweet, sweet goodness. Adjust if your bananas are super-duper ripe or if you prefer it less sweet.
- Large Egg (1): The binder of all delicious things. Give it a quick whisk before adding, just to be thorough.
- Melted Butter (¼ cup, or 4 tablespoons): Because everything’s better with butter, right? Unsalted, if you’re feeling precise; salted, if you live life on the edge.
- Milk (¼ cup): Any kind works. Whole, skim, almond – pick your poison.
- Baking Soda (1 teaspoon): The magic lift, helping your bread rise to fluffy perfection.
- Salt (½ teaspoon): Just a pinch to make all those flavors pop and keep things from being *too* sweet.
- Vanilla Extract (1 teaspoon): A splash for extra ‘oomph’ and that classic bakery aroma.
- Optional Mix-ins (½ cup): Chocolate chips, chopped walnuts, pecans… because sometimes you just gotta live a little.
Step-by-Step Instructions
Alright, this is where the “effortless” part really shines. Follow these ridiculously simple steps, and you’ll be a banana bread wizard in no time.
- First things first, **mash those bananas**! Get them into a bowl and smash ’em good with a fork until they’re mostly smooth with a few lumps. This is therapeutic, trust me.
- Now, grab your bread machine pan. The general rule for bread machines is **liquids first, then dry ingredients**. So, pour in your melted butter and milk.
- Add the mashed bananas and the lightly beaten egg to the pan. Make sure everything is cozy at the bottom.
- Next, gently spoon in your flour, sugar, baking soda, and salt. Try to layer them evenly over the wet ingredients.
- Finally, add the vanilla extract right on top. If you’re using any mix-ins like chocolate chips or nuts, add them now or wait for the machine’s “add-in” beep (check your machine’s manual for this feature!).
- Carefully place the pan into your bread machine. Close the lid and select the **”Quick Bread” or “Cake” cycle**. This is super important because these cycles don’t knead for long and use baking soda/powder instead of yeast. If you don’t have one, some machines have a “Sweet Bread” cycle that might work, but check the manual!
- Press start and walk away. Seriously. Go binge-watch, read a book, or contemplate the meaning of life. Your work here is done.
- Once the cycle is complete, carefully remove the bread pan (it’ll be hot!). Let it cool in the pan for about 10-15 minutes. This makes it easier to remove and prevents it from crumbling.
- Gently invert the pan onto a wire rack and shake the bread out. Let it **cool completely** on the rack before slicing. I know, it’s torture to wait, but it helps prevent a gummy texture.
Common Mistakes to Avoid
Even though this recipe is basically foolproof, there are a few banana peels you can trip on. Learn from my past (many) errors!
- Using Under-Ripe Bananas: Rookie mistake! Green or yellow bananas won’t give you that intense flavor or moisture. They’ll also be a nightmare to mash. **Always go for those sad, spotty, nearly black bananas.** Trust the process.
- Opening the Lid Constantly: I get it, the smell is intoxicating. But resist the urge to peek every five minutes, especially during the baking phase. It can affect the internal temperature and the bread’s rise.
- Ignoring the “Liquids First, Dry Second” Rule: Your bread machine has an order for a reason. Messing it up can lead to uneven mixing or activate ingredients too early/late.
- Cutting It Hot: The struggle is real, but cutting warm banana bread means it’s more likely to crumble and can have a slightly gummy texture. Let it cool down, folks! **Patience is a virtue (and leads to better slices).**
- Using the Wrong Cycle: Don’t use a “Basic White Bread” or “Whole Wheat” cycle! Those are for yeast breads and will over-mix and over-proof your quick bread. Stick to “Quick Bread” or “Cake.”
Alternatives & Substitutions
Feeling adventurous? Or maybe you’re just out of an ingredient? No stress, we’ve got options!
- Sugar Swaps: You can totally use brown sugar instead of granulated for a deeper, more caramel-y flavor. Maple syrup or honey could also work, but you might need to slightly reduce the milk to account for the extra liquid.
- Flour Power: Want to get a little healthier? Substitute up to half of the all-purpose flour with whole wheat flour. Don’t go 100% whole wheat unless you’re prepared for a denser loaf, though. For gluten-free, use a 1:1 gluten-free baking blend.
- Butter Begone: If butter isn’t your jam (or you’re out), you can swap it for an equal amount of vegetable oil or even unsweetened applesauce for a lower-fat option. The texture might be slightly different, but still tasty!
- Milk Variations: Any milk works, truly. Almond, soy, oat, cashew – go wild. Just make sure it’s unsweetened if you’re not trying to add more sugar.
- Mix-in Mania: This is where the fun really begins! Beyond chocolate chips and nuts, consider dried cranberries, shredded coconut, a sprinkle of cinnamon or nutmeg, or even a tablespoon of cocoa powder for a chocolate banana bread.
FAQ (Frequently Asked Questions)
Got questions? I probably had them too at some point. Let’s tackle ’em!
- How ripe do my bananas *really* need to be? The riper, the better! Think brown spots, black patches, soft to the touch. Seriously, if you’re questioning if they’re too old, they’re probably perfect. Less ripe bananas mean less flavor and sweetness.
- My bread machine doesn’t have a “Quick Bread” setting! What now? Bummer! Some machines might have a “Cake” setting, which often works similarly. If not, look for a “Bake Only” cycle or a custom cycle where you can set your own mix and bake times. You essentially want a short mix, then a bake. Consult your manual, your machine is your guru here.
- Can I add more mix-ins than ½ cup? You can, but proceed with caution. Too many heavy mix-ins (like chocolate chips or nuts) can weigh down your bread and prevent it from rising properly. Stick to the recommended amount for the best results.
- Why is the top of my banana bread pale? Totally normal for bread machines! Since the heat source is usually at the bottom and sides, the top doesn’t brown as much. It’s still cooked through and delicious, just aesthetically different. Don’t sweat it.
- How should I store this amazing banana bread? Once cooled, wrap it tightly in plastic wrap or foil, or store in an airtight container at room temperature for up to 3-4 days. For longer storage, slice and freeze individual pieces for quick thawing and snacking!
- Can I use margarine instead of butter? Well, technically yes, but why hurt your soul like that? Butter just tastes better, IMO. Margarine will work in a pinch, but for that rich, moist flavor, butter is your best friend.
- My bread machine didn’t mix everything properly. What happened? Sometimes ingredients get stuck to the sides of the pan. About 5-10 minutes into the mixing cycle, you can quickly open the lid and use a rubber spatula to scrape down any flour or ingredients that haven’t incorporated. Be quick, though!
Final Thoughts
And there you have it, folks! Your new go-to, ridiculously easy, utterly delicious banana bread recipe, all thanks to your trusty bread machine. You’ve officially conquered the art of “lazy baking” and created something truly comforting and delightful. Now go impress someone—or yourself—with your new culinary skills. You’ve earned it! Seriously, go grab a slice, maybe with some butter, and bask in your effortless glory. You’re basically a chef now. 😉

