
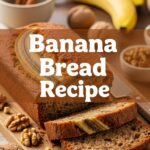
So, you’re staring at those sad, spotty bananas on your counter, practically begging for a purpose, huh? Or maybe you just woke up with an insatiable craving for something warm, sweet, and comforting, but you’re too lazy to spend forever in the kitchen? Same, my friend. Same. Well, put down that remote and grab those ‘nanners because we’re about to make the easiest, most ridiculously delicious banana bread you’ve ever tasted. And don’t worry, you don’t need a culinary degree or even a stand mixer. We’re keeping it real, simple, and seriously tasty.
Why This Recipe is Awesome
Okay, let’s be real. There are a gazillion banana bread recipes out there. So why this one? Because it’s practically idiot-proof. Seriously, even I, a master of culinary mishaps, manage to nail this every single time. Here’s the lowdown on why this recipe is about to become your new best friend:
- No fancy equipment needed: A bowl, a fork, and a whisk are pretty much all you need. Ditch the stand mixer unless you’re feeling extra bougie (and have extra dishes to wash).
- Quick & Easy: From start to oven in like, 10-15 minutes. Perfect for when that craving hits hard and fast.
- Foolproof: It’s hard to mess this one up. As long as you don’t set your kitchen on fire (please don’t), you’re golden.
- The Smell Factor: Your house will smell like a warm, cozy hug. Trust me, it’s worth it for the aroma alone.
Ingredients You’ll Need
Gather your troops! Here’s what you’ll need for this banana bread masterpiece. Chances are, most of this stuff is already chilling in your pantry.
- 3-4 Ripe Bananas: The spottier, the better! We’re talking brown, bruised, practically screaming ‘bake me!’ These are the true MVPs.
- 1 ½ cups All-Purpose Flour: The OG flour. Don’t overthink it.
- ¾ cup Granulated Sugar: Sweetness! Adjust to your sweet tooth level. (I usually go for ¾ cup, but you do you!)
- 1 Large Egg: One single egg, the binder of champions. Room temp is ideal, but straight from the fridge works in a pinch.
- ½ cup (1 stick) Unsalted Butter: Melted, please! Because butter makes everything better. Fact.
- 1 teaspoon Baking Soda: Our little lift-off agent. Makes it fluffy, not dense.
- ½ teaspoon Salt: Just a pinch, to balance the sweetness and make it ✨pop✨. Don’t skip this, it’s important!
- 1 teaspoon Vanilla Extract: The secret weapon for making things smell and taste amazing. Use the good stuff if you got it!
- Optional Add-ins: ½ cup chocolate chips, chopped walnuts, pecans, or a sprinkle of cinnamon. Live a little!
Step-by-Step Instructions
Alright, apron on (or not, we don’t judge), let’s get baking! These steps are so easy, you could probably do them blindfolded (though I don’t recommend it for safety reasons, obvi).
- Get Prepped: Preheat your oven to 350°F (175°C). Grease and flour a 9×5 inch loaf pan. Or, if you’re lazy like me, line it with parchment paper leaving an overhang so you can just lift it out later. Smart, right?
- Mash ‘Em Up: In a large bowl, mash your ripe bananas with a fork until they’re mostly smooth but still have a few small lumps. We’re going for rustic, not baby food.
- Wet Ingredients Party: Add the melted butter, sugar, egg, and vanilla extract to the mashed bananas. Stir it all together until well combined. It’ll look a little lumpy, and that’s totally fine.
- Dry Ingredients Unite: In a separate medium bowl, whisk together the flour, baking soda, and salt. Whisking ensures everything is evenly distributed – no pockets of pure baking soda here!
- Combine Forces: Add the dry ingredients to the wet ingredients. Mix JUST until combined. Seriously, stop stirring once you don’t see any dry streaks of flour. Overmixing is the enemy of tender banana bread, and we want tender!
- Add-in Fun (Optional): If you’re using chocolate chips, nuts, or anything else, gently fold them in now.
- Bake Time! Pour the batter into your prepared loaf pan. Pop it into the preheated oven and bake for 55-65 minutes. You’ll know it’s done when a toothpick inserted into the center comes out clean or with a few moist crumbs attached (but no wet batter!).
- Cool Down: Let your glorious creation cool in the pan for about 10 minutes. Then, carefully remove it and let it cool completely on a wire rack. This is the hardest part, IMO, because the smell is just too good.
Common Mistakes to Avoid
We’ve all been there. Learning from mistakes is part of the fun! But here are a few shortcuts to perfection (and avoiding sadness):
- Using Under-ripe Bananas: Green bananas? You’re doing it wrong. We want maximum sweetness and mashability here. Seriously, wait until they look like they’ve seen better days.
- Overmixing the Batter: I know, I said it before, but it’s crucial! Overmixing develops the gluten in the flour, leading to tough, sad banana bread. Nobody wants that. Mix until just combined, then back away from the spoon.
- Not Greasing Your Pan Properly: Unless you enjoy chiseling your bread out piece by piece, grease that pan generously! Or use parchment paper. Your choice.
- Opening the Oven Door Constantly: Patience, grasshopper. Every time you open the oven, the temperature drops, messing with your bake. Let it do its thing.
- Cutting it Hot: I know the temptation is real, but let it cool! Hot bread can be gummy and difficult to slice cleanly.
Alternatives & Substitutions
Feeling creative? This recipe is super flexible! Here are a few ideas to switch things up:
- Butter Swap: Can you use vegetable oil or coconut oil instead of butter? Sure! It’ll be a bit lighter and less rich, but still totally delicious. Your call, though.
- Sugar Rush: Try using brown sugar instead of granulated for a deeper, molasses-y flavor. Or do half and half! You can also reduce the sugar a bit if you prefer less sweetness.
- Flour Power: For a slightly healthier (but denser) loaf, swap out up to half of the all-purpose flour for whole wheat flour. Gluten-free? Use a 1:1 gluten-free baking blend.
- Add-in Extravaganza: Get wild! Walnuts, pecans, shredded coconut, dried cranberries, blueberries, a swirl of Nutella, a dash of cinnamon or nutmeg – the possibilities are endless.
- Make it Muffins! This recipe works great for muffins too! Just divide the batter into a greased muffin tin and bake for about 20-25 minutes, or until a toothpick comes out clean.
FAQ (Frequently Asked Questions)
Got questions? I’ve got (casual) answers!
- Can I use frozen bananas? Absolutely! Just make sure to thaw them completely and drain any excess liquid before mashing. Otherwise, your bread might be too watery.
- How do I know my bananas are ripe enough? They should be covered in brown spots, maybe even a little black, and feel soft to the touch. The browner they are, the sweeter and more flavorful your bread will be!
- My banana bread is dry, what happened? Most likely, you either overbaked it or overmixed the batter. Keep an eye on the oven, and remember: mix *just* until no dry streaks remain.
- Can I make this vegan? You bet! Use a flax egg (1 tbsp ground flaxseed + 3 tbsp water, let sit for 5 mins) instead of a regular egg, and plant-based butter (or oil) instead of dairy butter.
- How long does banana bread last? At your house? Probably not long! But seriously, it’s good for 3-4 days at room temperature (tightly wrapped), up to a week in the fridge, or you can freeze slices for up to 3 months.
- Why did my banana bread sink in the middle? Common culprit! It could be too much leavening (baking soda), opening the oven door too soon, or it might just be underbaked in the center. Don’t worry, it usually still tastes great!
Final Thoughts
So there you have it, folks! Your new go-to recipe for when life gives you too many bananas (or you just need a serious dose of comfort). This banana bread is simple, satisfying, and proof that sometimes, the best things in life don’t require fancy ingredients or complicated techniques. Now go forth and bake, you magnificent human! Impress someone—or yourself—with your new culinary skills. You’ve earned it! And hey, if you end up with an extra slice, you know who to send it to. 😉
