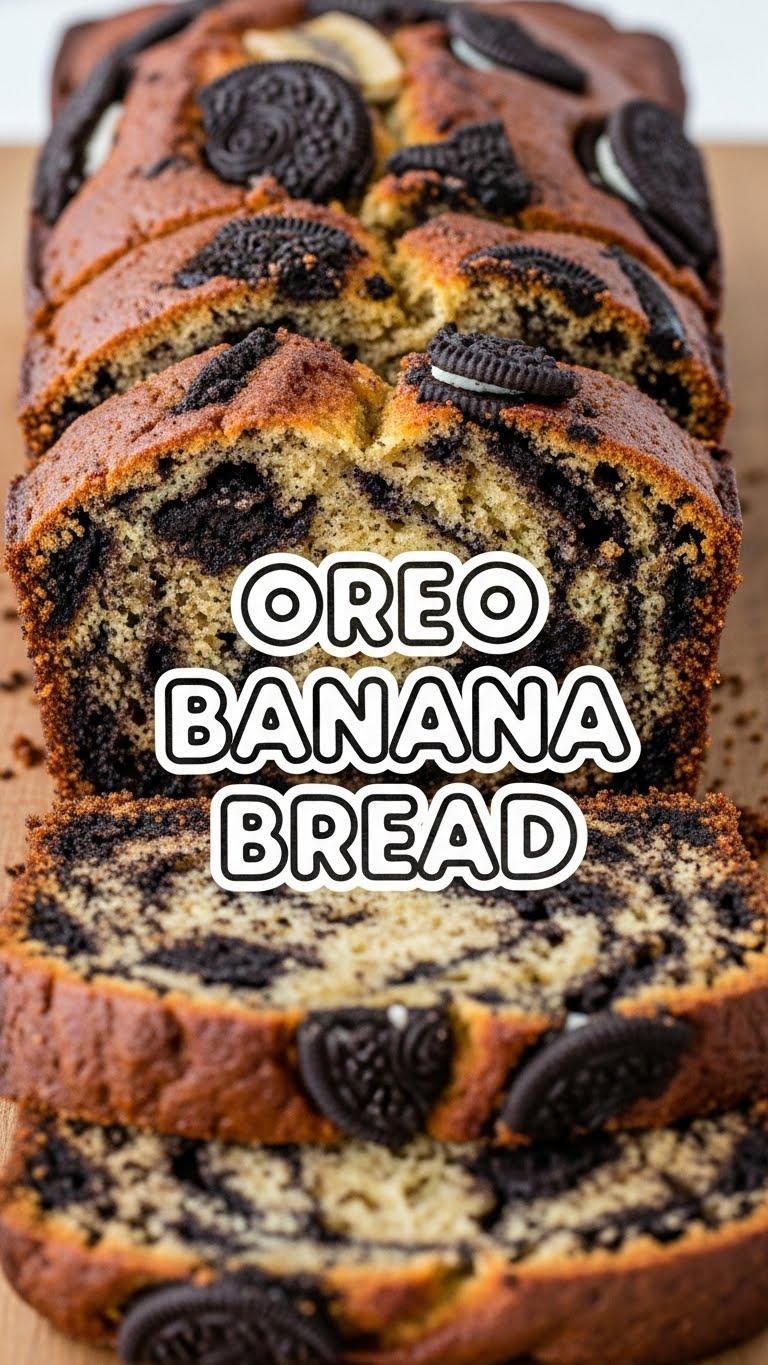
So, you’ve got some sad, lonely bananas on your counter, looking all brown and neglected, right? And maybe a sleeve of Oreos *accidentally* bought at the store? Oh, it’s about to get real. We’re talking about a culinary mash-up that’s so good, it should probably be illegal: Oreo Banana Bread. Get ready to elevate your snack game without breaking a sweat, because this recipe is ridiculously easy and dangerously delicious.
Why This Recipe is Awesome
Okay, first off, it’s banana bread. Already a win. But then you throw in Oreos? It’s basically a genius-level move. This isn’t just a recipe; it’s a *lifestyle choice*. Plus, it’s so **mind-numbingly simple**, even your pet hamster could probably follow the instructions. Seriously, if you can mash a banana, you can make this. No fancy equipment, no bizarre techniques. Just pure, unadulterated, chocolatey-banana bliss. It’s idiot-proof, even I didn’t mess it up!
Ingredients You’ll Need
- 3-4 medium overripe bananas: The browner, the better – don’t be shy! These are where all the natural sweetness comes from.
- 1 ½ cups all-purpose flour: The standard stuff, nothing fancy.
- ¾ cup granulated sugar: Sweetness! The more Oreos you add, the less you might need… just kidding, kinda.
- 1 teaspoon baking soda: The magic leavening agent that makes things fluffy.
- ½ teaspoon salt: Just a pinch, to balance everything out. Trust me, it makes a difference.
- 1 large egg: The glue that holds it all together.
- ½ cup melted unsalted butter: Because everything is better with butter, duh.
- 1 teaspoon vanilla extract: A dash for good measure, or a generous splash if you’re feeling wild.
- 1 cup crushed Oreos: The star of the show! About 10-12 cookies, crushed. Plus extra for topping, because why not?
Step-by-Step Instructions
- **Preheat your oven** to 350°F (175°C). Grease and flour a 9×5-inch loaf pan. Don’t skip this, unless you enjoy playing “pry the bread out of the pan” later. You want that baby to slide out cleanly.
- In a large bowl, **mash those sad, lonely bananas** until mostly smooth. A few lumps are totally fine; adds character, right? Embrace the rustic look.
- Add the **melted butter, egg, and vanilla** to the mashed bananas. Whisk it all together until just combined. You’re building flavor foundations here.
- In a separate bowl, **whisk together the flour, sugar, baking soda, and salt**. Make sure there are no lumps of baking soda – nobody wants a bitter bite.
- **Gently fold the dry ingredients into the wet ingredients.** Mix *just* until combined. **Overmixing is the enemy here**, so stop as soon as you see no dry streaks. A little lumpy is good.
- Now for the fun part: **fold in most of your crushed Oreos.** Save some for the top, because presentation matters, even if you’re eating it alone in your pajamas.
- Pour the glorious batter into your prepared loaf pan. **Sprinkle the remaining crushed Oreos** on top. It’s like a crunchy, chocolatey crown!
- **Bake for 50-65 minutes**, or until a toothpick inserted into the center comes out clean. Start checking around 50 minutes, as ovens vary.
- Let it cool in the pan for 10 minutes, then transfer to a wire rack to cool completely. Or, you know, just slice into it immediately and burn your tongue. Your call!
Common Mistakes to Avoid
- **Not using ripe bananas:** Seriously, those green ones? Save them for smoothies. Brown is your friend here. The browner, the sweeter, the better. Your bread will thank you.
- **Overmixing the batter:** I said it once, I’ll say it again: **stop mixing as soon as the dry ingredients disappear!** Overmixing develops gluten, leading to tough bread. Nobody wants tough banana bread. It should be tender and moist.
- **Ignoring the cooling time:** I know it’s tempting, but letting it cool slightly in the pan helps it set and makes it easier to remove. Patience, young padawan, patience.
- **Forgetting to grease your pan:** Unless you want to chisel your banana bread out in sad, broken pieces, **grease that pan!** You worked hard for this, don’t let it stick.
Alternatives & Substitutions
Feeling a little adventurous, or just missing an ingredient? No worries, I got you!
- **Chocolate chips:** No Oreos? Sad face. But **chocolate chips** are a fantastic stand-in! Milk, semi-sweet, dark—whatever your heart desires.
- **Walnuts/Pecans:** If you’re feeling *extra* fancy (or just just want some crunch), a handful of chopped nuts would be delicious. Just don’t tell the Oreo purists.
- **Oil instead of butter:** You *can* use an equal amount of vegetable oil or melted coconut oil instead of butter. It’ll be moist, but you’ll lose a little of that buttery flavor. IMO, butter is king.
- **Different crushed cookies:** Got some leftover shortbread or digestive biscuits? Get creative! Though, let’s be real, Oreos are a classic for a reason.
FAQ (Frequently Asked Questions)
- My bananas aren’t brown enough! Help! No worries! You can bake them (with the peel on) at 300°F (150°C) for 15-20 minutes until they’re black and soft. Or, if you’re really desperate, put them in a paper bag with an apple overnight. Science!
- Can I use a different size pan? You can, but you’ll need to adjust baking time. A smaller pan means a taller, denser loaf that bakes longer; a wider pan means a shorter loaf that bakes faster. Keep an eye on it and use that toothpick test!
- How do I store it? At room temp, tightly wrapped, for 2-3 days. In the fridge, it’ll last a bit longer, maybe up to a week. It also freezes beautifully for up to 3 months! Slice it first for easy thawing.
- Can I make this dairy-free? Absolutely! Use a plant-based butter substitute and check your Oreos (some varieties are accidentally vegan, FYI).
- Can I use margarine instead of butter? Well, technically yes, but why hurt your soul like that? Butter just tastes better, let’s be honest. But if it’s all you have, go for it!
- Is this healthy? Uh… it has bananas? So, fruit? Let’s just say it’s *good for the soul*. Don’t overthink it. Enjoy the moment.
Final Thoughts
See? I told you it was easy! Now you’ve got this incredible, ridiculously delicious Oreo Banana Bread just waiting to be devoured. Slice it up, grab a cup of coffee (or milk, for the full Oreo experience), and bask in the glory of your culinary triumph. Go ahead, pat yourself on the back. You earned it! Now go impress someone – or just yourself – with your new baking prowess. Happy munching!

