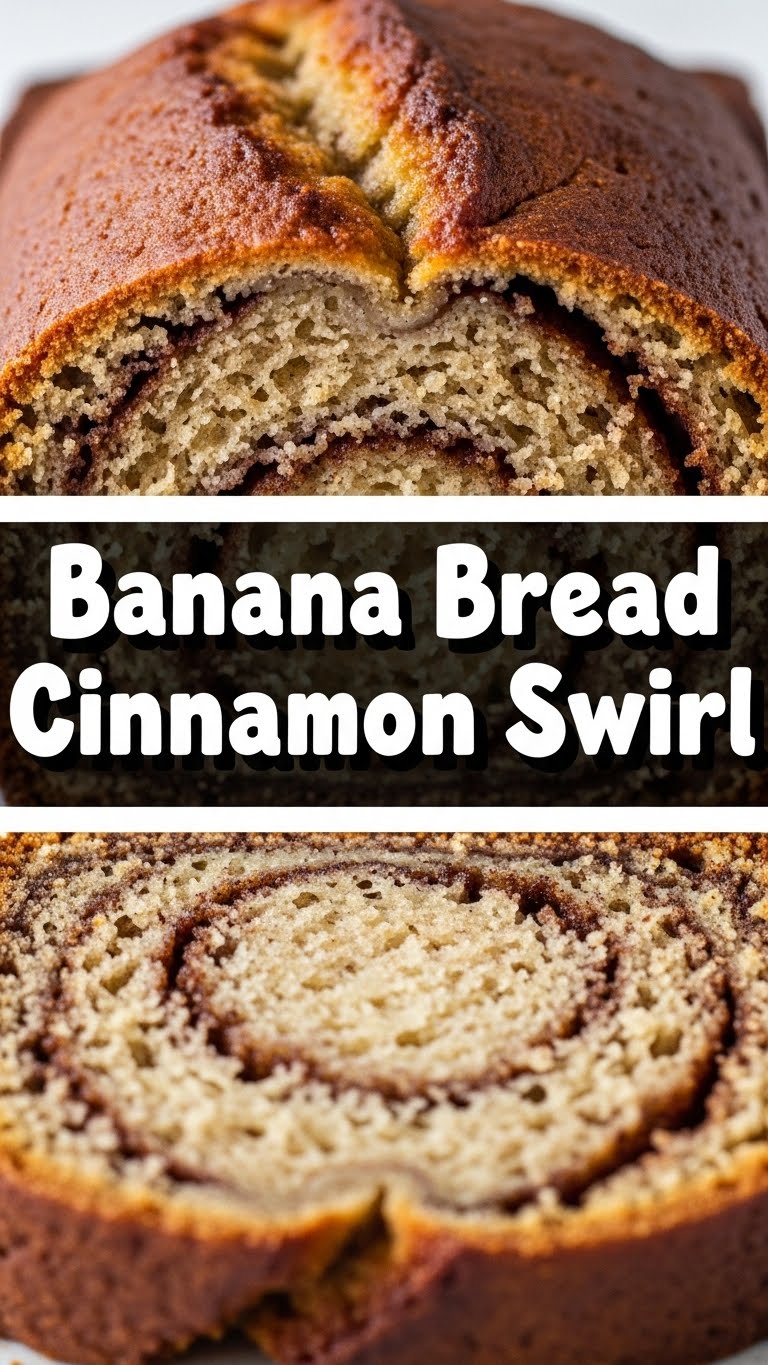
So you’re craving something warm, comforting, and absolutely decadent but, let’s be real, you’re also eyeing that couch and contemplating a nap. Sound familiar? Same. That’s why we’re diving headfirst into the glorious world of Banana Bread Cinnamon Swirl. It’s basically a hug in loaf form, but with a spicy, sweet secret hidden inside. Prepare for your kitchen to smell like a bakery exploded (in the best way possible, obviously).
Why This Recipe is Awesome
Okay, so you might be thinking, “Another banana bread recipe? Yawn.” But hold up, buttercup! This isn’t just *any* banana bread. This is the Beyoncé of banana breads – flawless, iconic, and with a little extra sparkle. Not only is it ridiculously easy (seriously, if I can do it without setting off the smoke alarm, anyone can), but it combines two of life’s greatest pleasures: moist, comforting banana bread AND a gooey, sweet cinnamon swirl that practically screams “eat me for breakfast, lunch, and dinner.” It’s idiot-proof, even I didn’t mess it up. Plus, it’s a fantastic way to use up those bananas that have been chilling on your counter, slowly morphing into a shade that suggests they’ve seen too much. You know the ones.
Ingredients You’ll Need
Time to gather your culinary arsenal! Don’t worry, it’s nothing too fancy. Just the good stuff.
- For the Banana Bread Base:
- 3 very ripe bananas: The browner, the better. We’re talking practically black. Don’t be shy!
- 1/2 cup (1 stick) unsalted butter: Melted and slightly cooled. Because butter makes everything better, duh.
- 1/2 cup granulated sugar: Sweetness is key.
- 1/4 cup packed light brown sugar: Adds a little extra molasses-y depth.
- 1 large egg: Room temp, if you’re feeling fancy.
- 1 teaspoon vanilla extract: The more the merrier, IMO.
- 1 1/2 cups all-purpose flour: The backbone of our bread.
- 1 teaspoon baking soda: Our lifting agent – no flat bread allowed!
- 1/2 teaspoon salt: Balances all that sweetness.
- For the Cinnamon Swirl:
- 1/4 cup light brown sugar: Again, that delicious molasses kick.
- 1 teaspoon ground cinnamon: The star of the swirl!
- 2 tablespoons unsalted butter: Melted. This is what makes it gloriously gooey.
Step-by-Step Instructions
Alright, apron on (or not, I’m not judging), let’s get baking!
- Preheat & Prep: First things first, get that oven nice and toasty to 350°F (175°C). Then, grease and flour a 9×5 inch loaf pan, or line it with parchment paper with an overhang for easy removal. Trust me on the parchment.
- Mash ‘Em Up: In a medium bowl, mash those gloriously ripe bananas until they’re mostly smooth but still have a few small lumps. We like character!
- Wet Ingredients Party: To your mashed bananas, add the melted butter, granulated sugar, brown sugar, egg, and vanilla extract. Whisk it all together until it’s just combined. Don’t go crazy, we’re not whipping meringue here.
- Dry Spell: In a separate, larger bowl, whisk together your flour, baking soda, and salt. Make sure there are no lumpy bits.
- Combine Forces: Pour the wet banana mixture into the dry ingredients. Stir gently with a spatula until *just* combined. A few streaks of flour are totally fine. Do not overmix! Overmixing leads to tough banana bread, and nobody wants that.
- Swirl Time Prep: In a small bowl, whisk together the brown sugar and cinnamon for your swirl. Then, stir in the 2 tablespoons of melted butter until it forms a thick paste. Mmm, magic.
- Layer Up: Pour half of your banana bread batter into the prepared loaf pan. Drizzle about half of your cinnamon swirl mixture over the batter. Use a knife or a skewer to gently swirl it in – don’t go too deep or mix it all together!
- More Layers! Now, pour the remaining banana bread batter over the swirled layer. Top with the rest of the cinnamon swirl mixture and repeat the gentle swirling motion. Get creative, but remember, gentle is key.
- Bake It Baby: Pop that beautiful loaf into your preheated oven and bake for 55-65 minutes. You’ll know it’s done when a wooden skewer inserted into the center comes out mostly clean, maybe with a few moist crumbs attached (but no wet batter!).
- Cool Down: Let the loaf cool in the pan for about 10-15 minutes before using those parchment paper handles (you remembered, right?!) to lift it out onto a wire rack to cool completely. Or, you know, just eat it warm. No judgment here.
Common Mistakes to Avoid
We all make ’em, but here’s how to dodge the most common banana bread blunders:
- Thinking you don’t need to preheat the oven: Rookie mistake! A cold oven means uneven baking and sad, dense bread. Don’t do it.
- Not using ripe enough bananas: Seriously, those green-tinged ones won’t give you the flavor or moisture you need. Wait for the dark spots!
- Overmixing the batter: This is a big one. As soon as the wet and dry ingredients are *just* combined, stop. Stirring too much develops the gluten, making your bread tough and chewy. We want tender, folks!
- Forgetting the salt: It might seem small, but salt is a flavor enhancer and balances the sweetness. Don’t skip it!
- Cutting into it too soon: I know, the smell is intoxicating. But letting it cool slightly allows the bread to set properly, preventing it from crumbling when you slice it. Patience, young padawan!
Alternatives & Substitutions
Feeling adventurous? Or just realized you’re missing an ingredient? No stress, we got options!
- Flour Power: You can totally swap out some of the all-purpose flour for whole wheat flour if you’re feeling “healthy” (it’s still banana bread, let’s not kid ourselves). Start with a 50/50 mix. Gluten-free? Use a good quality 1:1 gluten-free baking blend.
- Sugar Rush: Don’t have brown sugar? You can use all granulated sugar, but you’ll miss a little of that caramel-y depth. You could also try maple syrup for some of the liquid, but adjust other liquids if you do.
- Butter Me Up: If you’re out of unsalted butter, salted butter is fine, just reduce the added salt by half. For a dairy-free option, use a plant-based butter alternative that melts well.
- Add-ins Galore: Want more texture? Fold in a 1/2 cup of chocolate chips (milk, dark, white – your call!), chopped walnuts, or pecans into the batter with the dry ingredients. Seriously, chocolate chips and banana bread are soulmates.
FAQ (Frequently Asked Questions)
Got questions? I’ve got answers. Mostly.
- Can I use margarine instead of butter? Well, technically yes, but why hurt your soul like that? Butter just tastes better and provides a superior texture. For real, though, if it’s all you have, go for it, but expect a slight difference.
- My bananas aren’t super ripe, what do I do? Desperate times call for desperate measures! You can bake unpeeled bananas on a baking sheet at 300°F (150°C) for 15-20 minutes until they’re black and soft. Let them cool, then proceed. You’re welcome.
- How long does this glorious bread last? Wrapped tightly at room temperature, it’s good for 3-4 days. In the fridge, maybe a week. But honestly, it rarely lasts that long in my house.
- Can I freeze banana bread? Heck yes! Wrap individual slices or the whole cooled loaf tightly in plastic wrap, then foil. It’ll keep in the freezer for up to 3 months. Thaw at room temperature or zap a slice in the microwave for a quick treat.
- What if my swirl just disappears? Don’t panic! Sometimes the swirl can get a bit lost in the baking process, especially if your batter is very thick or you swirled too much. It’ll still taste amazing, even if it’s less “swirly” and more “marbled.”
- Can I make this into muffins? Absolutely! Divide the batter and swirl into muffin cups. Bake at the same temperature for about 20-25 minutes, or until a toothpick comes out clean. Muffin power!
Final Thoughts
And there you have it, folks! Your very own, incredibly delicious, Banana Bread Cinnamon Swirl. It’s the kind of treat that makes you feel like a domestic goddess (or god!), even if your secret is that it was super easy. So go ahead, slice yourself a thick piece, grab a cuppa, and bask in the glory of your creation. You’ve earned it! Now go impress someone—or yourself—with your new culinary skills. Happy baking, my friend!
