So, You’re Craving Something Sweet (But Kinda Lazy)?
So you’re craving something tasty but too lazy to spend forever in the kitchen, huh? Same, friend, *same*. And let’s be real, sometimes a perfectly ripe banana just stares at you from the fruit bowl, daring you to use it before it becomes… well, *too* ripe. But other times, you’ve got those sad, spotty, nearly-black bananas just begging for a glorious purpose. Enter: The humble, yet mighty, Banana Bread. It’s the ultimate comfort food that tastes like a warm hug and screams, “I totally have my life together… for at least an hour!”
Why This Recipe is Awesome (Besides Being Idiot-Proof)
Okay, so I promised idiot-proof, and I deliver! Seriously, this banana bread recipe is so forgiving, you could probably bake it blindfolded after a long Tuesday. (Disclaimer: Please do not actually bake blindfolded. Safety first, pals!) What makes it awesome?
- It’s practically a science experiment where you *can’t* fail. Unless you burn it. Don’t burn it.
- It uses up those super-ripe bananas that look like they’ve seen better days. Waste not, want not, right?
- The house will smell like a bakery, and suddenly, you’re a domestic god/goddess without even trying that hard.
- It’s customizable! Feeling fancy? Throw in some chocolate chips. Feeling wholesome? Walnuts it is.
- And **the best part?** It’s quick. Minimal fuss, maximum deliciousness. Your taste buds will thank you, and your future self will too when you’re munching on a slice with your morning coffee.
Ingredients You’ll Need (The Good Stuff)
Gather ’round, my culinary comrades! Here’s what you’ll need to transform those spotty bananas into pure bliss. No fancy-pants equipment, just the basics!
- Super Ripe Bananas (3-4 medium): These are the stars of the show! The spottier, the better, honestly. Think ‘ready for a spa day’ rather than ‘fresh from the market’.
- All-Purpose Flour (1 ½ cups): The structural engineer of our bread. Pretty standard, no drama here.
- Granulated Sugar (¾ cup): For that perfect sweetness. You can adjust this a bit if your bananas are *super* sweet or if you prefer it less sweet. Your call!
- Unsalted Butter (½ cup / 1 stick): Melted, please! Because everything is better with butter.
- Egg (1 large): Our binder. Hold it all together, little guy!
- Baking Soda (1 teaspoon): The magic leavening agent that makes it all fluffy. Don’t skip this!
- Salt (½ teaspoon): Just a pinch to balance out all that sweetness. Trust me on this one.
- Vanilla Extract (1 teaspoon): Adds a lovely depth of flavor. Think of it as the bread’s perfume.
- Optional Mix-ins (½ cup): Chocolate chips, chopped walnuts, pecans, cinnamon swirl, whatever your heart desires! This is where you get to be creative.
Step-by-Step Instructions (Let’s Get Baking!)
Alright, apron on (or not, I won’t judge), let’s make some magic happen.
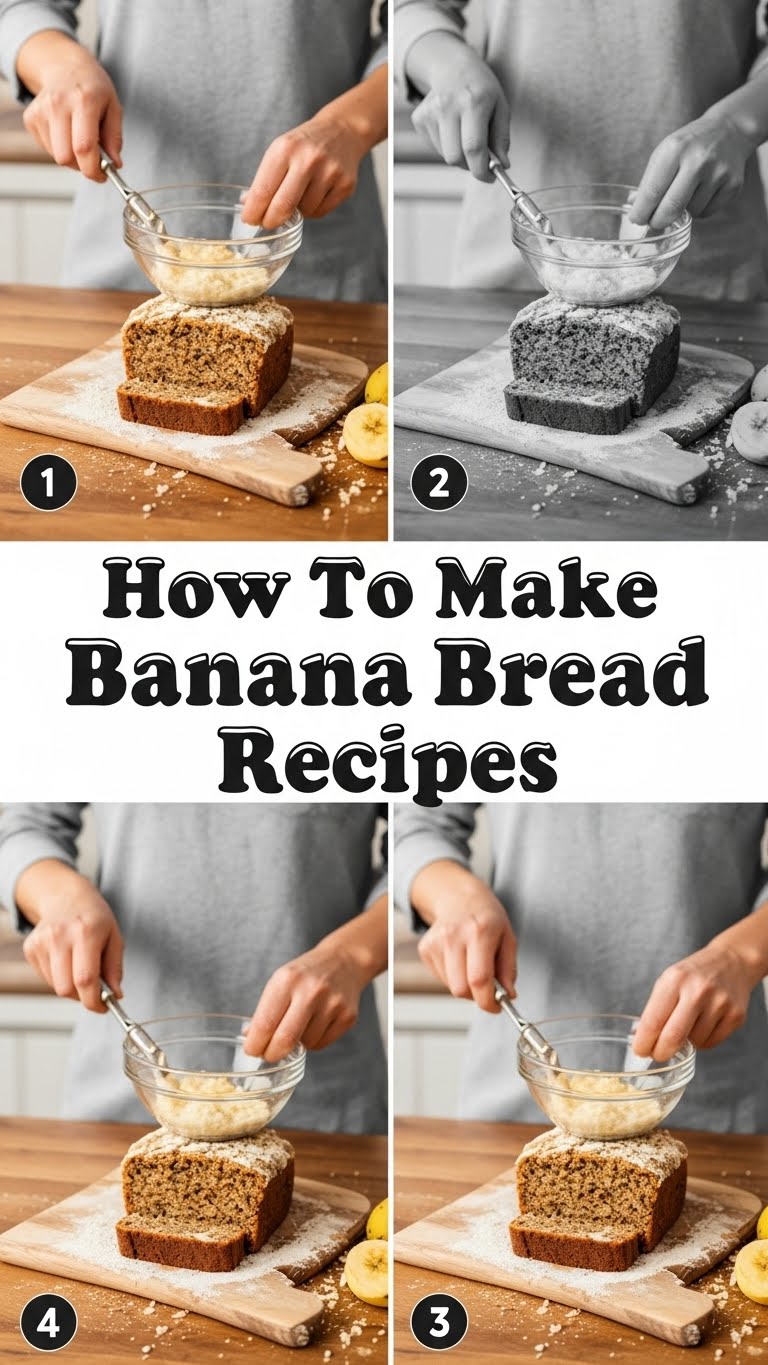
- Get That Oven Hot: First things first, **preheat your oven to 350°F (175°C)**. While it’s warming up, grease and flour a 9×5 inch loaf pan. Or line it with parchment paper for easy lift-out. You’ll thank me later.
- Mash the Bananas: In a medium bowl, mash those ripe bananas with a fork until they’re mostly smooth but still have a few small lumps. We want texture, not baby food!
- Wet Ingredients Unite!: To your mashed bananas, add the melted butter, sugar, egg, and vanilla extract. Whisk it all together until it’s nicely combined. Don’t overdo it, just mix until everything is friendly.
- Dry Ingredients’ Turn: In a separate, larger bowl, whisk together the flour, baking soda, and salt. Make sure it’s all evenly distributed.
- Marry Them Gently: Pour the wet ingredients into the dry ingredients. Stir just until combined. **DO NOT overmix!** A few lumps of flour are totally fine. Overmixing leads to tough bread, and nobody wants tough bread. If you’re using optional mix-ins, gently fold them in now.
- Into the Pan It Goes: Pour the batter into your prepared loaf pan. Spread it out evenly. If you’re feeling fancy, you can sprinkle a little extra sugar or some nuts on top.
- Bake ‘Em Up!: Pop that pan into your preheated oven. Bake for about 50-65 minutes. The exact time depends on your oven and the size of your bananas.
- The Toothpick Test: How do you know it’s done? Insert a toothpick into the center of the loaf. If it comes out clean or with just a few moist crumbs, you’re golden!
- Cool Down, Buttercup: Let the banana bread cool in the pan for about 10 minutes before carefully transferring it to a wire rack to cool completely. Or, if you’re like me, cut a slice immediately and risk burning your tongue. Worth it.
Common Mistakes to Avoid (So You Don’t Cry Over Crumbs)
Listen, we’ve all been there. Baking can be tricky if you’re not paying attention. Here are a few traps to avoid:
- Using Under-ripe Bananas: This is probably the biggest sin. Greenish bananas just don’t have that sweet, intense flavor you need. **Wait for those brown spots!** They’re your friends.
- Forgetting to Preheat the Oven: Rookie mistake! Your oven needs to be at the correct temperature from the start to ensure proper rising and baking.
- Overmixing the Batter: I know, it’s tempting to get every single lump out. But seriously, stop once the flour is *just* incorporated. Overmixing develops the gluten too much, leading to a dense, chewy, sad loaf.
- Opening the Oven Door Too Soon: Patience, grasshopper! Opening the door early can cause your bread to sink in the middle. Resist the urge for at least the first 40 minutes.
- Not Greasing Your Pan Properly: You don’t want your beautiful creation to stick. A little butter and flour (or parchment) go a long way.
Alternatives & Substitutions (Get Creative, My Friend!)
This recipe is a fantastic base, but don’t be afraid to experiment! It’s your kitchen, your rules.
- Flour Power: Want to go a bit healthier? You can substitute up to half of the all-purpose flour with whole wheat flour. The texture will be a bit denser, but still delicious. Gluten-free? Use your favorite GF all-purpose blend.
- Sweetness Scale: If you’re cutting back on refined sugar, try swapping half the granulated sugar with brown sugar for a richer, more caramel-like flavor. Maple syrup or honey can also work, but adjust the liquids slightly.
- Butter vs. Oil: Ran out of butter? You can use an equal amount of vegetable oil or melted coconut oil. It’ll give you a slightly different texture (often a bit more moist), but it still tastes great.
- Mix-in Mania: This is where the fun really begins!
- Chocolate chips: Duh. Any kind!
- Nuts: Walnuts or pecans are classic. Toast them first for extra flavor!
- Spices: A pinch of cinnamon or nutmeg can elevate the flavor profile.
- Dried fruit: Raisins, dried cranberries, or chopped dates can be a nice addition.
FAQ (Because You Have Questions, And I Have Answers!)
Alright, deep breaths. Let’s tackle some burning banana bread questions.
-
“My bananas aren’t ripe enough! What do I do?”
Oh, the agony! You *could* bake them on a sheet pan at 300°F (150°C) for 15-30 minutes until they’re black and soft. Or, if you’re truly impatient, just buy some new ones next time and wait it out. It’s worth it, **IMO**. -
“Can I use margarine instead of butter?”
Well, technically yes, you *can*. But why hurt your soul (and your bread’s flavor) like that? Butter just gives it that richness and flavor that margarine can’t quite replicate. Just sayin’. -
“How do I store banana bread?”
Once cooled, wrap it tightly in plastic wrap or foil, or store it in an airtight container at room temperature for up to 3-4 days. For longer storage, freeze slices for up to 3 months! Thaw on the counter or zap in the microwave. -
“Why did my banana bread sink in the middle?”
Ah, the dreaded crater! Usually, this means it was underbaked, you opened the oven door too early, or there was too much leavening (baking soda). Make sure your oven temp is accurate and give it enough time! -
“Can I make muffins instead?”
Absolutely! Divide the batter into a greased muffin tin. Bake at the same temperature for about 20-25 minutes, or until a toothpick comes out clean. **FYI**, muffins are basically just smaller, cuter loaves of bread!
Final Thoughts (Go Forth and Bake!)
See? That wasn’t so scary, was it? You just whipped up a glorious loaf of banana bread like a pro. Whether you share it (highly recommend, it’s a great peace offering), or hoard it all for yourself (no judgment here), you’ve accomplished something delicious. Now go impress someone—or yourself—with your new culinary skills. You’ve earned it! Enjoy every single sweet, moist, banana-y bite. Happy baking!

