
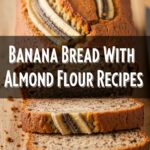
So you’re scrolling on Pinterest, drooling over those perfectly styled banana bread pics, huh? And now you’re thinking, ‘I want that but without the ‘perfectionist breakdown’ part.’ Totally get it. This recipe is for us.
Why This Recipe is Awesome
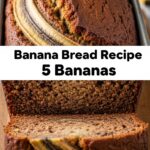
Okay, so this isn’t just any banana bread. This is the banana bread that makes you look like a domestic goddess/god without actually breaking a sweat. It’s so forgiving, it practically bakes itself. Seriously, even if you usually burn water, you’ve got this. Plus, it smells like a hug from your grandma, but tastes way more current. It’s basically a hug in loaf form.
Ingredients You’ll Need
- Ripe Bananas (3-4 medium): The blacker the better, my friend. Don’t be shy. These are the unsung heroes of flavor.
- All-Purpose Flour (1 ½ cups): Just your everyday, run-of-the-mill flour. Nothing fancy needed here.
- Granulated Sugar (½ to ¾ cup): Depending on how sweet your tooth is and how ripe your bananas are. You do you!
- Baking Soda (1 teaspoon): Our little magic leavening agent. Makes it fluffy, not flat.
- Salt (¼ teaspoon): Just a pinch to balance all that sweetness. Trust the process.
- Cinnamon (½ teaspoon): Optional, but seriously, don’t skip it. It’s the secret handshake of deliciousness.
- Unsalted Butter (½ cup / 1 stick): Melted. Because melted butter makes everything better, fact.
- Egg (1 large): Room temperature, if you’re feeling fancy. Otherwise, straight from the fridge is fine. We’re not judging.
- Vanilla Extract (1 teaspoon): The MVP of baked goods. Makes it smell and taste divine.
Step-by-Step Instructions
- Preheat & Prep: First things first, get your oven to 350°F (175°C). Then, grease and flour a 9×5 inch loaf pan. Or line it with parchment paper if you’re feeling extra.
- Mash ‘Em Up: In a large bowl, mash those ripe bananas with a fork until they’re mostly smooth but still have a few chunky bits. Texture is key!
- Wet Ingredients Party: Add the melted butter, egg, and vanilla extract to the mashed bananas. Stir them together until just combined. Don’t go crazy over-mixing; we’re making bread, not a milkshake.
- Dry Ingredients Unite: In a separate bowl, whisk together the flour, sugar, baking soda, salt, and cinnamon (if using). Make sure there are no lumpy bits.
- Combine Forces: Gently fold the dry ingredients into the wet ingredients. Mix just until no streaks of flour remain. Overmixing is the enemy of tender banana bread, so stop when it looks good.
- Into the Pan: Pour the batter into your prepared loaf pan. You can sprinkle some extra sugar or chocolate chips on top if you’re feeling it.
- Bake It Up: Pop it into your preheated oven and bake for about 50-60 minutes. You’ll know it’s done when a toothpick inserted into the center comes out clean or with just a few moist crumbs attached.
- Cool Down: Let it cool in the pan for about 10-15 minutes before carefully transferring it to a wire rack to cool completely. Patience, young grasshopper.
Common Mistakes to Avoid
- Using under-ripe bananas: Rookie mistake! They won’t mash well, and your bread won’t have that deep, sweet banana flavor. Black spots are your friend!
- Overmixing the batter: This activates the gluten too much, leading to a tough, dense loaf. We want tender, folks, not a brick. Mix until *just* combined.
- Not preheating your oven: Seriously, don’t skip this. A cold oven messes with the rise and texture. Patience, my friend.
- Cutting into it too soon: We know, it smells amazing. But let it cool a bit; it continues to set as it cools, giving you that perfect slice.
Alternatives & Substitutions
- Chocolate Chip Obsession: Add ½ cup of chocolate chips (dark, milk, white – your call!) with the dry ingredients. Because, well, chocolate. Duh.
- Nutty Professor: Toss in ½ cup of chopped walnuts or pecans for some crunch. Toast them lightly first for extra flavor. My personal fave!
- Dairy-Free Diva: Swap out the butter for an equal amount of melted coconut oil or a neutral oil like vegetable oil. Easy peasy.
- Sugar Swap: You can use brown sugar for a richer, more molasses-y flavor. Maple syrup or honey *can* work, but adjust other liquids if you go that route. Stick to sugar for simplicity, IMO.
- Spice It Up: A pinch of nutmeg or allspice can join the cinnamon party for more warmth.
FAQ (Frequently Asked Questions)
- My bananas aren’t ripe enough! What do I do? Panic? Nah. You can bake them (unpeeled!) on a baking sheet at 300°F (150°C) for 15-20 minutes until they’re black and squishy. Problem solved!
- Can I use margarine instead of butter? Well, technically yes, but why hurt your soul like that? Butter just tastes better, let’s be real.
- How long does banana bread last? On your counter, tightly wrapped, about 2-3 days. In the fridge, 5-7 days. In my house? About 24 hours, if I’m lucky.
- Can I freeze banana bread? Absolutely! Wrap cooled slices or the whole loaf tightly in plastic wrap, then foil. It’ll last for up to 3 months. Perfect for future cravings!
- Is it okay if my batter looks lumpy? A few small lumps from the bananas are fine, even desirable for texture. But large lumps of flour? Nope, keep folding *gently* until they disappear.
Final Thoughts
See? That wasn’t so scary, was it? You just made yourself a beautiful, fragrant, and ridiculously tasty loaf of banana bread. Go on, slice it up, maybe slather on some butter (because why not?), and enjoy your masterpiece. You’ve officially leveled up your home baking game. Now go impress someone—or yourself—with your new culinary skills. You’ve earned it!
