So you’re craving something warm, comforting, and utterly delicious but are maybe, just maybe, a *tad* too lazy to spend forever in the kitchen, huh? Same, friend, same. My spirit animal is a sloth, especially when it comes to intricate baking. But guess what? We can still have our cake (or in this case, bread) and eat it too!
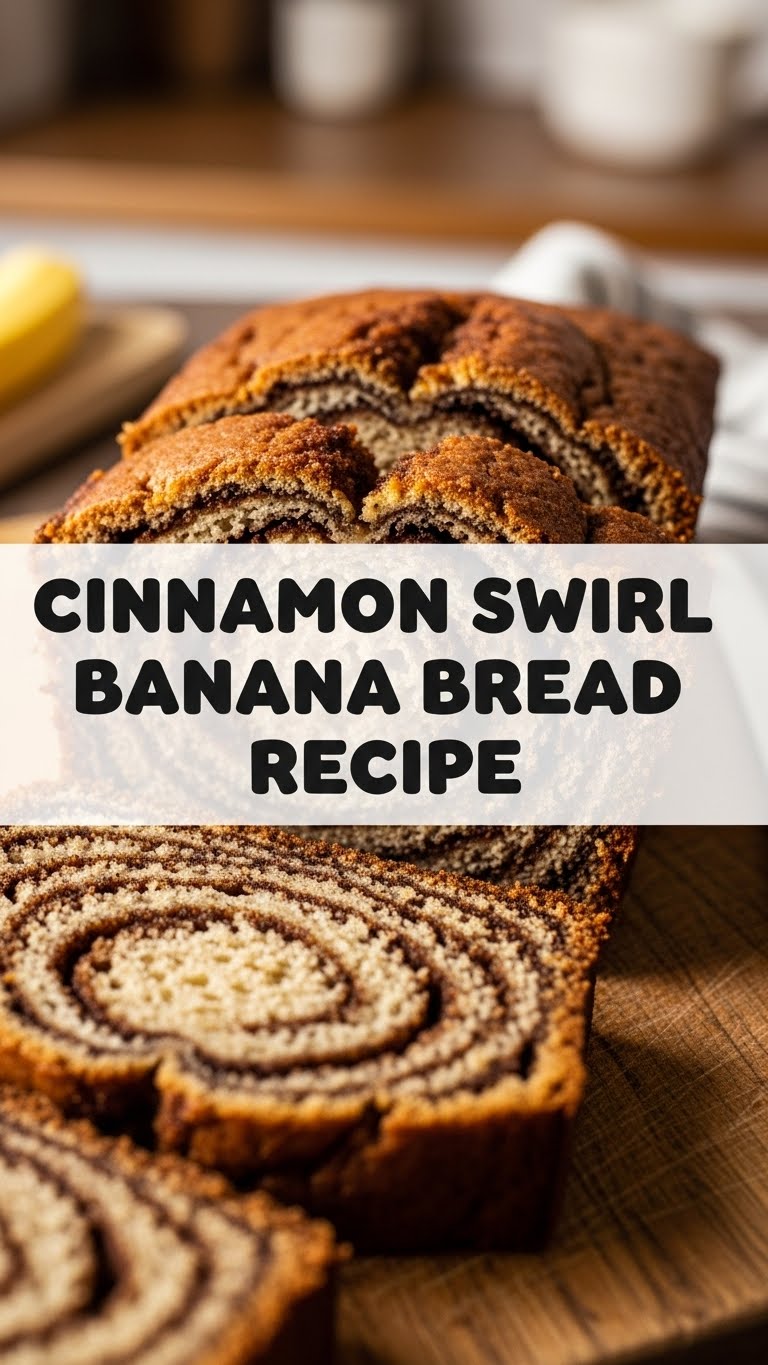
Enter the hero of our story: Cinnamon Swirl Banana Bread. It’s basically a hug in loaf form, with a bonus swirl of cinnamon-sugar magic that will make your kitchen smell like a fancy bakery and your taste buds do a happy dance. Ready to get this show on the road?
Why This Recipe is Awesome
Okay, let’s be real. There are a bazillion banana bread recipes out there. So why this one? Because it’s not just banana bread; it’s banana bread with a secret weapon – that glorious, ribbon-like cinnamon swirl. It elevates humble banana bread from “oh, that’s nice” to “OMG, I need another slice RIGHT NOW.” Plus, it’s genuinely idiot-proof. And coming from someone who once set off the smoke alarm trying to boil water (don’t ask), that’s high praise. It’s simple, uses ingredients you probably already have lying around (especially those suspiciously brown bananas), and the end result is moist, tender, and ridiculously flavorful. Trust me on this one, your future self will thank you.
Ingredients You’ll Need
Gather ’round, pantry explorers! Here’s what you’ll need to whip up this masterpiece. No exotic stuff, promise.
- For the Banana Bread:
- 1 ½ cups all-purpose flour: The basic building block. Don’t overthink it.
- 1 teaspoon baking soda: Our magical leavening agent. No flat bread on our watch!
- ¼ teaspoon salt: Just a pinch to make everything else pop.
- ½ cup (1 stick) unsalted butter: Softened, please. The real deal, not that weird spread.
- ¾ cup granulated sugar: Sweetness central. Feel free to adjust slightly if your bananas are super sweet or you’re watching your sugar.
- 2 large eggs: Room temperature works best, they incorporate better.
- 1 teaspoon vanilla extract: Because everything tastes better with vanilla, IMO.
- 3 very ripe bananas: We’re talking brown spots, bruised, practically black – these are your MVPs for flavor and sweetness!
- For the Cinnamon Swirl:
- 2 tablespoons granulated sugar: Yep, more sugar. We’re committing here.
- 1 teaspoon ground cinnamon: The star of the swirl! Fresh is always better if you have it.
Step-by-Step Instructions
Alright, apron on (optional, I usually just get flour everywhere regardless), let’s bake!
- Get Prepped: Preheat your oven to 350°F (175°C). Seriously, do it now. Grease and flour a 9×5-inch loaf pan, or line it with parchment paper for easy removal.
- Mash ‘Em Up: In a medium bowl, mash those gloriously ripe bananas with a fork until they’re mostly smooth but still have a few small lumps. Set aside.
- Cream It Good: In a large bowl, cream together the softened butter and ¾ cup granulated sugar until light and fluffy. A hand mixer makes this super easy, but a whisk and some elbow grease work too!
- Egg-cellent Addition: Beat in the eggs one at a time, making sure each is fully incorporated before adding the next. Stir in the vanilla extract.
- Dry Mix: In a separate bowl, whisk together the flour, baking soda, and salt. This ensures even distribution of your leavening agents.
- Combine Forces: Gradually add the dry ingredients to the wet ingredients, mixing until *just* combined. Do not overmix! A few streaks of flour are totally fine. Gently fold in your mashed bananas.
- Swirl Time!: In a small separate bowl, mix together the 2 tablespoons of sugar and 1 teaspoon of cinnamon for your epic swirl.
- Layer It Up: Pour about half of your banana bread batter into the prepared loaf pan. Sprinkle half of your cinnamon-sugar mixture evenly over the batter. Now, carefully dollop the remaining banana bread batter over the cinnamon layer. Top with the rest of the cinnamon-sugar mixture.
- Get Swirly: Take a butter knife or skewer and gently swirl through the top layer of batter, creating pretty ribbons. Don’t go too deep or you’ll lose the distinct swirl!
- Bake Away: Pop that beautiful loaf into your preheated oven. Bake for 50-65 minutes, or until a wooden skewer or toothpick inserted into the center comes out clean (or with a few moist crumbs, but no wet batter). If the top starts to brown too quickly, you can loosely tent it with foil.
- Cool Down: Let the bread cool in the pan for about 10-15 minutes before carefully removing it to a wire rack to cool completely. Or, if you’re like me, cut a slice while it’s still warm and slightly gooey. You’ve earned it!
Common Mistakes to Avoid
We’ve all been there, friend. Here are a few pitfalls to sidestep on your journey to banana bread glory:
- Using unripe bananas: This is a biggie! Green or yellow bananas just don’t have the sweetness or moisture needed. Wait for those lovely brown spots!
- Overmixing the batter: Seriously, resist the urge! Overmixing develops gluten, leading to a tough, chewy bread instead of a soft, tender one. Mix until *just* combined.
- Not preheating the oven: Rookie mistake! A properly preheated oven ensures even baking from the get-go. Otherwise, your bread might not rise correctly.
- Underbaking: No one wants a soggy bottom! Make sure that toothpick comes out clean. If it’s still gooey, give it another 5-10 minutes.
- Forgetting the cinnamon swirl: Okay, it’s still banana bread, but why deny yourself the sheer joy of that swirly goodness? It’s the whole point, people!
Alternatives & Substitutions
Feeling a little rebellious? Here are some ways to shake things up or make it work with what you’ve got:
- Gluten-Free: Swap the all-purpose flour for a 1:1 gluten-free baking blend. Just make sure it contains xanthan gum!
- Dairy-Free: Use a plant-based butter alternative and/or replace the butter with an equal amount of oil (like vegetable or canola oil). The texture might be slightly different, but still delicious.
- Add-ins: Go wild! Chocolate chips (dark chocolate is amazing here), chopped walnuts or pecans, or even a sprinkle of shredded coconut would be fantastic additions to the batter.
- Spice it Up: Add a pinch of nutmeg or allspice to your cinnamon swirl mixture for an extra layer of warmth.
- Reduce Sugar: If your bananas are super ripe and sweet, you can definitely reduce the sugar in the bread batter by ¼ cup. Just be aware it might affect the overall moisture slightly.
FAQ (Frequently Asked Questions)
Got questions? I’ve got (casual) answers!
- Can I use frozen bananas? Absolutely! Just thaw them completely and drain off any excess liquid before mashing. Otherwise, your bread might get too watery.
- How ripe do the bananas really need to be? The riper, the better! We’re talking dark brown spots, practically black skins. That’s when they’re at their sweetest and easiest to mash.
- Can I make this into muffins instead of a loaf? You bet! Pour the batter into a greased muffin tin (filling about two-thirds full), add the swirl, and bake for 20-25 minutes, or until a toothpick comes out clean.
- How long does this banana bread last? Wrapped tightly in plastic wrap or in an airtight container, it’ll last 3-4 days at room temperature. It also freezes beautifully for up to 3 months (wrap individual slices for quick treats!).
- Do I *have* to do the cinnamon swirl? Well, technically yes, you can skip it… but why deny yourself such pure, unadulterated joy? It’s like going to a party and not dancing!
- Can I use margarine instead of butter? Well, technically yes, but why hurt your soul (and your bread’s flavor) like that? Butter just gives it that unbeatable richness and texture. Go for the good stuff!
- My bread isn’t rising! What went wrong? Could be old baking soda (check the expiration date!), overmixing, or your oven temperature was off. Make sure your ingredients are fresh and your oven is accurate!
Final Thoughts
And there you have it! A ridiculously easy, incredibly delicious, and totally impressive Cinnamon Swirl Banana Bread. Whether you’re making it for a lazy Sunday brunch, a thoughtful gift, or just to devour on your own (no judgment here!), you’ve just unlocked a new level of baking greatness. So go on, impress someone—or yourself—with your new culinary skills. You’ve earned it! Now, if you’ll excuse me, I hear a slice calling my name…

