
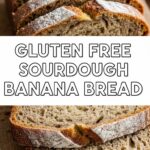
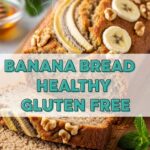
So you’re staring at those spotty bananas on your counter, feeling vaguely guilty, and suddenly a craving for something warm, sweet, and comforting hits you? But, like, without all the fuss and fancy chef shenanigans? You, my friend, are in the right place. Welcome to the no-stress zone of glorious banana bread, made even better with the liquid gold that is maple syrup.
Why This Recipe is Awesome
Let’s be real, life’s too short for complicated recipes unless there’s a serious payoff. Good news: this one is pure payoff, minimal effort. It’s not just banana bread; it’s *maple syrup* banana bread. That’s like a warm, cozy hug for your taste buds, delivered straight to your face.
Seriously, this recipe is practically **idiot-proof**. If you can mash a banana with a fork, you’re halfway there. No fancy equipment, no stand mixer required. Just a couple of bowls and a spatula. Your house will smell like a dream, your friends will think you’re a culinary genius (don’t tell them how easy it was, shhh), and you finally get to use those aggressively ripe bananas before they stage a full-blown rebellion in your fruit bowl. Win-win-win.
Ingredients You’ll Need
Gather ’round, my fellow lazy gourmands! Here’s your shopping list for pure maple-banana bliss:
- The Bananas: Three medium-ish, **super ripe** bananas. We’re talking brown, spotty, almost-black — the uglier, the better for flavor, trust me.
- Butter: ½ cup (113g) unsalted butter, melted. Because butter makes everything better, duh.
- Maple Syrup: ½ cup (120ml) **pure maple syrup**. This is NOT the time for corn syrup-laden “pancake syrup” impostors. Splurge a little; your future tastebuds will thank you.
- Egg: One large egg. Just a regular guy, helping bind it all together.
- Vanilla: 1 teaspoon vanilla extract. For that little extra *oomph*.
- Flour: 1 ½ cups (190g) all-purpose flour. The basic building block of deliciousness.
- Baking Soda: 1 teaspoon baking soda. Our little leavening agent, making it fluffy and light.
- Salt: A pinch of salt. Don’t skip it; it balances the sweetness perfectly.
- Optional (but highly recommended): ½ cup chopped walnuts or chocolate chips. Because why not live a little?
Step-by-Step Instructions
- Preheat & Prep: Preheat your oven to 350°F (175°C). Lightly grease and flour a 9×5 inch loaf pan. You can also line it with parchment paper for easy lifting.
- Mash ‘Em Up: In a large bowl, mash your super-ripe bananas with a fork until they’re mostly smooth but still have a few small lumps. We’re going for rustic, not baby food.
- Wet Mix Wonders: Add the melted butter, pure maple syrup, egg, and vanilla extract to the mashed bananas. Stir everything together until it’s well combined.
- Dry Mix Magic: In a separate medium bowl, whisk together the flour, baking soda, and salt. Make sure there are no lumpy bits of baking soda.
- Combine Forces: Pour the dry ingredients into the wet ingredients. Mix **just until combined**. A few streaks of flour are totally fine. Remember, overmixing is the enemy of tender banana bread.
- Fold in Goodies (Optional): If you’re feeling fancy (or just want more texture), gently fold in your chopped walnuts or chocolate chips now.
- Bake It Baby: Pour the batter into your prepared loaf pan. Pop it into the preheated oven and bake for 50-60 minutes. How do you know it’s done? A wooden skewer or toothpick inserted into the center should come out clean.
- Cool Down: Let the banana bread cool in the pan for about 10 minutes. This helps it firm up. Then, carefully transfer it to a wire rack to cool completely. Or, if you’re like me, cut a slice while it’s still warm and slightly gooey. YOLO.
Common Mistakes to Avoid
We all make mistakes, especially in the kitchen. Here’s how to sidestep the most common banana bread blunders:
- Using Under-Ripe Bananas: This is the cardinal sin! Green or yellow bananas won’t give you that deep, sweet, banana-y flavor you’re after. **Wait for those ugly, spotty ones!**
- Overmixing the Batter: I repeat: overmixing equals tough, rubbery bread. Mix until *just* combined. A few lumps are a badge of honor.
- Opening the Oven Door Constantly: Resist the urge to peek! Every time you open the oven, the temperature drops, which can lead to a sad, sunken loaf. Give it at least 40 minutes before you even consider checking.
- Forgetting to Grease the Pan: Unless you enjoy chiseling your masterpiece out in broken, crumbly chunks, grease that pan thoroughly. No one wants to fight their banana bread.
- Not Using Pure Maple Syrup: Okay, not a “mistake” per se, but using imitation syrup will fundamentally change the flavor profile. **Go for the good stuff!** It makes a huge difference.
Alternatives & Substitutions
Feeling adventurous? Or just missing an ingredient? No stress, I got you.
- Butter Swap: You can swap the melted butter for an equal amount of coconut oil (it’ll add a subtle coconut flavor, which is kinda divine) or another neutral oil like canola or vegetable oil. But, IMO, butter brings the best flavor here.
- Flour Power: Want to get a little healthier? You can substitute up to half of the all-purpose flour with whole wheat flour for a nuttier, denser loaf. Just be aware it might need a tiny bit more moisture.
- Mix-in Madness: Not a fan of walnuts? Try pecans, shredded coconut, dried cranberries, or even a swirl of cream cheese filling. Your bread, your rules!
- Sweetener Switcheroo: Can you use brown sugar instead of maple syrup? Well, technically yes, but then it’s just “brown sugar banana bread,” and we’re aiming for that **maple magic** here. If you *really* have no maple, brown sugar is your next best bet, just know the flavor will be different.
FAQ (Frequently Asked Questions)
Got questions? I’ve got (casual and hopefully helpful) answers!
- My bananas aren’t ripe enough! What do I do? Panicking? Don’t! Pop them on a baking sheet and bake at 300°F (150°C) for 15-30 minutes until they’re black and squishy. Problem solved!
- Can I make muffins instead of a loaf? Absolutely! Pour the batter into a muffin tin (greased or with liners). Reduce the baking time to about 20-25 minutes, or until a toothpick comes out clean. Perfect for grab-and-go breakfasts!
- How do I store banana bread? Wrap it tightly in plastic wrap or foil at room temperature for up to 3-4 days. For longer storage, slice it up, wrap individual slices, and freeze for up to a month. It thaws beautifully!
- Is this recipe healthy? “Healthy-ish?” It has fruit! And maple syrup is a “natural” sweetener! Let’s just say it’s good for your soul and leaves you feeling happy. Everything in moderation, right?
- Can I add spices to my banana bread? Totally! A teaspoon of cinnamon, half a teaspoon of nutmeg, or even a pinch of ground cloves would be delicious. **Spice it up, buttercup!**
- Why did my banana bread sink in the middle? Ah, the dreaded crater! Usually, this means it was underbaked, you opened the oven door too soon, or perhaps you overmixed the batter causing too much air initially. Next time, be patient and let the oven do its thing.
- Can I use margarine instead of butter? Well, technically yes, you *can*, but why hurt your soul like that? Butter just has a superior flavor and texture. If it’s all you have, go for it, but don’t expect the same richness.
Final Thoughts
So there you have it, folks! Your new go-to recipe for when those bananas start looking a little sad and you need a serious comfort food fix. This maple syrup banana bread is so simple, so forgiving, and so darn delicious, you’ll wonder why you ever bought it from a bakery.
It’s perfect for breakfast, a snack, or even a light dessert. Plus, the smell alone is worth the effort (which, let’s be honest, isn’t much). Now go forth and bake! Your kitchen (and your stomach) will thank you. **Happy baking, friend!**
