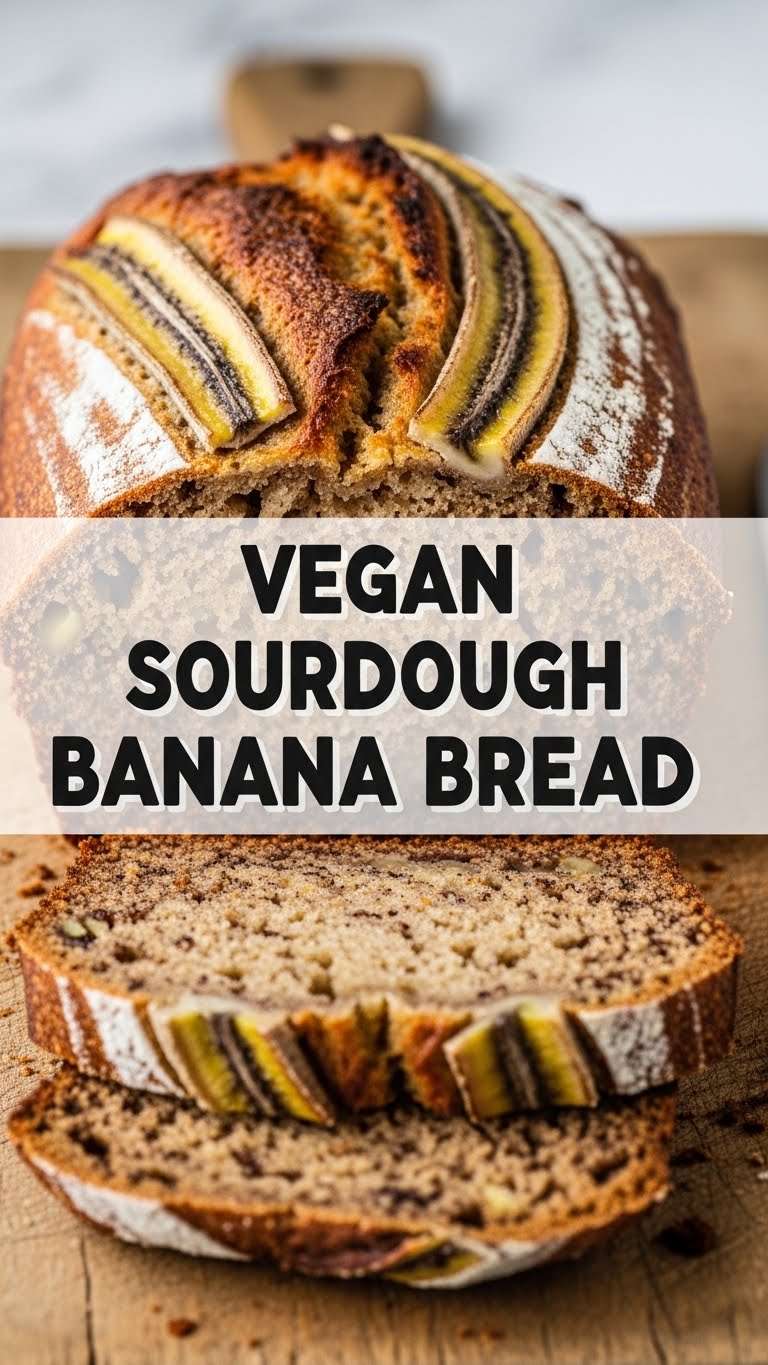
So you’ve got a pile of sad, spotty bananas looking at you judgmentally from the counter, huh? And that sourdough starter you’ve been nurturing like a finicky houseplant? Yeah, they’re about to become best friends. Prepare for the *ultimate* vegan sourdough banana bread – because who needs eggs and dairy when you’ve got bananas and a bubbly starter, right?
Why This Recipe is Awesome
Listen, I get it. Life’s busy, and sometimes you just want something delicious without feeling like you need a culinary degree. This recipe? It’s basically magic. Here’s why you’ll love it:
- It uses up those super ripe (read: almost black, don’t be shy!) bananas that no one wants to eat. Finally, a purpose for them beyond attracting fruit flies!
- It gives your sourdough starter a job beyond bubbling for discard. It adds a subtle, irresistible tang that elevates humble banana bread to “OMG, what is this sorcery?” status.
- It’s vegan, baby! Impress your plant-based pals, or just feel smug about consuming less dairy and eggs. It’s a win-win.
- Seriously easy. Like, even if your culinary skills peak at instant noodles, you got this. I didn’t mess it up, and that’s saying something. It’s practically idiot-proof.
- The sourdough tang combined with sweet banana is just… chef’s kiss.
Ingredients You’ll Need
Gather ’round, fellow food adventurer! Here’s your shopping (or pantry raiding) list:
- 3-4 Ripe Bananas: The riper, the better! We’re talking brown, spotty, almost-ready-for-the-bin ripe. Don’t be scared of the dark spots – that’s where the flavor lives!
- 1 cup Sourdough Starter Discard: This is your unfed, bubbly friend. Freshly fed works too, but discard is perfect for using up what would otherwise go to waste.
- 1/2 cup Granulated Sugar: Or brown sugar for a richer, caramel-y vibe. Your call!
- 1/2 cup Plant Milk: Almond, oat, soy, whatever’s chilling in your fridge.
- 1/4 cup Neutral Oil: Melted coconut oil, vegetable oil, canola, grapeseed – whatever’s handy.
- 1 tsp Vanilla Extract: Because everything’s better with vanilla, IMO.
- 1 1/2 cups All-Purpose Flour: Or a 50/50 mix with whole wheat if you’re feeling *extra* healthy.
- 1 tsp Baking Soda: The magic fluff maker.
- 1/2 tsp Baking Powder: Its equally important sidekick.
- 1/2 tsp Salt: Don’t skip it! It balances all the sweet goodness.
- Optional Fun Stuff: 1/2 cup chocolate chips (dark chocolate for extra decadence!), chopped walnuts, pecans, or a sprinkle of cinnamon. Live a little!
Step-by-Step Instructions
Alright, let’s get this bread in the oven. Follow these super simple steps:
- Preheat & Prep: First things first, get your oven ready! Preheat it to 350°F (175°C). While it’s heating up, grease and lightly flour a standard 9×5-inch loaf pan. Nobody wants sticky bread!
- Mash those Bananas: In a large bowl, go to town on your ripe bananas. Mash ’em with a fork until they’re mostly smooth, but a few lumps are totally fine and add character.
- Wet Ingredients Party: To your mashed bananas, add the sourdough starter, sugar, plant milk, oil, and vanilla extract. Whisk everything together until it’s well combined and looking like a deliciously lumpy smoothie.
- Dry Ingredients Unite: In a separate, medium-sized bowl, whisk together the flour, baking soda, baking powder, and salt. Give it a quick whisk to make sure everything’s evenly distributed.
- Mix ’em Up (Gently!): Pour the dry ingredients into the wet banana mixture. Now, here’s the crucial part: gently fold them together with a spatula until just combined. A few lumps of flour are okay! Do not overmix! Overmixing leads to tough bread, and we want tender, moist goodness.
- Add the Good Stuff: If you’re feeling fancy, now’s the time to fold in your chocolate chips, nuts, or whatever delicious add-ins you chose.
- Into the Pan: Pour your beautiful batter into the prepared loaf pan. Give it a gentle tap on the counter to settle it.
- Bake Away: Pop it in the preheated oven and bake for 50-65 minutes. To check if it’s done, insert a toothpick into the center of the loaf. It should come out clean, or with just a few moist crumbs clinging to it.
- Cool Down (If You Can Wait): Let the banana bread cool in the pan for about 10-15 minutes. This helps it firm up. Then, carefully transfer it to a wire rack to cool completely. Or, if you’re like me, cut a slice while it’s still warm and slightly gooey. You’ve earned it!
Common Mistakes to Avoid
Nobody’s perfect, but we can avoid some common banana bread blunders together. Learn from my past (and often delicious) mistakes:
- Not using RIPE bananas: This isn’t banana bread, it’s just sad bread with banana bits. Seriously, the riper the better. Green bananas are for monkeys, not masterpieces!
- Overmixing the batter: This is probably the number one killer of moist, tender banana bread. You’ll end up with tough, rubbery bread. Gentle folds, remember? Lumps are your friend here.
- Impatience: Pulling it out of the oven too early. Undercooked banana bread is just gooey disappointment in the middle. Give it its full baking time, or until that toothpick comes out clean.
- Forgetting to preheat the oven: Rookie mistake! Your oven needs to be ready for action when the batter goes in, otherwise, it won’t rise properly.
- Eating the whole loaf in one sitting: Okay, maybe not a *mistake* per se, but your stomach (and maybe your loved ones) might disagree with your lack of sharing. Just sayin’.
Alternatives & Substitutions
Feeling creative? Or maybe you’re just missing an ingredient? No worries, we can totally improvise!
- Flour Power: All-purpose flour is great, but feel free to experiment! A 50/50 mix of all-purpose and whole wheat flour adds a lovely nutty flavor and a slightly denser texture. Gluten-free all-purpose blends *might* work, but I haven’t personally tested it. (If you do, let me know how it goes!)
- Sweetener Swap: Brown sugar adds a wonderful molasses-y depth, but regular white granulated sugar is totally fine. Maple syrup or agave *could* work, but they might change the texture slightly, so be prepared for a minor experiment.
- Oil Options: Any neutral oil (vegetable, canola, grapeseed) is perfect. Melted coconut oil adds a subtle tropical note if you’re into that. Applesauce can also work as a partial oil substitute for a lower-fat version, but might make it a bit denser.
- Mix-ins Mania: Beyond chocolate chips and nuts, consider dried cranberries, chopped dates, a sprinkle of cinnamon or nutmeg, or even a tablespoon of instant espresso powder for a mocha-banana vibe. The world is your oyster!
FAQ (Frequently Asked Questions)
Got questions? I’ve got (casual and hopefully helpful) answers!
- “Do I *have* to use ripe bananas? Like, really ripe?” Yes, darling, YES! Green bananas are for monkeys, not delicious banana bread. The riper they are, the sweeter and more flavorful your bread will be. Plus, they mash way easier. It’s science (and deliciousness)!
- “Can I use active sourdough starter instead of discard?” Absolutely! Both work beautifully. Using discard just happens to be a fantastic way to use up the “unfed” portion, reducing waste. Win-win for you and your sourdough baby!
- “My banana bread is too dense, what went wrong?” You probably overmixed it, my friend. Or maybe your leavening agents (baking soda/powder) are old. **Always check those expiration dates!** They lose their potency over time, leading to flat, sad bread.
- “How long does it last?” Ha! The real question is, how long will it *survive* in your house? Usually 3-4 days at room temp, covered. In the fridge, maybe a week. It freezes beautifully too – just wrap it tightly in plastic wrap and then foil, and thaw on the counter.
- “Can I make muffins instead of a loaf?” You bet your sweet bottom you can! Just grease a muffin tin and fill the cavities about two-thirds full. Reduce baking time to 20-25 minutes, or until a toothpick inserted into the center of a muffin comes out clean.
- “Is this *really* easy, or are you just saying that?” I swear on my last banana! If you can mash a banana, measure some stuff, and stir, you can make this bread. No fancy equipment needed. You got this!
Final Thoughts
There you have it, folks! Your new go-to recipe for those pesky ripe bananas and that ever-growing sourdough discard. This isn’t just bread; it’s a hug in loaf form, packed with that delicious sourdough tang. It’s proof that vegan baking can be incredibly simple and mind-blowingly tasty.
So go forth, get baking, and make your kitchen smell absolutely divine. Then, go impress someone—or yourself—with your new culinary skills. You’ve earned those bragging rights (and that glorious slice of bread!). Happy baking!

