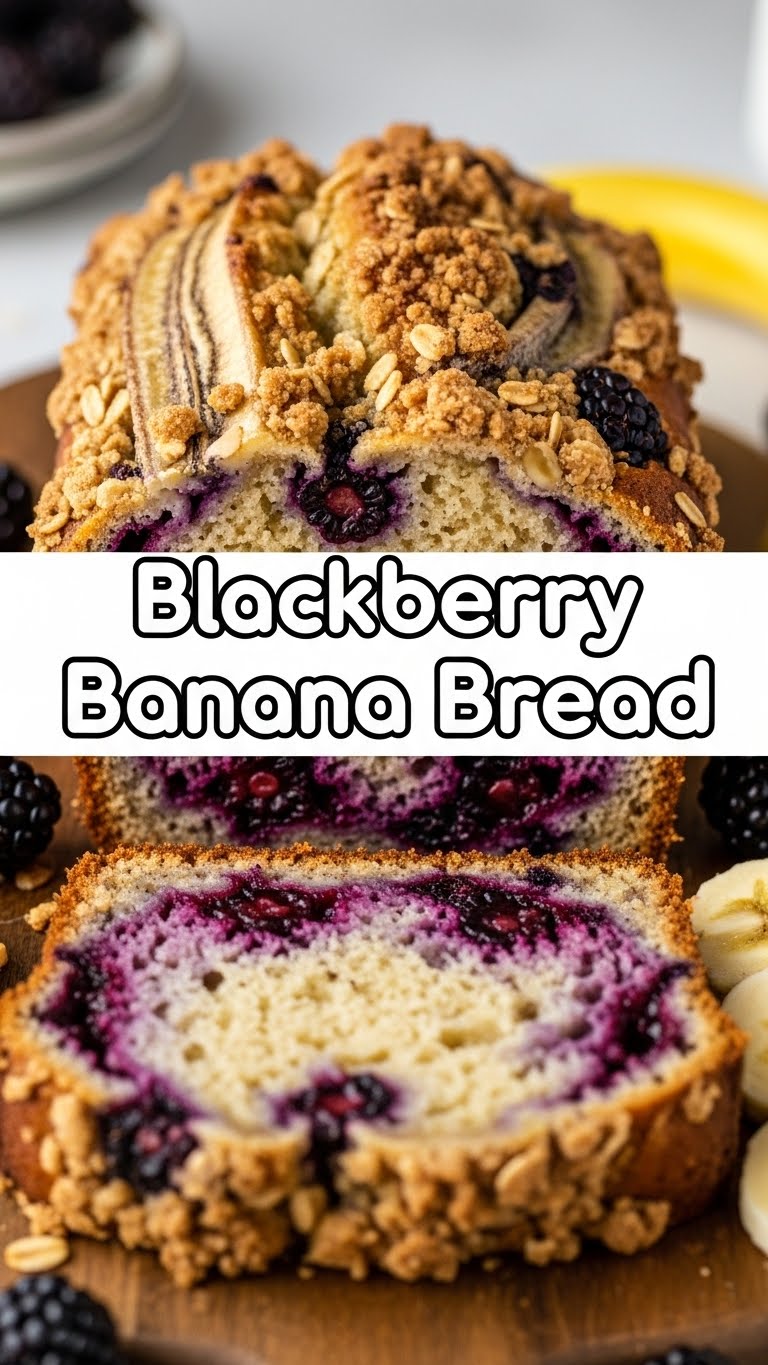
Ever stare at those sad, spotty bananas on your counter and think, “There has to be a better destiny than the trash for you, my speckled friends!”? Or maybe you’re just like me – perpetually hungry and always on the hunt for something ridiculously delicious but also, like, *effortless*? Good, we’re on the same page. Today, we’re not just saving those bananas; we’re giving them a glow-up with their new BFFs, the blackberries. Get ready for some Blackberry Banana Bread magic!
Why This Recipe is Awesome
Okay, let’s be real. There are a million banana bread recipes out there. But this one? This one is special. Why? Because it’s so gloriously simple, even your cat could probably follow along (if it had opposable thumbs and an interest in baking, which, let’s be honest, mine mostly cares about knocking things off counters). It’s moist, it’s bursting with sweet-tart berries, and it smells like a hug from a gourmet bakery. Plus, it’s basically an excuse to eat cake for breakfast. You’re welcome.
No fancy equipment, no bizarre techniques. Just pure, unadulterated comfort in loaf form. It’s idiot-proof, even I didn’t mess it up! So, if you’re looking for a low-stress, high-reward baking project, you’ve hit the jackpot. Trust me on this one, your taste buds will send you a thank-you card.
Ingredients You’ll Need
Gather your troops! Here’s what you’ll need to make this berry-licious masterpiece. Most of these are probably chilling in your pantry already, FYI.
- 1 ½ cups all-purpose flour: The backbone of our bread. Nothing fancy, just your standard flour power.
- 1 teaspoon baking soda: Our magical leavening agent. Don’t skip it unless you want a sad, flat banana brick.
- ½ teaspoon salt: Balances all the sweetness and makes everything taste *more*.
- ½ teaspoon ground cinnamon: Because cinnamon and banana are a match made in heaven.
- ¾ cup granulated sugar: Sweetness is key, my friends.
- ½ cup (1 stick) unsalted butter, melted: Because butter makes everything better. Period.
- 2 large eggs: Room temp if you can remember, but honestly, I rarely do and it still works.
- 1 teaspoon vanilla extract: The secret ingredient to making everything smell and taste incredible.
- 3 very ripe bananas, mashed: We’re talking brown, spotty, practically liquid bananas here. The uglier, the better!
- 1 cup fresh or frozen blackberries: The star of the show! If using frozen, don’t thaw them, just toss ’em in.
Step-by-Step Instructions
Alright, apron on (or not, I’m not your mom), let’s get baking! These steps are so easy, you’ll wonder why you ever bought banana bread from a store.
- Preheat & Prep: First things first, crank up your oven to 350°F (175°C). Then, grab a standard loaf pan (about 9×5 inches), grease it up, and lightly flour it. Or just use parchment paper, you savvy baker, you!
- Dry Mix Magic: In a medium bowl, whisk together your flour, baking soda, salt, and cinnamon. Give it a good whisk until it’s all nicely combined. Set it aside for a sec.
- Wet Mix Wonders: In a separate, larger bowl, whisk the sugar and melted butter until they’re friends. Then, crack in the eggs, one at a time, whisking after each. Stir in the vanilla extract and those beautifully mashed bananas. Your kitchen should already be smelling amazing, IMO.
- Combine Forces: Now, gently add your dry ingredients to the wet ingredients. Mix until just combined. We’re not trying to develop gluten here; overmixing makes for tough bread, and no one wants tough bread.
- Berry Good Addition: Fold in those lovely blackberries. Be gentle! We want those berries to stay somewhat intact, not become a purple smear.
- Into the Pan: Pour the batter into your prepared loaf pan. Smooth out the top with a spatula. You’re almost there!
- Bake It Up: Pop that pan into your preheated oven. Bake for 50-65 minutes. How do you know it’s done? A toothpick inserted into the center should come out clean, maybe with a few moist crumbs, but no raw batter.
- Cool Down: Once baked, let it cool in the pan for about 10-15 minutes. This helps it firm up. Then, carefully remove it from the pan and let it cool completely on a wire rack. Patience is a virtue, especially when it comes to warm bread.
Common Mistakes to Avoid
Baking is fun, but sometimes we make oopsies. Here are a few to steer clear of:
- Not preheating your oven: Rookie mistake! A cold oven means uneven baking and sad, dense bread. Always preheat!
- Overmixing the batter: Remember that “just combined” rule? Seriously, listen to it. Overmixing develops gluten, making your bread tough and chewy instead of tender.
- Using underripe bananas: If your bananas are still green or even mostly yellow, put them back on the counter and wait. You want them very ripe and spotty for maximum sweetness and moisture. This is not the time for firm bananas!
- Not greasing/flouring your pan: Unless you love a good fight with stuck bread, don’t skip this step. Parchment paper is your best friend here.
Alternatives & Substitutions
Feeling a little rebellious? Here are some ways to shake things up:
- Different Berries: No blackberries? No problem! Blueberries, raspberries, or even chopped strawberries would be delicious. Mix and match for a berry medley!
- Add-ins: A handful of chopped walnuts or pecans would add a lovely crunch. Or, if you’re feeling extra indulgent, white chocolate chips are a dream with blackberries and banana.
- Dairy-Free? You can easily swap the butter for an equal amount of melted coconut oil or a plant-based butter alternative. It works like a charm!
- Spice it Up: A pinch of nutmeg or allspice can add another layer of warmth.
- Gluten-Free Flour: While I haven’t tested it extensively with this exact recipe, a good 1:1 gluten-free baking flour blend should work just fine if you need a GF option.
FAQ (Frequently Asked Questions)
- Can I use frozen bananas? Absolutely! Just thaw them first (the liquid is good for moisture!), then mash ’em up. Pro tip: freeze bananas when they’re perfectly ripe so you always have some on hand for baking.
- What if I don’t have ripe bananas? Well, you could bake them in their skins at 300°F (150°C) for 15-20 minutes until they’re black and soft. Or, you know, just wait. Impatience is a virtue, but ripe bananas are better.
- Can I use margarine instead of butter? Well, technically yes, but why hurt your soul like that? Butter just tastes better and gives a richer flavor. But if it’s all you have, it’ll work.
- How long does this banana bread last? On the counter, wrapped tightly, it’ll last 3-4 days. In the fridge, maybe up to a week. But honestly, it rarely lasts that long in my house.
- Can I freeze the banana bread? Heck yes! Wrap individual slices or the whole loaf tightly in plastic wrap, then foil. It’ll keep for up to 3 months. Just thaw at room temperature when you’re ready for a slice of heaven.
- My bread turned out dense, what happened? Probably overmixing or not enough leavening. Remember, gentle mixing is key! Also, check your baking soda expiry date.
Final Thoughts
There you have it, folks! A ridiculously delicious, easy-peasy Blackberry Banana Bread recipe that’s guaranteed to make your kitchen smell amazing and your tummy happy. This isn’t just baking; it’s an act of self-care. Or a brilliant way to impress friends, family, or even just your mail carrier. So go forth, embrace those spotty bananas, and get baking!
Now go impress someone—or yourself—with your new culinary skills. You’ve earned it!

