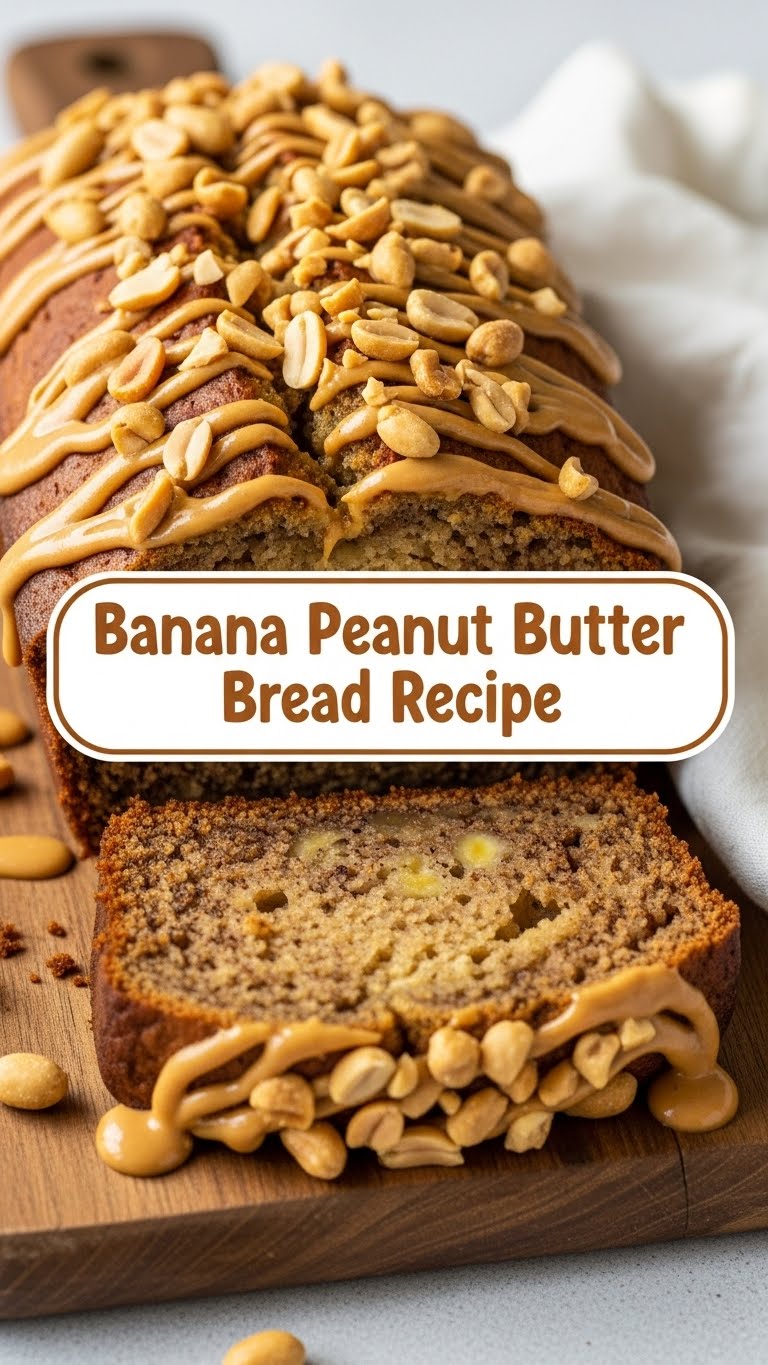
So you’re craving something tasty but too lazy to spend forever in the kitchen, huh? Same. High five! We’ve all been there, staring into the abyss of our fridge, wondering if a cheese stick counts as a meal. But what if I told you there’s a magical concoction that combines your favorite comfort flavors, is ridiculously easy to make, and will have your entire house smelling like a warm hug? Get ready for the gloriousness that is **Banana Peanut Butter Bread**. It’s the kind of recipe you’ll want to keep in your back pocket for emergencies (like, “I need cake NOW” emergencies). Let’s do this!
Why This Recipe is Awesome
Okay, let’s be real. This isn’t just *any* bread. This is the kind of bread that makes you question why you ever bothered with plain old banana bread. It’s so good, it might just make you weep tears of joy into your coffee. And here’s why it’s truly next-level:
- **It’s practically idiot-proof.** Seriously, if I can make it without setting off the smoke alarm, you’re golden.
- **The flavor combo is legendary.** Bananas + peanut butter = a match made in heaven. It’s like your favorite childhood snack, but in sophisticated bread form.
- **It uses up those sad, spotty bananas.** You know, the ones that have been silently judging you from the fruit bowl for days? Give them a purpose!
- **It makes your house smell divine.** Forget those expensive scented candles; just bake this. Your neighbors will be knocking.
- **Minimal effort, maximum reward.** You get a fancy-looking, ridiculously delicious treat without breaking a sweat. Win-win!
Ingredients You’ll Need
Gather ’round, my friends. Here’s what you’ll need for this culinary adventure. Don’t worry, nothing too exotic here!
- 3 very ripe bananas: The darker, the better! Think “almost black but not moldy.” These are your flavor bombs.
- 1/2 cup (1 stick) unsalted butter: Softened, because room temp butter just cooperates better.
- 3/4 cup granulated sugar: For that “OMG this is amazing” factor.
- 1 large egg: Your binder, your glue, your everything.
- 1/2 cup creamy peanut butter: Your favorite brand will do. No-sugar-added is fine, or go full Jif. Your call!
- 1 teaspoon vanilla extract: Optional, but highly recommended for extra *oomph*.
- 1 1/2 cups all-purpose flour: The foundation of our delicious bread.
- 1 teaspoon baking soda: The magic puff-upper. Don’t skip it!
- 1/2 teaspoon salt: Just a pinch to balance all that sweetness.
Step-by-Step Instructions
Alright, apron on! Let’s get baking. These steps are super simple, promise.
- Preheat & Prep: First things first, fire up your oven to **350°F (175°C)**. Then, grab a standard loaf pan (9×5 inches usually works great) and grease it up. A quick spray with baking non-stick spray or a smear of butter and a dusting of flour will prevent sticking. Nobody wants a stuck loaf!
- Mash ‘Em Bananas: In a medium bowl, take those sad, ripe bananas and mash them up with a fork. You want them mostly smooth, but a few small lumps are totally fine. Character, right?
- Cream the Good Stuff: In a separate, larger bowl, cream together the softened butter and granulated sugar until it’s light and fluffy. This usually takes a couple of minutes with an electric mixer, or a good arm workout if you’re going old school.
- Add Wet Ingredients: Beat in the egg until it’s just combined. Then, add the peanut butter and vanilla extract (if using) and mix until everything is smooth and happy.
- Combine Dry Ingredients: In yet another small bowl (yes, we’re using a few here, but it’s worth it!), whisk together the flour, baking soda, and salt. This ensures everything is evenly distributed.
- Marry Wet & Dry: Now, gently add the dry ingredients to the wet ingredients. Mix until just combined. **Don’t overmix!** Overmixing develops gluten, making your bread tough, and we want tender, fluffy goodness.
- Fold in Bananas: Gently fold your mashed bananas into the batter. Again, just mix until everything comes together.
- Bake It Up: Pour the glorious batter into your prepared loaf pan. Pop it into the preheated oven and bake for **50-65 minutes**. The best way to check if it’s done is to insert a toothpick into the center; if it comes out clean, you’re golden!
- Cool Down & Devour: Let the bread cool in the pan for about 10-15 minutes before carefully transferring it to a wire rack to cool completely. Or, if you’re impatient like me, slice into it while it’s still warm and gooey. You’ve earned it!
Common Mistakes to Avoid
Nobody’s perfect, but we can learn from past blunders. Here are a few things to keep in mind to ensure your bread is always a triumph:
- **Using under-ripe bananas:** Rookie mistake! Green or yellow bananas just don’t have the sweetness and moisture needed. **The uglier, the better** for banana bread. Seriously.
- **Overmixing the batter:** I’m not kidding about this one. When you add the flour, mix *just* until it’s combined. Lumps are okay! Overmixing leads to dense, chewy bread, and we’re going for tender.
- **Forgetting to grease your pan:** Oh, the horror! **A truly sticky situation you want to avoid.** Nothing’s worse than wrestling your beautiful bread out of a pan, only for half of it to stay behind.
- **Opening the oven door constantly:** Patience, grasshopper! Every time you open the oven, you drop the temperature, which can mess with the rise. Peek only when absolutely necessary, especially towards the end.
Alternatives & Substitutions
Feeling adventurous? Or maybe you’re just out of one tiny ingredient? No stress! Here are some ideas to tweak this recipe:
- **Nutella Swap:** Instead of peanut butter, try Nutella for a chocolate-hazelnut dream bread. OMG, yes!
- **Add-ins Galore:** Amp up the fun with 1/2 to 1 cup of chocolate chips (peanut butter chips or dark chocolate are amazing here!), chopped nuts (walnuts or pecans, anyone?), or even a swirl of cream cheese frosting on top once it’s cooled.
- **Dairy-Free Version:** Swap out the butter for a plant-based butter alternative and you’re good to go!
- **Different Nuts:** If you’re not a peanut butter fan (gasp!), almond butter or cashew butter would also work beautifully.
FAQ (Frequently Asked Questions)
Got questions? I’ve got answers! (Mostly.)
- Can I use crunchy peanut butter instead of creamy? Absolutely! For that extra textural thrill, go for it. It adds a nice little crunch.
- My bananas aren’t super ripe. Can I still use them? You *can*, but the flavor won’t be as intense or sweet. If you’re in a pinch, you can roast them in their skins at 300°F (150°C) for 15-20 minutes until they’re black and soft. Instant ripeness!
- How do I store this delicious bread? Keep it in an airtight container at room temperature for up to 3-4 days. For longer storage, wrap it tightly and pop it in the fridge for up to a week, or freeze slices for future cravings!
- Can I make muffins instead of a loaf? You bet! Pour the batter into a greased muffin tin (about 12 muffins) and bake for 20-25 minutes, or until a toothpick comes out clean.
- What if I don’t have vanilla extract? No biggie! It adds a nice depth of flavor, but the bread will still be delicious without it. Don’t let it stop you.
- Can I use a sugar substitute? You can, but it might slightly alter the texture and moisture. If you do, pick one that’s designed for baking.
Final Thoughts
And there you have it! A ridiculously easy, unbelievably tasty Banana Peanut Butter Bread recipe that’s sure to impress everyone (or just yourself, no judgment here!). It’s the perfect treat for breakfast, a snack, or even a casual dessert. So go forth, embrace those overripe bananas, and fill your home with the glorious aroma of fresh-baked goodness. You’ve totally got this. Now go impress someone—or yourself—with your new culinary skills. You’ve earned it!
