So you’ve stared into the abyss of your fridge, sighed at the sad, overripe bananas, and suddenly thought, “Is this my destiny? To throw them away?” NO! This is your destiny: turning them into something glorious. And maybe a little hazelnutty. Because why not?
Why This Recipe is Awesome
Okay, real talk. This isn’t just *another* banana bread. This is the ‘I-can’t-believe-I-made-this-and-it’s-actually-good’ banana bread. It’s practically idiot-proof (trust me, I’ve tested its limits). Plus, the hazelnuts? They’re like the sophisticated, slightly nutty friend who elevates the whole party. It’s comfort food with a glow-up, and honestly, who couldn’t use that right now?
Ingredients You’ll Need
- Overripe Bananas (3-4 medium): The browner, the better. We’re talking leopard print, not just a few freckles. These are the unsung heroes of moistness.
- All-Purpose Flour (1 ½ cups): The backbone. Don’t go all fancy with almond flour unless you know what you’re doing. This is a basic b.
- Granulated Sugar (¾ cup): Sweetness! Adjust to your banana ripeness. Less ripe? More sugar. Simple math.
- Brown Sugar (¼ cup, packed): Adds that lovely caramelly depth. Don’t skip it, it’s the secret sauce.
- Unsalted Butter (½ cup, melted): Melted, not just soft. We’re going for easy mixing, not chunky butter bits. FYI, salted butter works too, just maybe dial back any extra salt.
- Large Egg (1): The binder. Keeps it all together like a good therapist.
- Baking Soda (1 teaspoon): Our lift-off expert. Helps it rise beautifully.
- Salt (½ teaspoon): Balances all the sweetness. Don’t underestimate its power.
- Vanilla Extract (1 teaspoon): Because everything is better with vanilla. It’s just a fact.
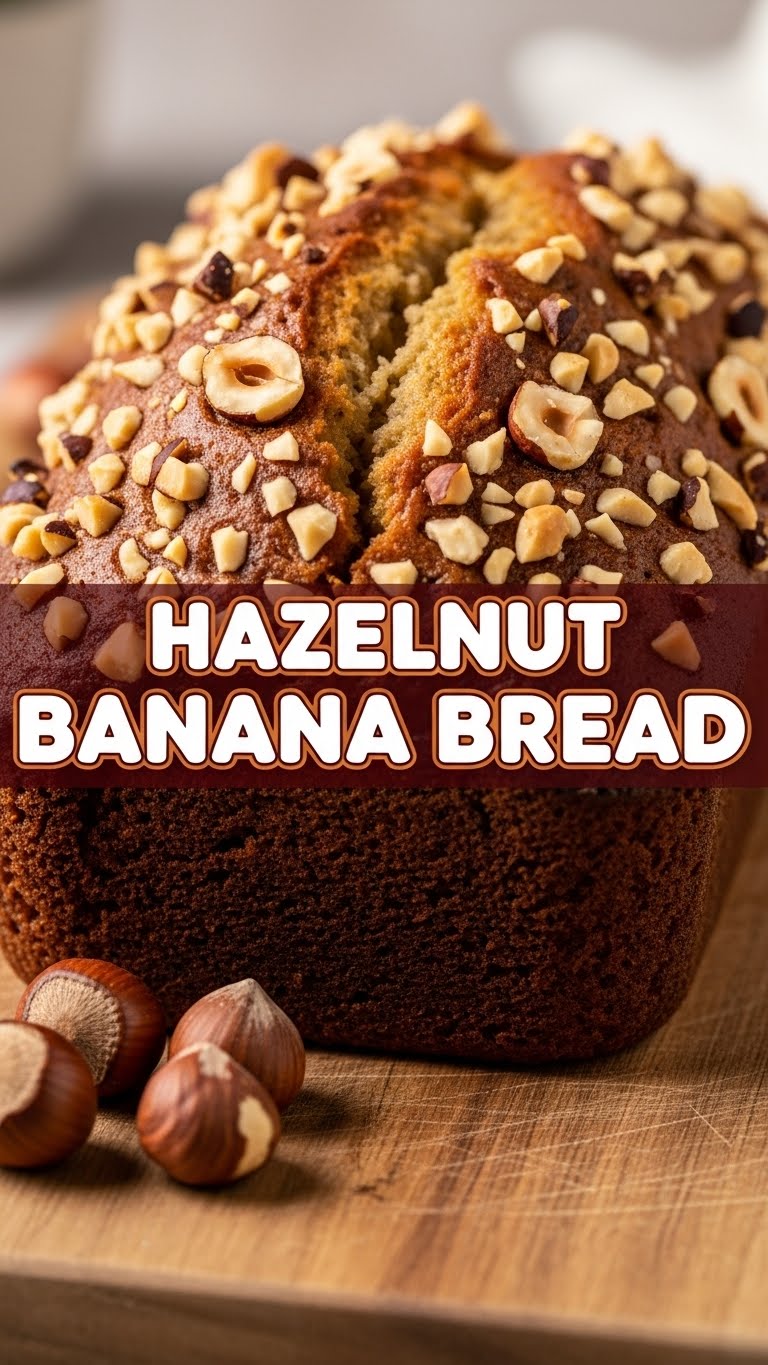
- Chopped Hazelnuts (½ cup): The star player! Toasted is even better (quick pan toast for 5-7 mins). Your future self will thank you.
- Optional: Chocolate Chips (½ cup): If you’re feeling extra indulgent. No judgment here.
Step-by-Step Instructions
- Preheat Your Oven: Set it to 350°F (175°C). Then, grease and flour a 9×5-inch loaf pan. Don’t forget this step, unless you enjoy archaeological digs for your bread.
- Mash Those Bananas: Grab a medium bowl and get mashing! A fork works perfectly. Leave a few small lumps for texture, because who wants perfectly smooth banana bread?
- Wet Ingredients Unite! Add the melted butter, granulated sugar, brown sugar, egg, and vanilla extract to your mashed bananas. Stir them well until everything is gloriously combined.
- Dry Ingredients Party: In a separate, larger bowl, whisk together the flour, baking soda, and salt. Make sure it’s all mixed thoroughly.
- Combine the Squad: Pour the wet banana mixture into the dry ingredients. Mix gently with a spatula just until combined. Overmixing is the enemy of tender bread. A few streaks of flour are totally fine.
- Hazelnut Glory: Gently fold in the chopped hazelnuts (and chocolate chips, if you’re using them). Distribute them evenly throughout the batter.
- Pan Time: Pour your magnificent batter into the prepared loaf pan. Spread it out evenly.
- Bake It Up: Pop it into your preheated oven. Bake for 50-60 minutes, or until a wooden skewer inserted into the center comes out clean. If the top starts browning too fast, loosely tent it with foil.
- Cool Down: Once baked, let it cool in the pan for about 10 minutes. Then, carefully transfer it to a wire rack to cool completely. Patience, young grasshopper.
Common Mistakes to Avoid
- Underripe Bananas: Seriously, don’t. Greenish-yellow bananas give you dry, bland bread. Wait for those glorious brown spots!
- Overmixing the Batter: This is a biggie! Mixing too much develops the gluten, making your bread tough and chewy. We want tender, not tire rubber.
- Skipping the Greasing/Flouring: Unless you’re a fan of aggressively scraping your bread out of the pan in sad, broken pieces, do yourself a favor and prep that pan properly.
- Not Toasting Hazelnuts (Optional but Recommended): You can skip it, sure. But toasting brings out their incredible flavor. It’s like hearing a song in mono versus full stereo. Just sayin’.
- Cutting It Too Soon: I know, I know, the smell is intoxicating. But let it cool! This allows the bread to set properly and makes for cleaner slices.
Alternatives & Substitutions
- Nut Swap: No hazelnuts? No problem! Walnuts or pecans are fantastic here. Almonds would also be pretty delicious, IMO.
- Butter Alternative: While butter is king, you can definitely use vegetable oil or melted coconut oil for a dairy-free version. The texture will be slightly different, but still tasty.
- Sugar Play: Want to cut down on sugar? Reduce the granulated sugar by ¼ cup. The bananas add plenty of natural sweetness. Or go half white sugar, half maple syrup for a twist!
- Flour Power: Gluten-free? Use a 1:1 gluten-free baking flour blend. It usually works like a charm without needing extra adjustments.
- Extra Goodies: Beyond chocolate chips, consider adding dried cranberries, shredded coconut, or a touch of cinnamon or nutmeg for extra spice. Your kitchen, your rules!
FAQ (Frequently Asked Questions)
- “My bananas aren’t super ripe. Can I still make this?” Well, technically yes, but why hurt your soul like that? If they’re only slightly ripe, you might want to add an extra tablespoon or two of sugar to compensate for less natural sweetness. Or, roast them for 15-20 minutes at 300°F until soft and gooey – total game changer!
- “Can I use frozen bananas?” Absolutely! Just thaw them completely, and make sure to drain any excess liquid before mashing. They’ll be extra watery, but that just means extra moist bread. Win!
- “Do I have to toast the hazelnuts?” Nope, not *have* to. But seriously, it takes like 5 minutes and makes them taste ten times nuttier and more flavorful. It’s like the difference between plain toast and garlic bread. Your call.
- “How long does this glorious bread last?” If you can resist eating it all in one sitting (impressive!), it lasts about 3-4 days at room temperature, tightly wrapped. In the fridge? A week. Frozen? Up to 3 months! Just wrap it super tight.
- “Can I make muffins instead?” You betcha! Reduce the baking time to about 20-25 minutes. Fill muffin liners about two-thirds full. Instant banana hazelnut muffin party!
- “What if I don’t have a loaf pan?” A square 8×8-inch pan will work, but the baking time will be shorter (around 30-40 minutes). Keep an eye on it!
Final Thoughts
There you have it, folks! Your new favorite banana bread recipe, loaded with nutty goodness and guaranteed to make your kitchen smell like a cozy autumn dream. It’s simple, it’s delicious, and it’s basically an excuse to eat cake for breakfast.
Now go forth and bake! Impress your friends, baffle your family, or just hoard it all for yourself (no judgment here, remember?). You’ve earned this, culinary genius. Happy baking!
