
So, you’ve got three bananas sitting on your counter, looking a little… existential? Like they’re questioning their life choices and contemplating their inevitable demise into the compost bin? Been there, friend. But before you let them spiral into full-blown fruit depression, let’s turn those speckled beauties into something glorious: the best dang banana bread you’ve ever smelled (and eaten). This isn’t some fancy-pants, artisanal, “oh-so-perfect” recipe. This is real life, throw-it-together-and-still-impress-everyone banana bread. Ready?
Why This Recipe is Awesome
Okay, let’s be real. There are a gazillion banana bread recipes out there. So why this one? First off, it’s idiot-proof. Seriously, if I can do it without setting off the smoke detector, you can too. Second, it perfectly uses up those three forlorn bananas that are just begging for a purpose. No more food waste guilt! Third, it’s quick, requires minimal fancy equipment (unless you count a spoon as fancy), and tastes like a hug from your favorite grandma (the one who bakes, obvs). Plus, your kitchen will smell like pure heaven for hours, which is a pretty sweet bonus, IMO.
Ingredients You’ll Need
Gather ’round, buttercup! Here’s what you’ll need to transform those brown spotted beauties into golden deliciousness. Don’t worry, it’s mostly stuff you probably already have lurking in your pantry.
- 3 Ripe Bananas: The darker, the better! We’re talking deeply speckled, almost-black beauties. These are the unsung heroes of flavor and moisture.
- 1/2 cup (113g) Unsalted Butter: Melted and cooled slightly. Don’t grab it straight from the fridge and expect magic. Room temp, then melt!
- 1/2 cup (100g) Granulated Sugar: Because life’s too short for unsweetened banana bread.
- 1 Large Egg: Room temperature, if you’re feeling extra fancy. Gives it structure and tenderness.
- 1 teaspoon Vanilla Extract: The unsung hero of all baking. Don’t skip it!
- 1 1/2 cups (180g) All-Purpose Flour: The backbone of our bread.
- 1 teaspoon Baking Soda: Our leavening MVP, making it rise beautifully.
- 1/2 teaspoon Salt: Don’t underestimate salt; it balances the sweetness and brings out all those lovely flavors.
- Optional Mix-ins (but highly recommended): A handful of chocolate chips (because, duh), chopped walnuts, or pecans. Your bread, your rules!
Step-by-Step Instructions
Alright, apron on, game face ready! Let’s get this deliciousness going.
- Preheat & Prep: First things first, get your oven to 350°F (175°C). Then, grease and flour (or line with parchment paper) a standard 9×5 inch loaf pan. No one wants stuck banana bread, trust me.
- Mash ‘Em Up: In a medium bowl, mash those 3 super ripe bananas with a fork until they’re mostly smooth with a few small lumps. Embrace the lumps; they add character.
- Wet Ingredients Party: In a separate, larger bowl, whisk together the slightly cooled melted butter and granulated sugar until combined. Crack in your egg and add the vanilla extract, whisking until everything is happy and well-blended.
- Combine Wet & Bananas: Pour your mashed bananas into the wet ingredient mixture. Stir until just combined. We’re not trying to win any mixing championships here, just integrate.
- Dry Ingredients Unite: In yet another (sorry!) bowl, whisk together your flour, baking soda, and salt. Make sure it’s all evenly distributed.
- Marry Wet & Dry: Add the dry ingredients to the wet ingredients. Mix until just combined. Seriously, stop when you see no more streaks of dry flour. Overmixing is the enemy of tender banana bread!
- Fold in the Fun: If you’re adding chocolate chips or nuts, gently fold them in now. This is where you personalize your bread!
- Into the Pan & Bake: Pour the batter into your prepared loaf pan. Give it a gentle tap on the counter to settle. Bake for 50-65 minutes, or until a wooden skewer inserted into the center comes out clean (or with moist crumbs, but no wet batter).
- Cool Down: Let your masterpiece cool in the pan for about 10 minutes before turning it out onto a wire rack to cool completely. Or, if you’re impatient like me, slice into it while it’s still warm and gooey. Just don’t burn your tongue!
Common Mistakes to Avoid
Listen, we all make mistakes. It’s part of the human (and baking) condition. But let’s try to avoid these rookie errors, shall we?
- Using Under-Ripe Bananas: This isn’t a beauty contest for bananas. The browner, the uglier, the better. Under-ripe bananas mean less flavor and less natural sweetness. Don’t do it!
- Overmixing the Batter: I know, it’s tempting to keep stirring until it’s perfectly smooth. Resist! Overmixing develops gluten, which leads to tough, chewy bread instead of light and tender. Just combine, then stop.
- Not Preheating Your Oven: Thinking you can just shove it in a cold oven and hope for the best? Rookie mistake. An even, preheated oven is crucial for proper rise and baking.
- Cutting Into It Too Soon: I get it, the smell is intoxicating. But giving it those 10 minutes in the pan and then cooling on a rack lets the banana bread finish cooking internally and set properly. Otherwise, it might crumble. (Though, a crumbled warm piece is still delicious, just messy.)
Alternatives & Substitutions
Feeling adventurous? Or maybe you just ran out of something key? No worries, we can roll with it!
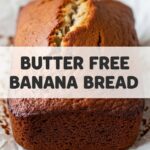
- Butter Begone? If you’re out of butter, you can totally use 1/2 cup of a neutral oil like vegetable, canola, or even melted coconut oil. The texture will be slightly different (a bit denser, but still yummy!), but it works.
- Sugar Swap: Got brown sugar instead of granulated? Go for it! It’ll add a richer, more caramel-y note to your bread. You can use it cup-for-cup.
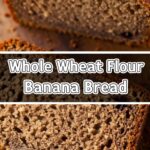
- Flour Power: While all-purpose is classic, you could experiment with a 1:1 gluten-free baking flour blend if needed. Results might vary slightly, but it’s worth a shot!
- Spice it Up: Add a teaspoon of cinnamon or a pinch of nutmeg to the dry ingredients for an extra layer of warmth and flavor. So good!
- Vegan Vibes: For a vegan version, swap butter for a plant-based butter or oil, and use a “flax egg” (1 tbsp ground flaxseed + 3 tbsp water, let sit for 5 mins) instead of a regular egg.
FAQ (Frequently Asked Questions)
Got questions? I’ve got (casual) answers!
- Can I use margarine instead of butter? Well, technically yes, but why hurt your soul like that? Butter just tastes better, period. But if that’s all you’ve got, go for it.
- My bananas aren’t super ripe, can I still use them? You can, but don’t expect the same intense banana flavor or moisture. If they’re just barely ripe, you might want to add an extra tablespoon of sugar. Pro tip: You can ripen bananas faster by baking them unpeeled at 300°F (150°C) for 15-30 minutes until soft and black.
- How long does banana bread last? On the counter, wrapped tightly, about 3-4 days. In the fridge, maybe up to a week. In my house? About 24 hours, tops.
- Can I freeze it? Absolutely! Wrap slices or the whole loaf tightly in plastic wrap, then foil. It’ll last for up to 3 months. Just thaw at room temp when the craving strikes.
- What if I only have 2 bananas? Or 4? This recipe is pretty forgiving. If you have 2, it’ll still be good, just a little less bananay. If you have 4, it might be a bit more moist, but totally fine. Don’t stress!
- Why did my banana bread sink in the middle? Could be a few things: oven too hot, overmixing, or opening the oven door too early. Make sure your oven temp is accurate and resist the urge to peek until at least the 40-minute mark!
- Is this a breakfast food or dessert? Yes. The answer is always yes. It’s truly a choose-your-own-adventure food.
Final Thoughts
So there you have it, folks! Your new go-to, stress-free, utterly delicious banana bread recipe. You’ve successfully rescued those bananas from an untimely end and transformed them into pure comfort. Now go impress someone—or just yourself—with your new culinary skills. You’ve earned it! Seriously, go make some tea or coffee, slice a warm piece, and pat yourself on the back. You deserve it. Happy baking, my friend!
